This document outlines how to login into EFIS 2.0 and the functionality of the software.
This document has information about the following:
- Logon to EFIS 2.0
- Planning User Setup
- Planning Navigation
- Data Input
- Smart View
- Submission Management
- Data Facility Management
- Prior Year Data Management
- OnSIS Data
For further technical support: efis.support@ontario.ca
Logon to EFIS 2.0
2.1 Logging in
In order to log into EFIS 2.0, you must be registered; if you have not yet registered please follow the instructions in the EFIS 2.0 Registration Guide. The EFIS 2.0 URL link will redirect to a login page. Enter your Username and Password.
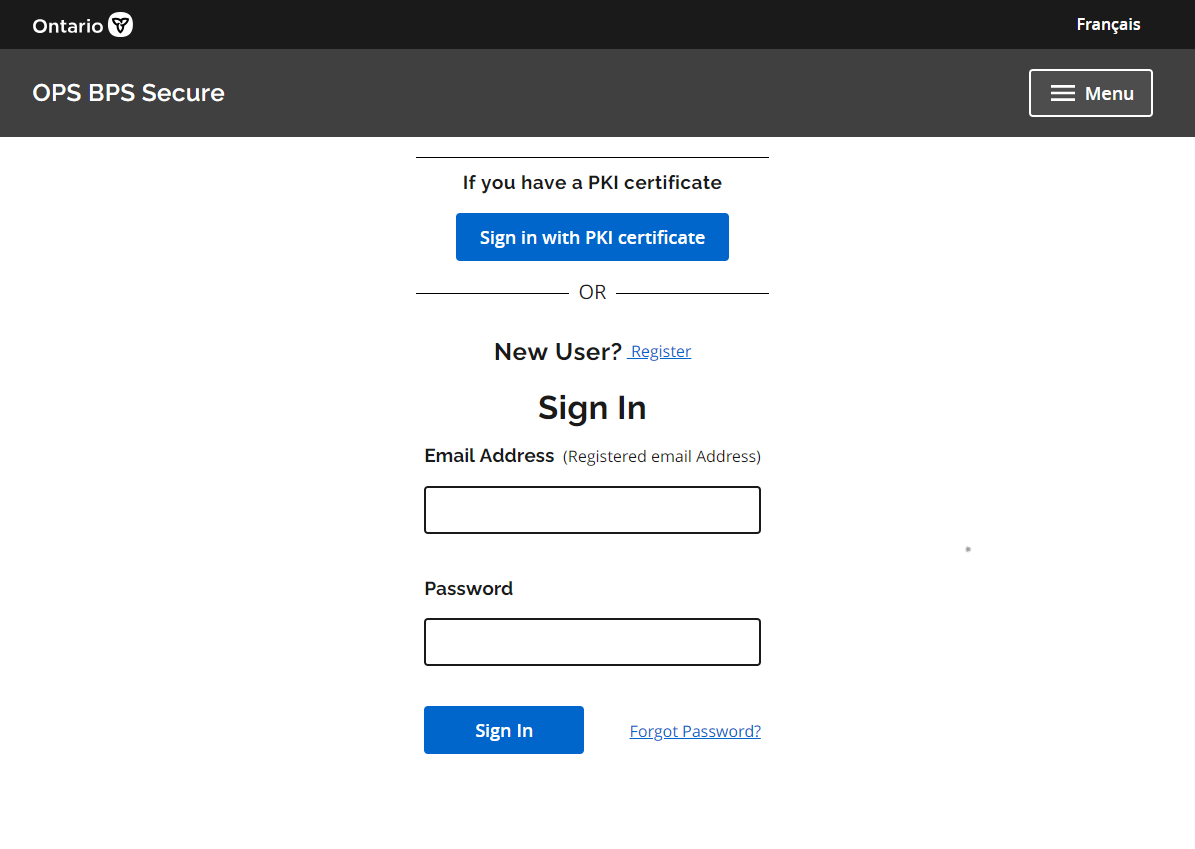
Once you click Sign In you will be directed to the EFIS 2.0 HomePage then click EPM to access Planning.
Note: EPM is only compatible with Edge, Firefox, and Chrome. Internet Explorer is no longer supported.
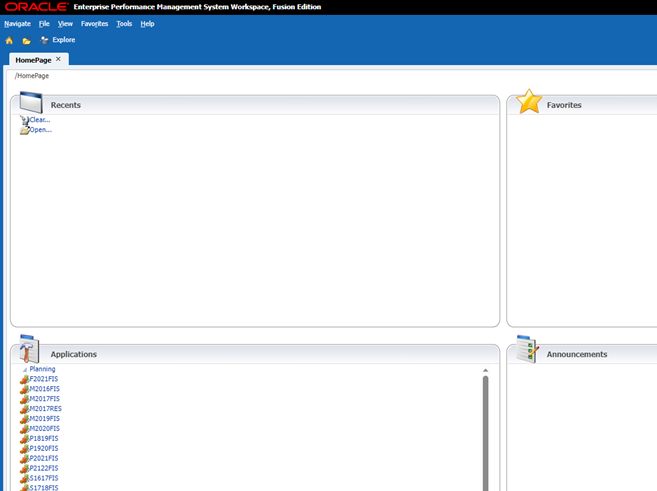
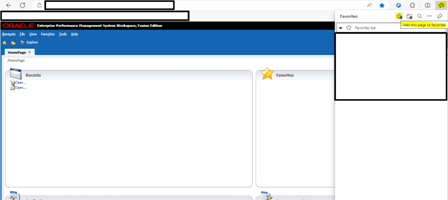
2.2 Bookmarking the EFIS 2.0 Page
To bookmark the link to EFIS 2.0 you need to create the link once you are in the application and NOT when you are in the login screen.
If you get the error screen below check that the bookmark to ensure it is NOT the following: https://www.iam.security.gov.on.ca/goID/access/index.jsp
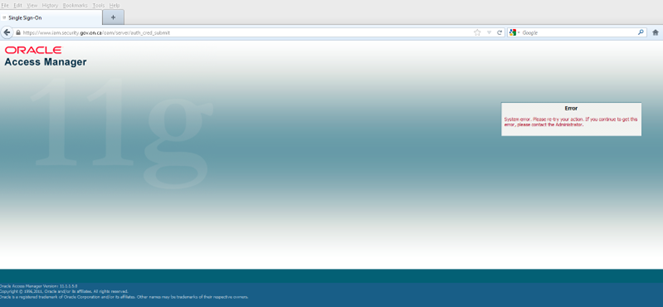
Error is also caused if you are logged into multiple tabs in the same window. If error screen persists, close all windows and reopen link to log in again.
Planning User Set Up
In order for the EFIS 2.0 application to work properly, there are a number of settings that need to be configured. There are two types of user preferences:
1. Global User Preferences
These preferences apply to applications in EFIS 2.0. In general, these need to be set up only once.
2. Application Specific User Preferences
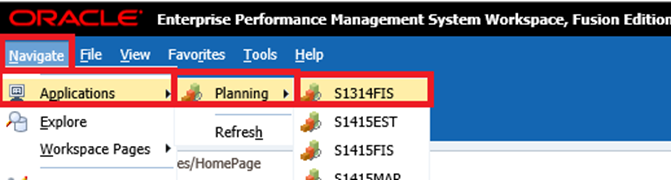
In EFIS 2.0 every unique Year / Cycle combination is represented by a different “application”. User preferences must be set up for each application before the application can be used properly. To change Application Specific user preferences for an application, the application must be opened first. On the home page click on Navigate → Applications → Planning → Application Name (i.e. S1314FIS)
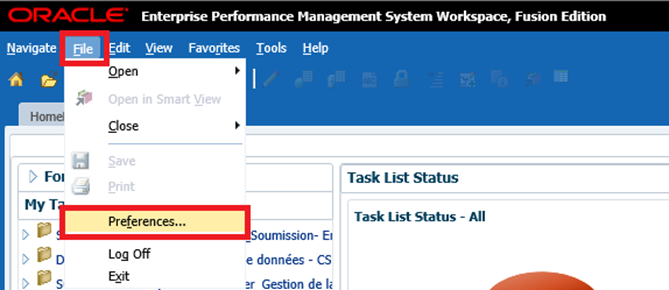
Once the application is open navigate to File → Preferences. Using this prompts a number of user preferences must be changed in order to make the selected application work as intended. The following section will describe the preferences in more detail.
3.1 Reporting Settings - Application Specific
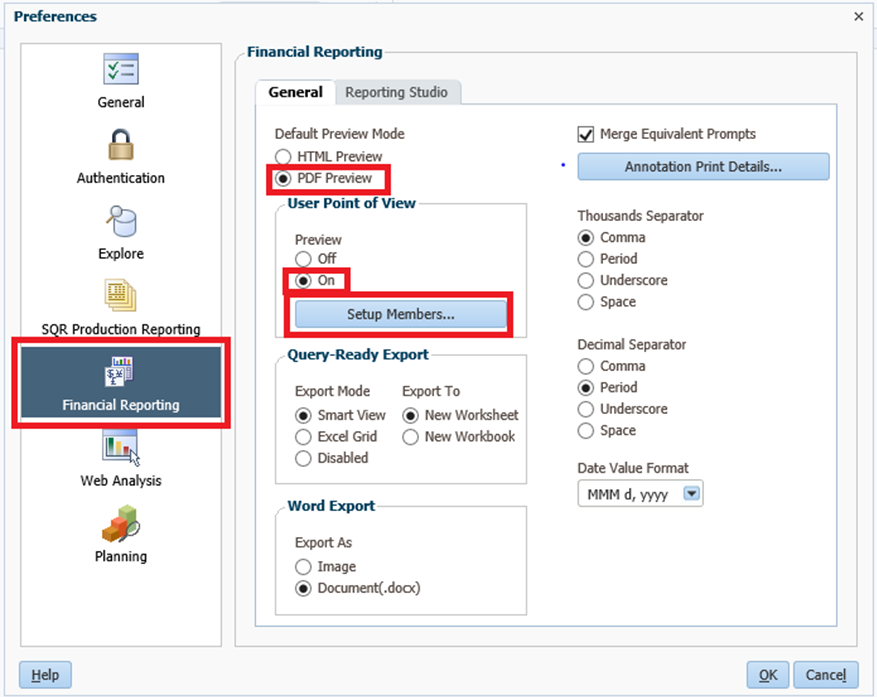
In order to generate reports, users are required to perform a simple one-time setup of User Point of View. In the popup dialogue, select Financial Reporting on the left handleft-hand side. Under Default Preview Mode select PDF Preview. Under User Point of View select On and click on Setup Members.
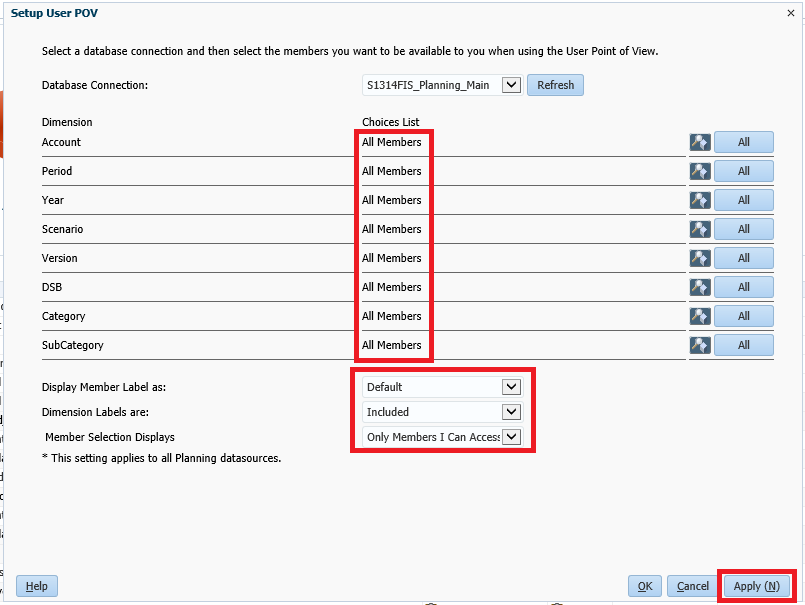
In the resulting Setup User POV dialog, click on the Database Connection dropdown. There are two connections for each Planning application, a “Main” one for the School Board level, and a “Detail” one for the School level.
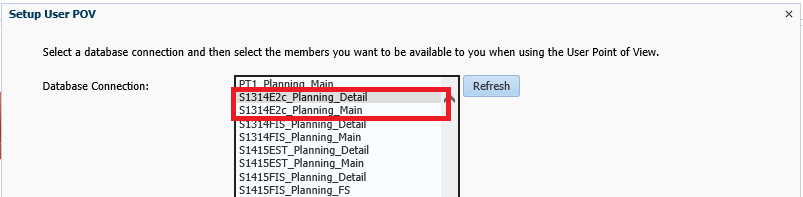
Select the “Main” database connection. Make the following selections and click Apply:
- Choices List for all dimensions: All Members
- Display Member Label as: Default
- Dimension Labels are: Included
- Member Selection Displays: Only Members I Can Access
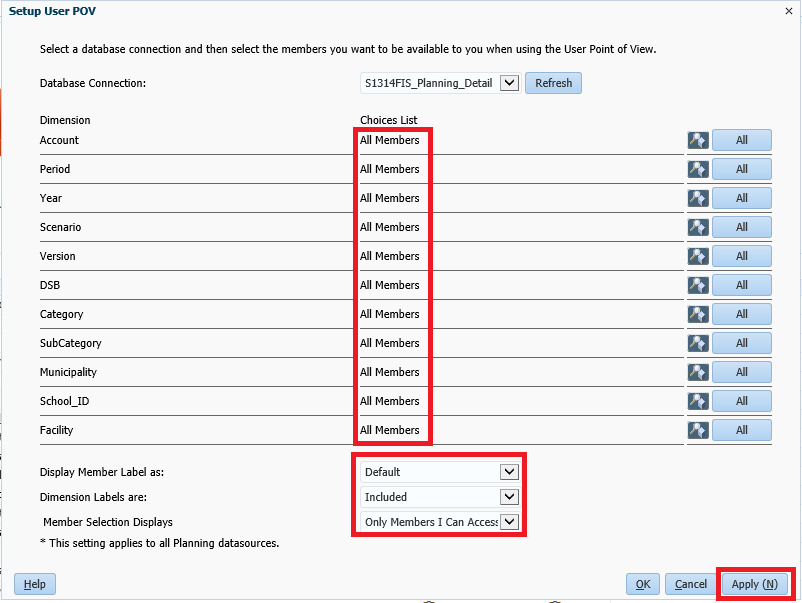
Select the “Detail” connection. Make the following selections and click Apply:
- Choices List for all dimensions: All Members
- Display Member Label as: Default
- Dimension Labels are: Included
- Member Selection Displays: Only Members I Can Access
Click OK to close the Setup User POV dialog. Click OK to close the Preferences dialog
Tip!
At the start of a new cycle or if you are having issues connecting to EFIS 2.0 it is good practice to clear the Browser cache, this is done by selecting the clear recent history from the browser menu and selecting clear all.
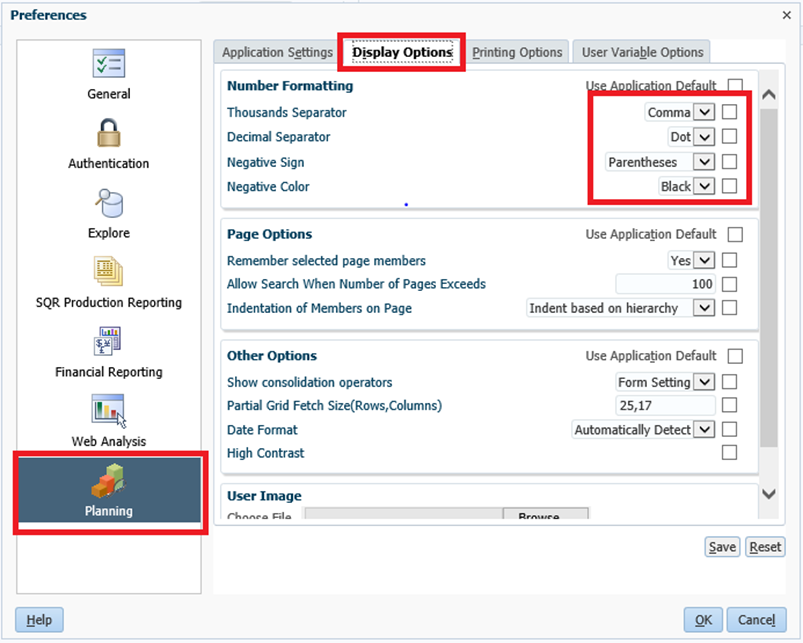
3.2 Display Options - Global
Display options dictate how data is displayed on web forms. On the Preferences screen, select Planning from the left hand panel and select Display Options. Select the desired Number Formatting from the dropdown lists and click OK on the Preferences screen.
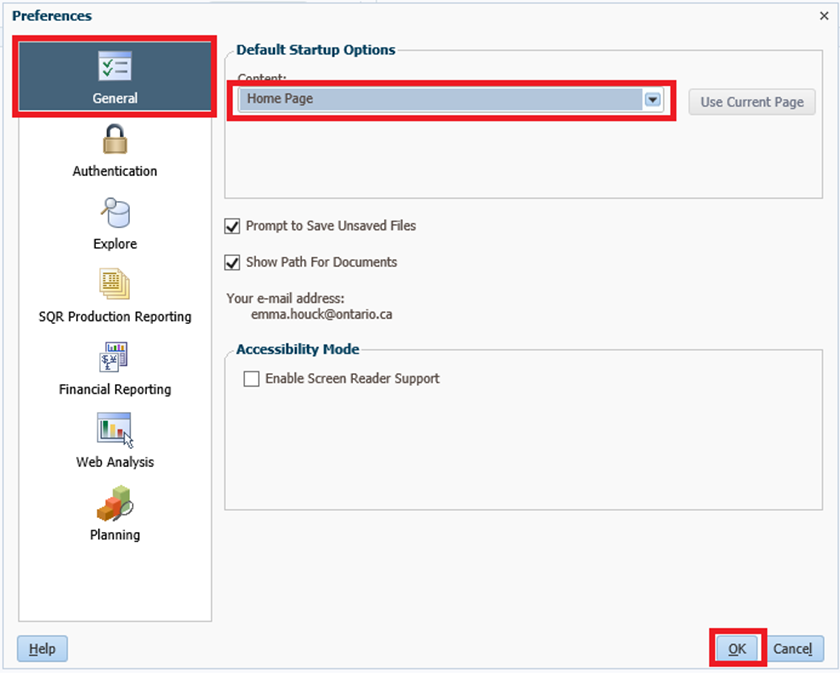
3.3 Setup your Home Page - Global
The HomePage is the page that opens when the users first logs into EFIS 2.0. Even though the settings can be changed (i.e. have the current cycle “Application” load on log in) it is recommended that the user sets the home page to the default EFIS 2.0 “Home Page” as it contains a number of useful features which will be discussed in later sections.
To set the “Home Page” as the default, open the Preferences screen, select General from the left hand panel and choose “Home Page” from the Content dropdown list. Click OK on the Preferences screen.
3.4 Change Language
3.4.1 Web Browser Language - Chrome - Global
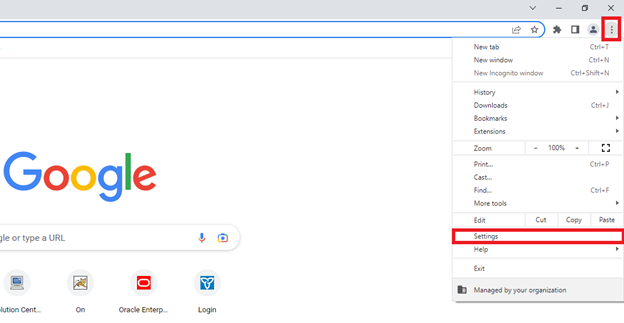
Chrome users can change the Chrome page display to the French language by selecting the dropdown menu on the side and clicking on settings.
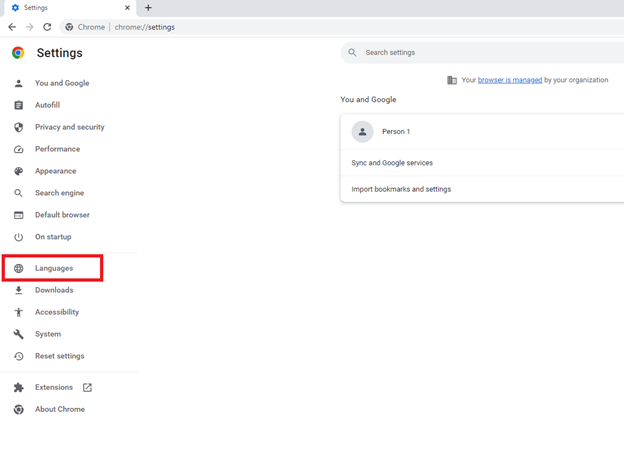
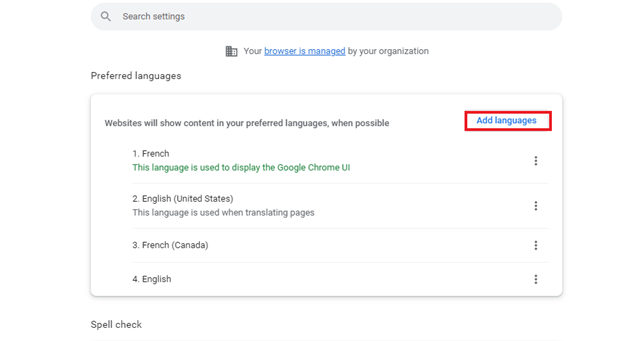
On the left-hand side, click on Languages and under the Preferred Languages section, select Add languages.
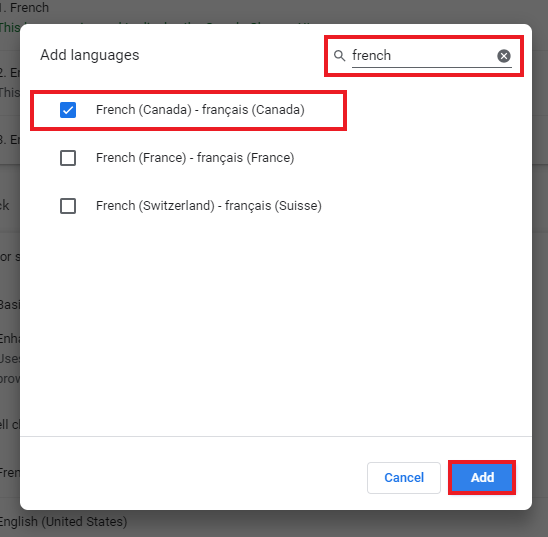
In the popup, you can either scroll down or search for French (Canada). Select it then click add.
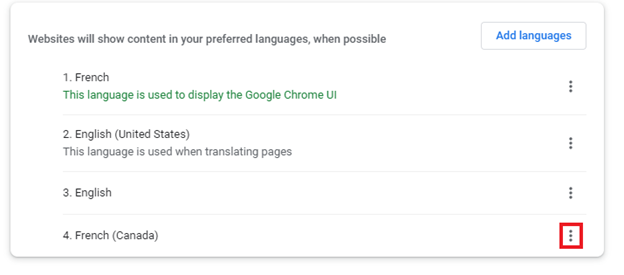
Click on the 3 dots on the right and select Display Google Chrome in this language. Then click on Relaunch.


Browser will then restart for the language setting to take effect.
3.4.2 Web Browser Language - Firefox - Global
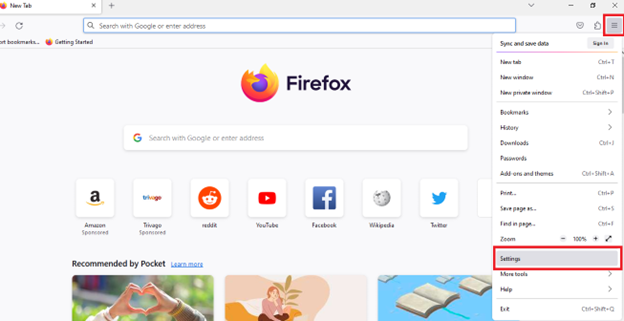
Firefox users can change the Firefox page display to French Language by selecting the dropdown menu on the side and clicking on Settings.
In the General tab, click on Choose under Language next to Choose the languages used to display menus, messages, and notifications from Firefox.
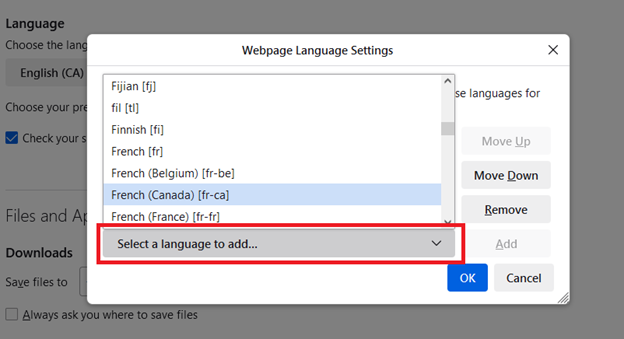
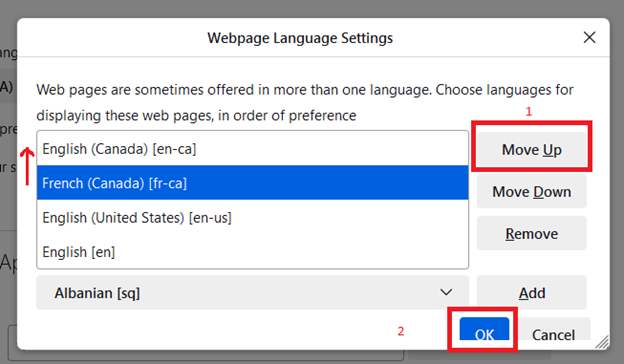
Click on Select a language to add… and select French (Canada) [fr-ca]. Click Add on the right afterwards and click Move Up on French (Canada) [fr-ca] until it reaches the top and click OK to exit out.
Restart the browser afterwards for the language settings to take effect.
Remember to click “Add” here, otherwise the language won’t add.
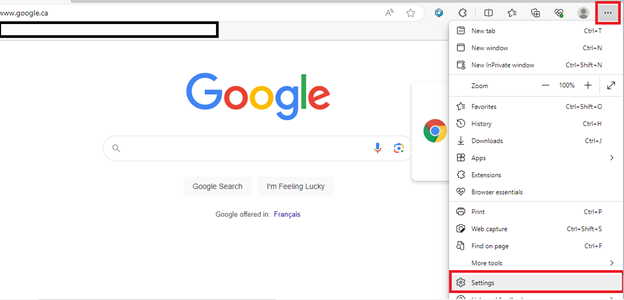
3.4.3 Web Browser Language - Microsoft Edge - Global
Microsoft Edge users can change the Microsoft Edge page display to French Language by selecting the dropdown menu on the side and clicking on Settings.
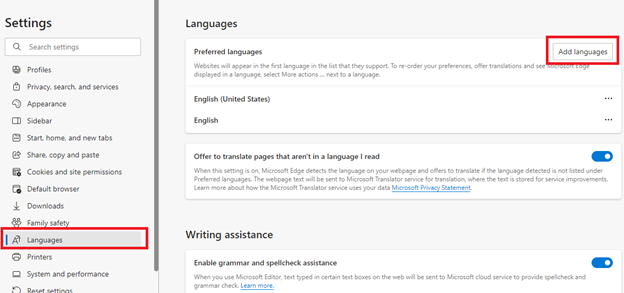
On the left pane, click on Languages and then click on the Add Languages button next to Preferred languages.
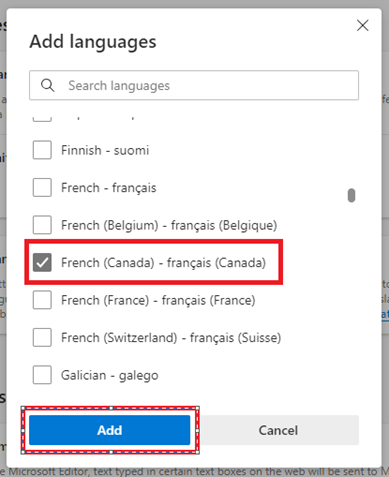
On the popup, add French (Canada) by selecting it and clicking on Add. Then move it to the top by clicking on the three dots (. . .) next to French (Canada) and click Move to the top.
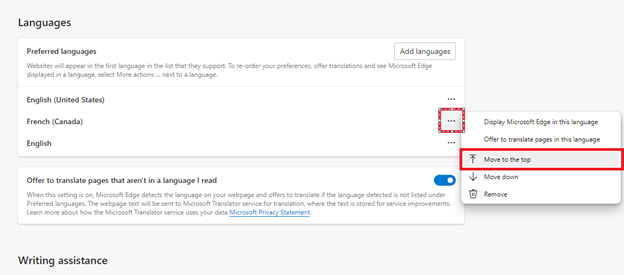
Restart Edge to complete the process.
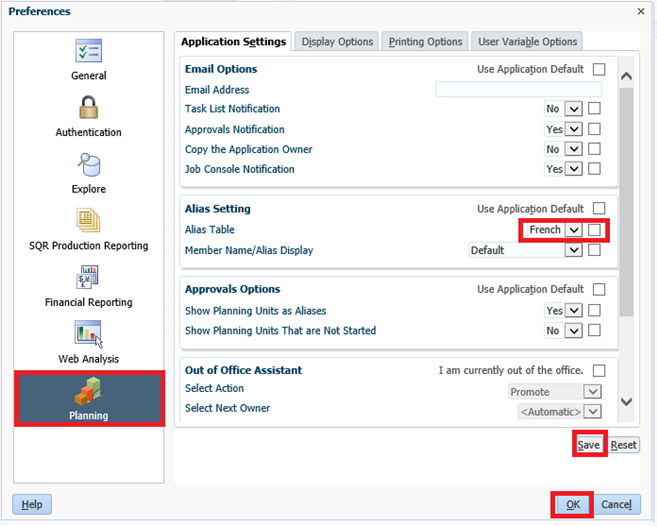
3.4.4 Set Language in Planning - Application Specific
To set the Language in Planning, first open the application you wish to set up. Once the application is open navigate to File → Preferences. Select Planning on the left hand panel and under the Application Settings tab change the Alias Settings, selecting French as the Alias Table. Select Save then Select OK. Note: in order to set the language back to English, select the Default Alias Table.
Planning Navigation
4.1 Selecting an Application (Doc Set)
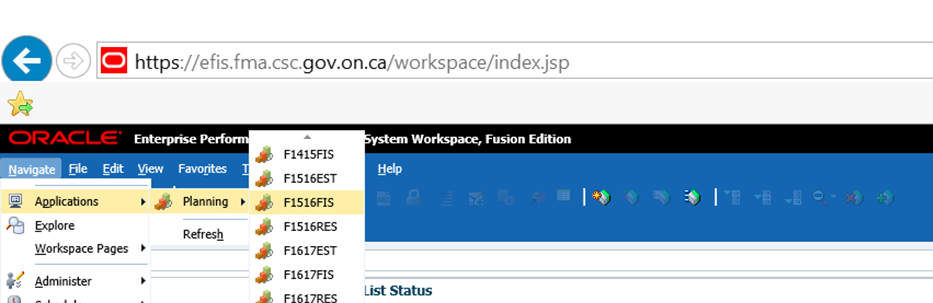
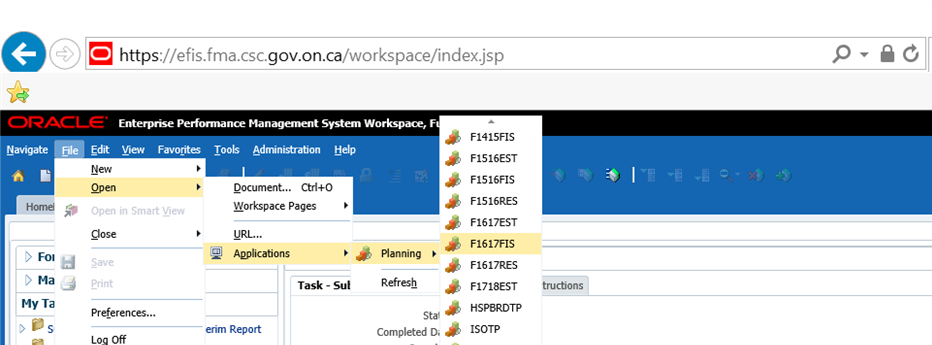
The application can be opened using one of the following methods:
To open the application from the menu bar either select → Navigate → Applications → Planning → application name (where application name is the application you wish to open), or File → Open → Applications → Planning → application name
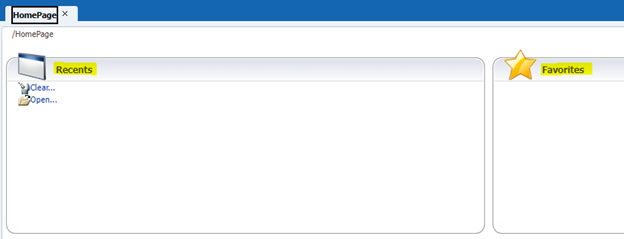
An alternative way to open applications is use the Home Page (see section 5.3 for setup). The application can be selected from either the Favourites or the Recents list.
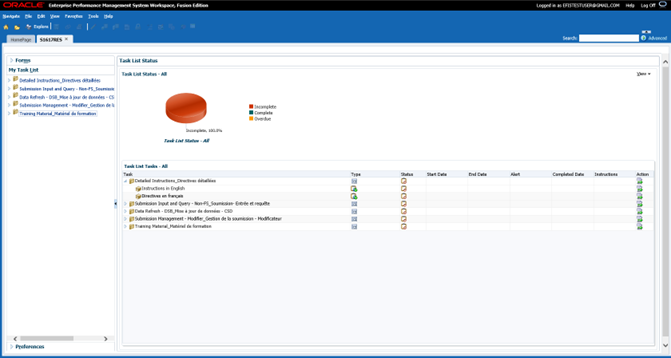
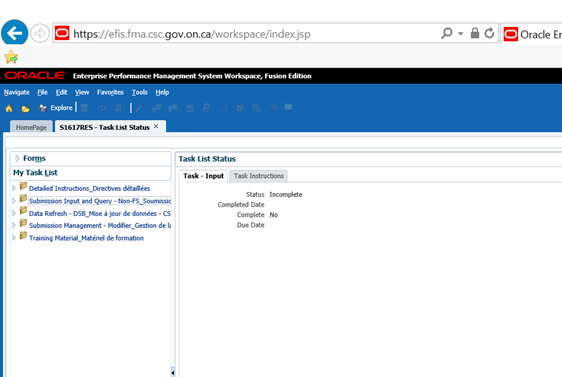
Once the user selects the Application using one of the above methods the My Task List will be displayed. The user will have the choice of using either an English or a French Task List.
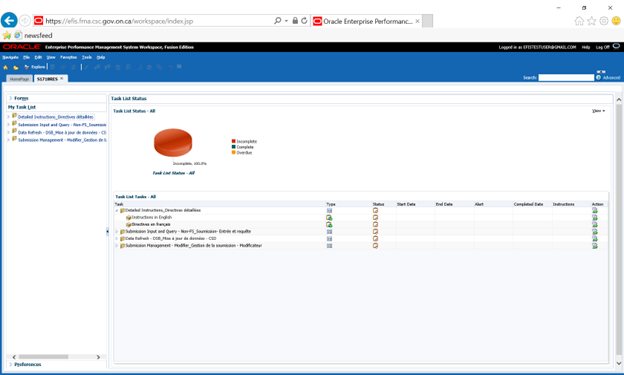
4.2 EFIS 2.0 Task List
Introduction
The Task List provides a central access point to all forms, reports and workflow activities that are available to each user type. The Task List has been organized to follow a suggested order of data input.
The Task List is hierarchical. Users drill down into lower level tiers of the Task List to reveal additional detail.
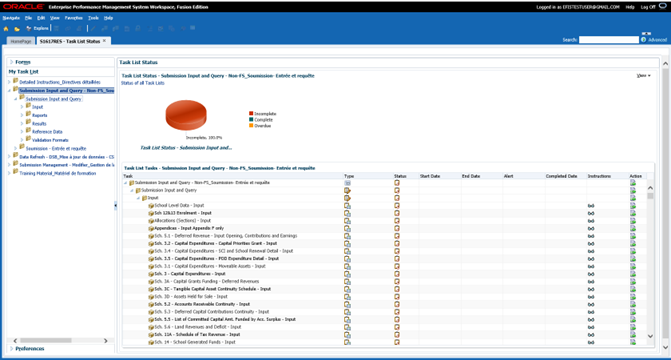
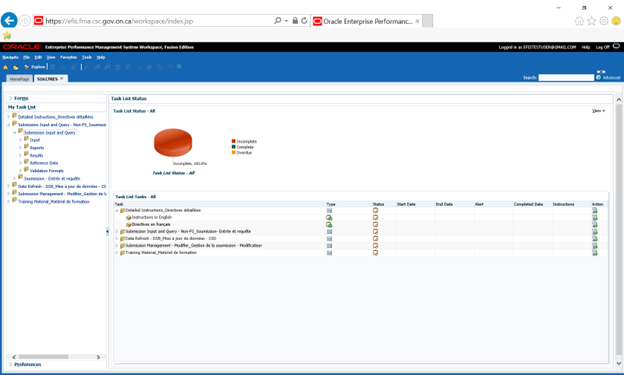
The Task List, when fully expanded is grouped into Input, Reports, Results, Reference Data, Validation Formats and Submission Management folders.
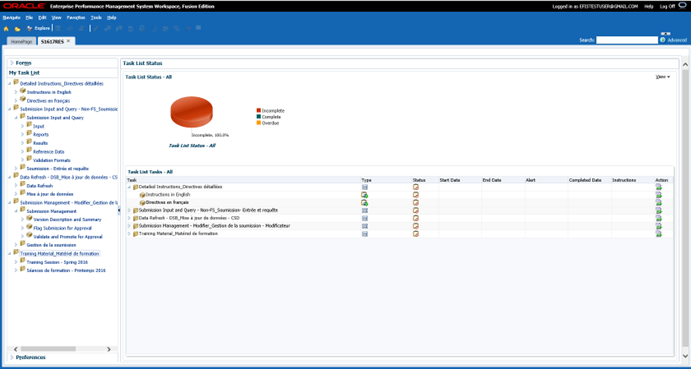
4.2.1 Expand and Collapse Task List
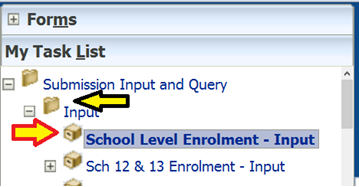
Task Lists are organized into folders that contain cubes, to drill down through folders the user navigates to the folder, right clicks and selects Expand or the + box next to the folder. To expand one level of folders select Expand, to expand all the folders below the selected folder select Expand All Below. To access the Task (Form, Report, etc.) the user will click on the Cube.
Black arrow points to an example of the folder Icon and the Red arrow points to an example of the Cube Icon.

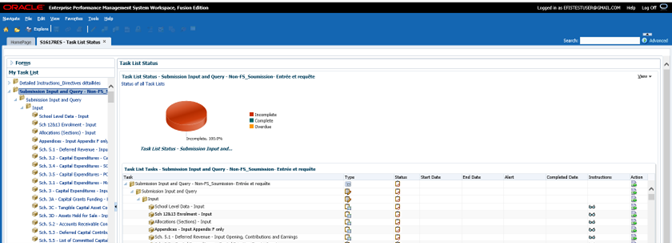
Example of right clicking on a folder and selecting Expand will drill down the selected item to the next level.
Example of right clicking on a folder and selecting Expand All Below will drill down the selected item to the next level.
Right clicking on an expanded folder in the Task List and clicking Collapse or the - box next to the folder to collapse one level or click Collapse All Below will hide all of the levels below the selected folder.
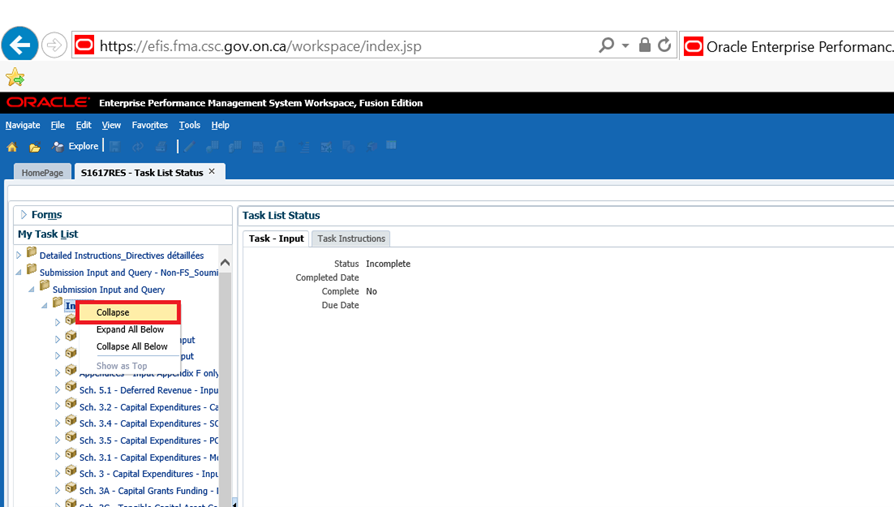
Example of selecting Collapse.
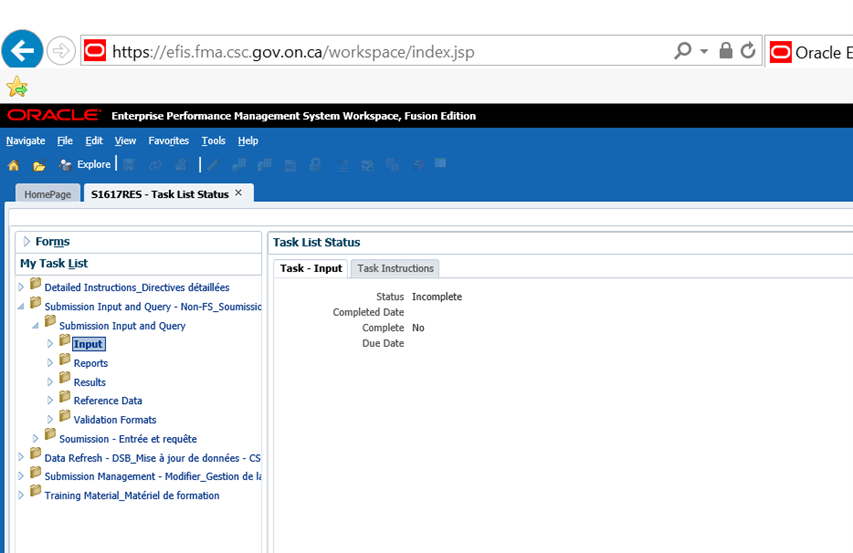
Example of selecting Collapse All.
4.3 How to Navigate in Planning Using Task List
Introduction
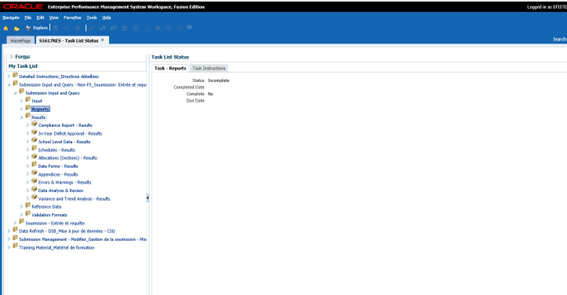
To drill down to any form in EFIS 2.0 Task List click on the Expand icon (+) next to desired Task List. A list of folders/cubes for each area will be displayed. The Input folder contains all the data input forms. The Reports folder contains reports for all Schedules, Allocation (Sections) and other EFIS 2.0 reports. The Results folder contains a set of forms that displays the calculation results for all Schedules, Allocation (Sections) and other EFIS 2.0 reports. The Reference Data folder contains all Benchmarks, Table Amounts as well as Summary of Reference Data Changes and Reference Data Variance Report and Results. The Validation Formats folder contains valid data formats for all input forms. The Submission Management folder contains tasks related to validation and promotion of the submission.
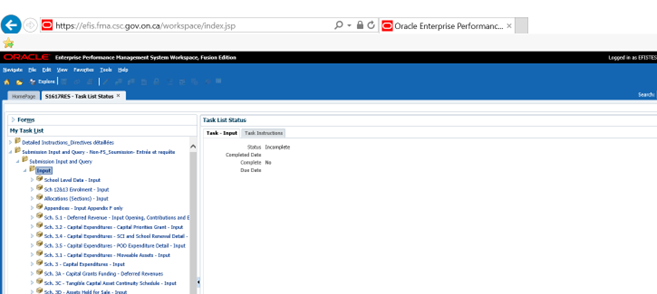
4.3.1 Input Data Navigation
Introduction
All data input forms are contained in the Input folder and are listed in the suggested order of data entry. To access the individual forms expand the Input folder.
Tip!
In a complex input form, due to screen resolution sometimes you will not be able to see all of the forms listed in the tab. To see all of the forms click on the arrow to the right and select the form. Also if the list after clicking on the arrow is long, you need to select last form and then click on the arrow again to see the rest of the forms. See the example above.
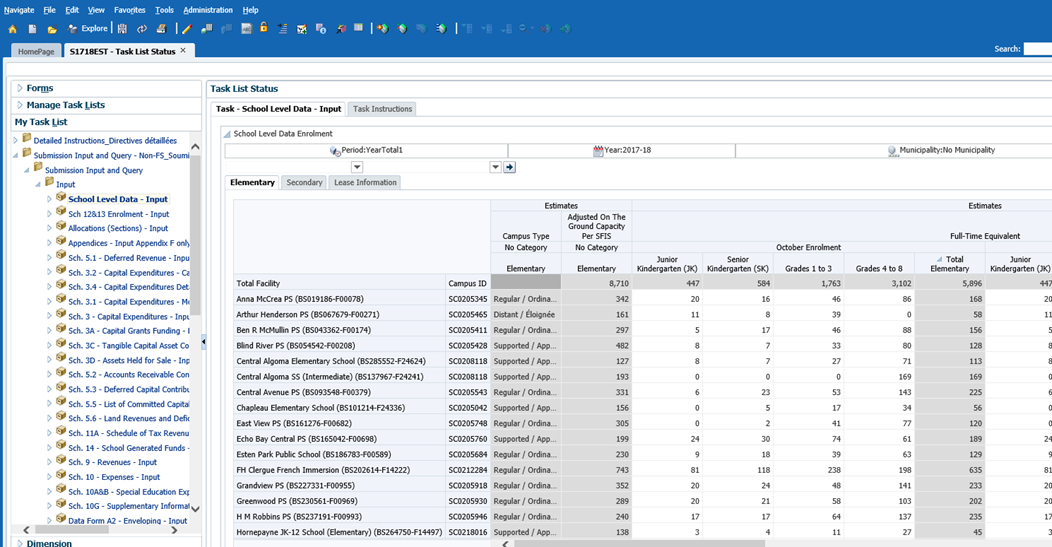
4.3.1.1 School Level Data Navigation - Input
To access the data input form for School Level Data- Input (formerly Appendix C) expand on the Input folder. In EFIS 2.0 school level data entry is now integrated into the application. Shown below is the School Level Data input form with a tab for Elementary and one for Secondary.
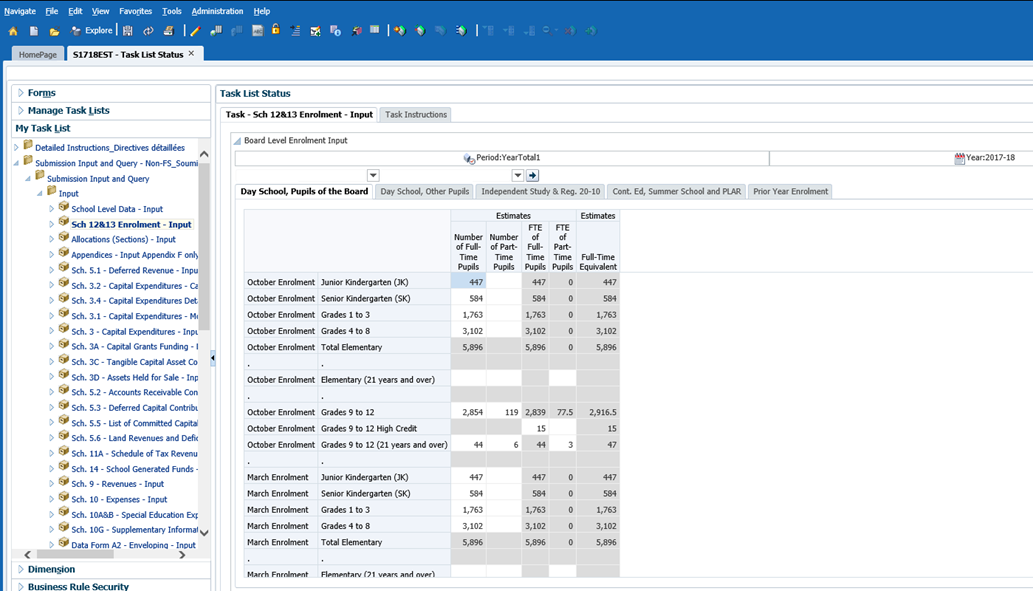
4.3.1.2 Board Level Enrolment Navigation- Input
Board level enrolment information is input in Sch12-13 Enrolment-Input. An example of the board level data input form follows:
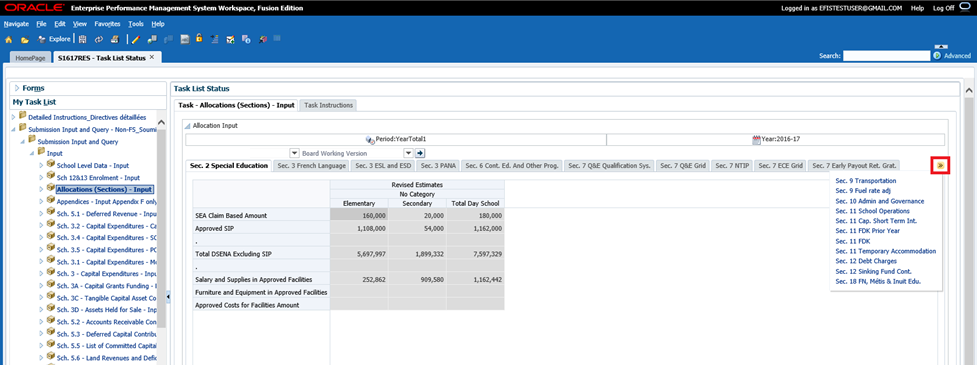
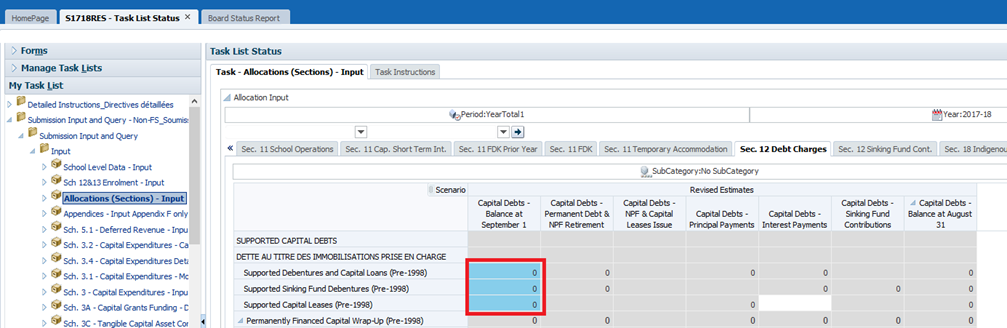
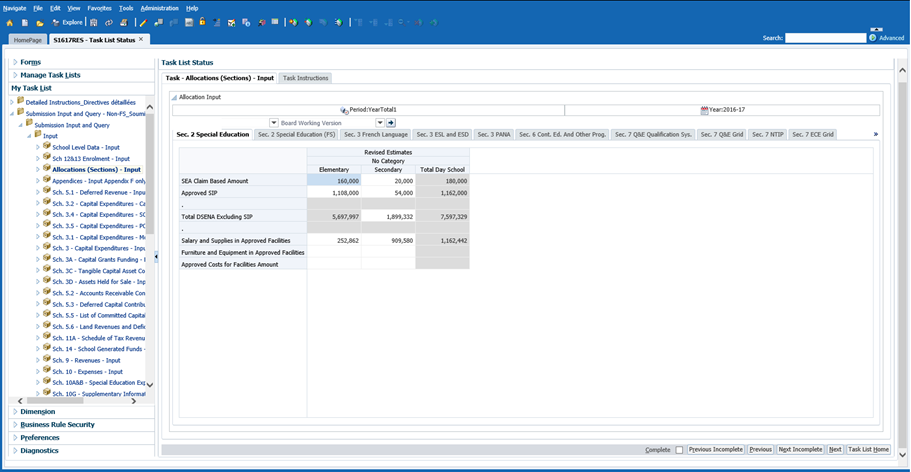
4.3.1.3 Allocation (Sections) Navigation- Input
The Allocation (Sections) - Input folder contains a single data input form with individual tabs for each of the sections that require data input. In addition to the white data entry cells, prior year data cells have a blue background and can be updated and saved by the user. Gray cells are calculated or empty cells and cannot be updated by the user.
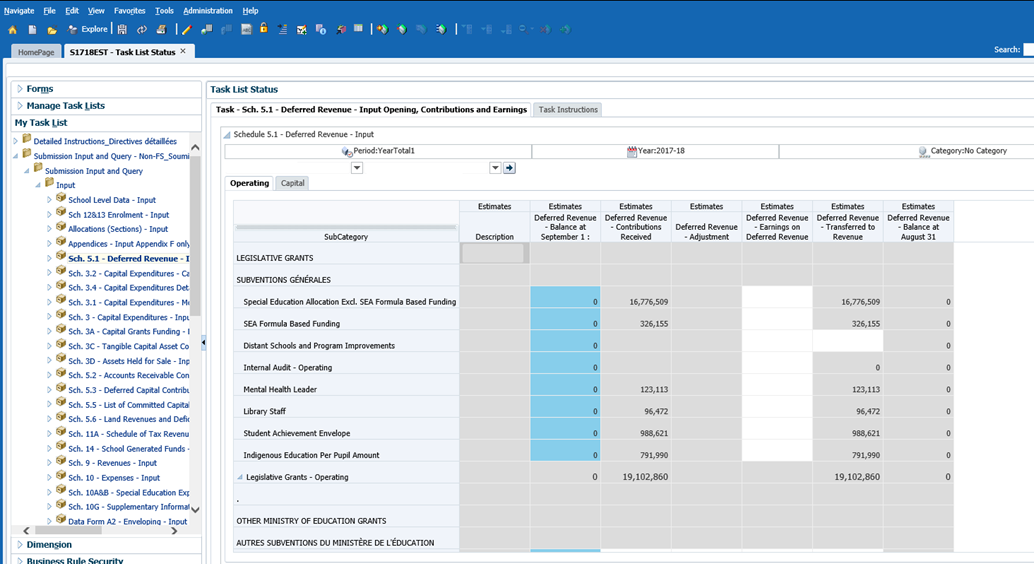
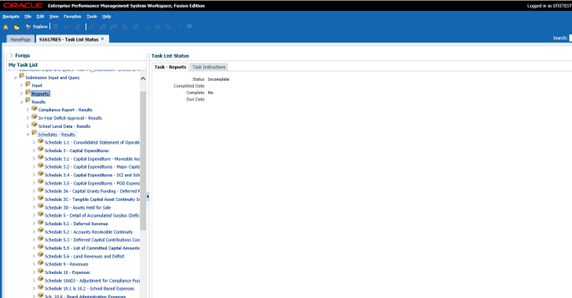
4.3.1.4 Schedules Navigation- Input
Each Schedule that requires data input has its own data input form, the example below is for Schedule 5.1. In this example there is one tab for operating and one tab for capital.
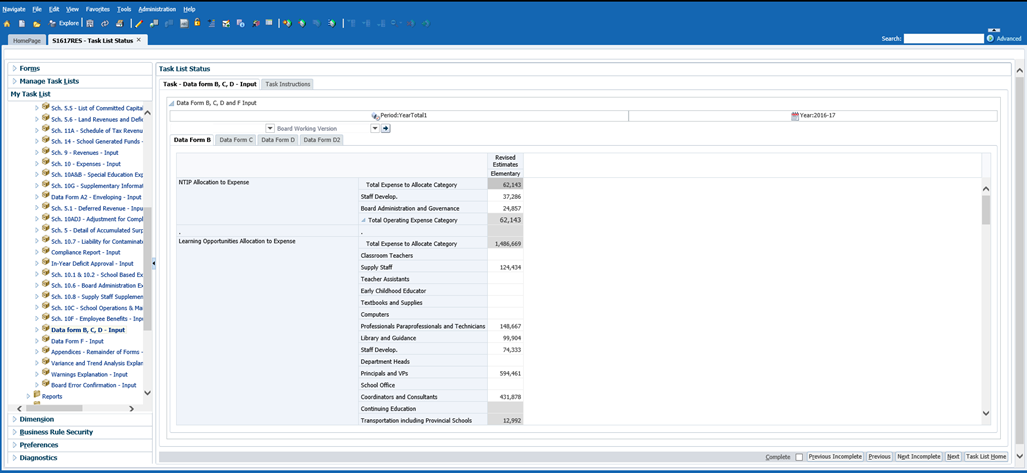
4.3.1.5 Data Forms Navigation- Input
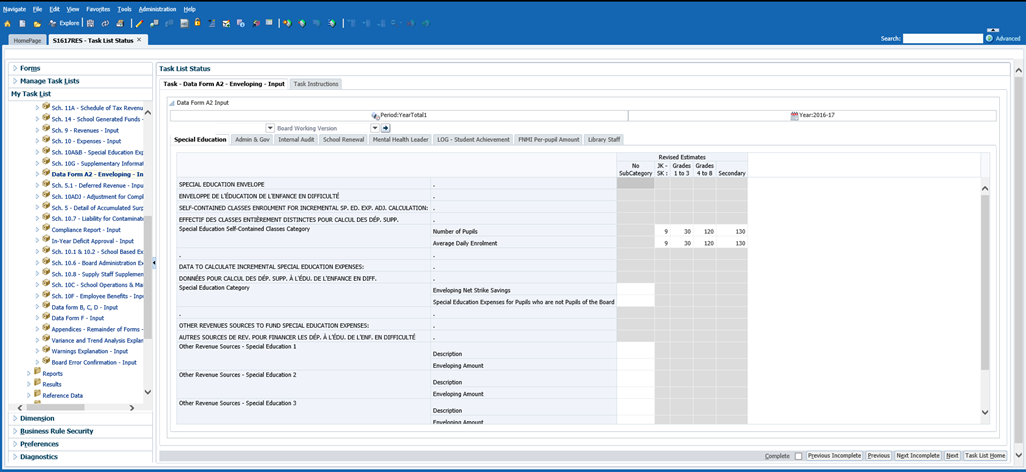
Data Forms B, C, D have been consolidated into one data entry form with multiple tabs, Data Form A2 – Enveloping is a separate form.
Example of Data Form B, C, D input form:
Example of Data Form A2
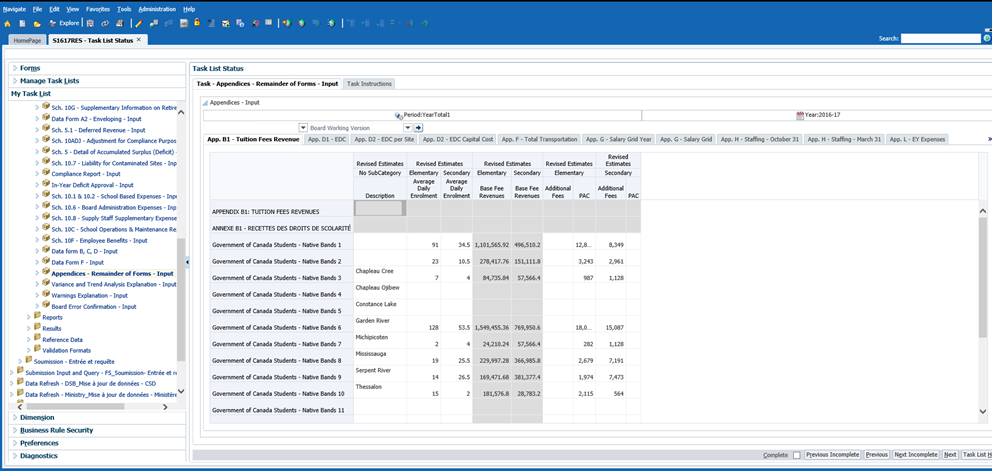
4.3.1.6 Appendices Navigation- Input
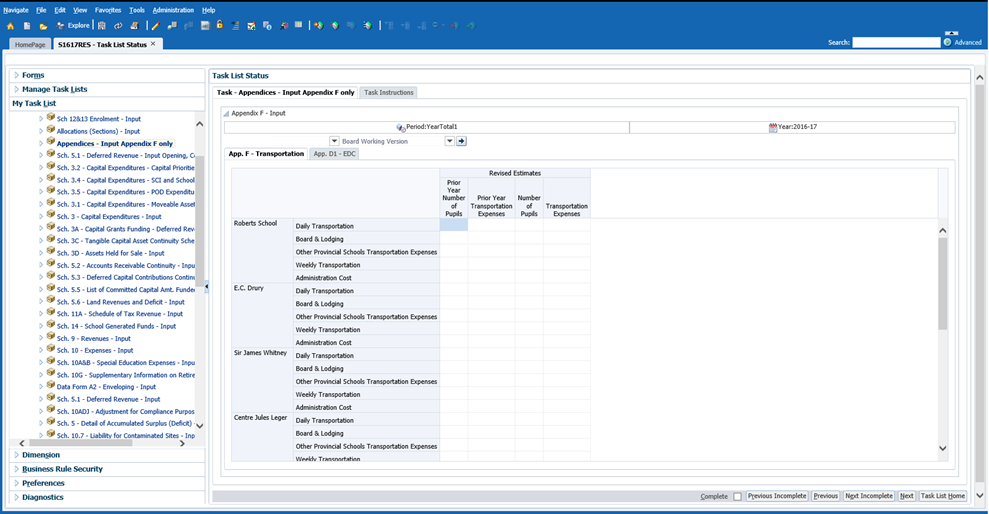
Most of the appendices have been consolidated into one data entry form with multiple tabs. Appendix F is a separate input form for the boards that need to input Daily and Weekly transportation.
Example of Appendices input form:
Example of Appendix F
4.3.1.7 Errors and Warnings Navigation- Input
The Errors and Warnings have been separated into 2 input forms; however the results remain one form with 2 tabs. The new Warnings Explanation – Input form is where the boards now enter an explanation for any warning that message that has a “Yes” value. This has replaced the external excel report. A new warning has also been added that will not allow the submission to be submitted until all explanations been entered.
Example of Warning Explanation Form:
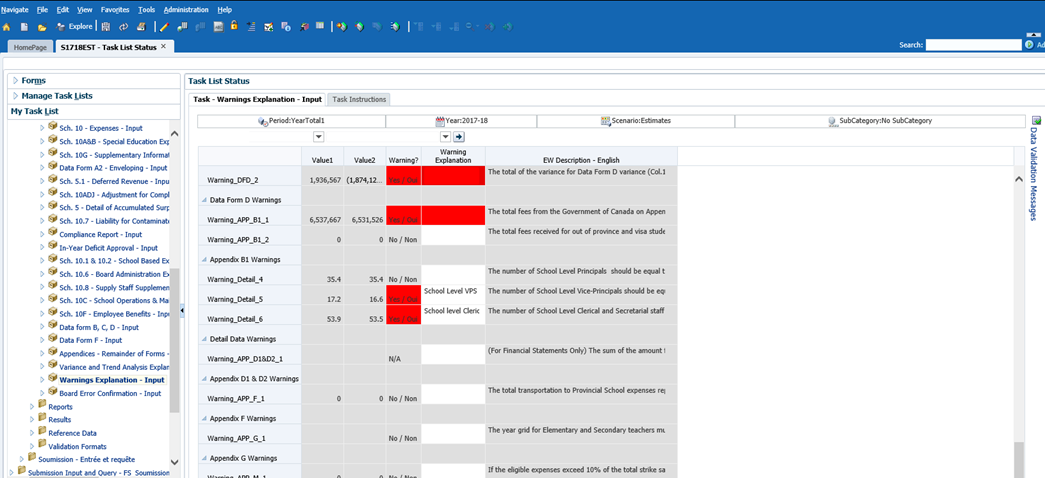
A new Board Error Confirmation form that allows the boards to submit with outstanding errors as part of the Submit with Errors process has been added. This functionality is only used after consulting the Ministry. Warnings can also be viewed as a tab on this form.
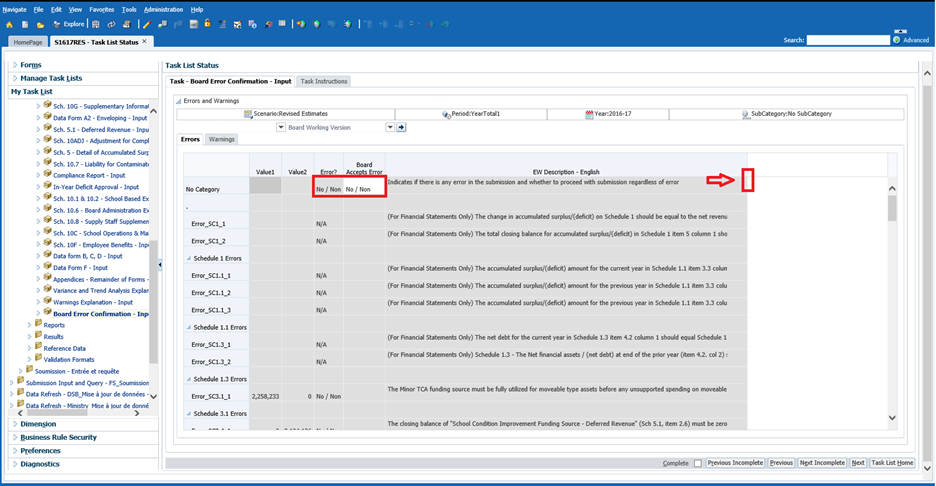
Tip!
To view the complete description position the mouse pointer on the edge of the description cell and drag the cell to expand. See arrow above.
4.3.2 Reports Data Navigation
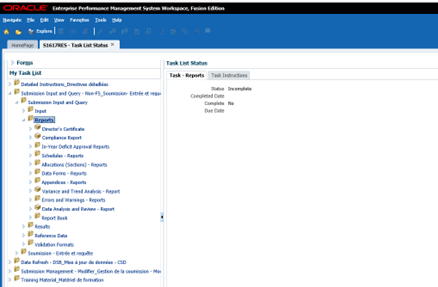
Reports displaying the input and results for each form are found under the Reports folder. Reports have been grouped into folders by the following areas: Directors Certificate, Compliance Report, Schedules, In-Year Deficit Elimination Plan, In-Year Deficit Approval Reports, Allocations (Sections), Data Forms, Appendices, Errors and Warnings and Data Analysis and Review. To print a complete set of reports the user will select the Report Book folder.
Example of the Report Area folders:
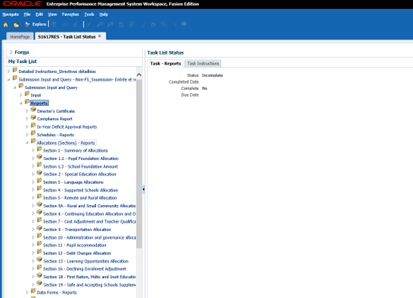
Example of the Allocation (Sections)- Reports folders:
4.3.3 Results Data Navigation
Results can also be viewed in a form; the Results folder contains these forms. Review forms have been grouped into folders by the following areas: Compliance Report, Enrolment, Schedules, Allocations (Sections), Data Forms, Appendices, Errors and Warnings and Data Analysis and Review.
Example of Results Area folders.
Example of Schedule Results folders
4.3.4 Reference Data Navigation
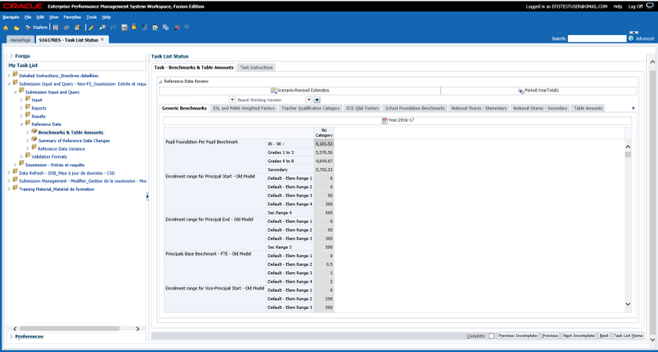
The Reference Data folder contains forms that display Benchmarks & Table Amounts of the board, a Summary of Reference Data Changes that most recently have occurred during a submission cycle and a Reference Data Variance Report that displays the impact of that change on Allocations (Sections) in a form. A PDF report is also available.
Example of the Benchmark tab
Example of Benchmark Changes
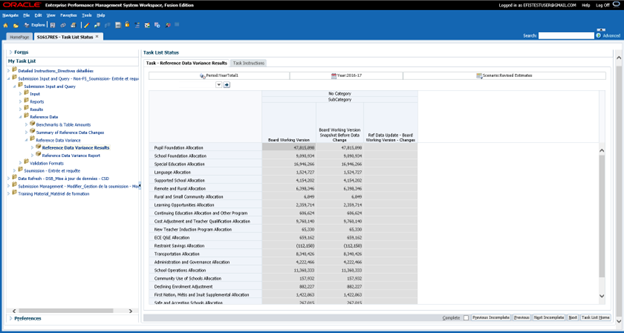
Example of Variance Report Form
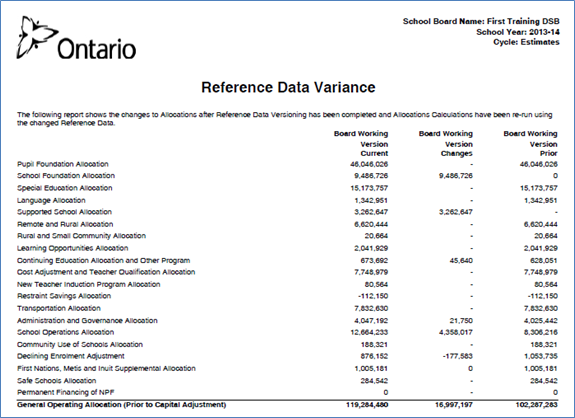
Example of PDF Variance Report
4.3.5 Validation Formats Navigation
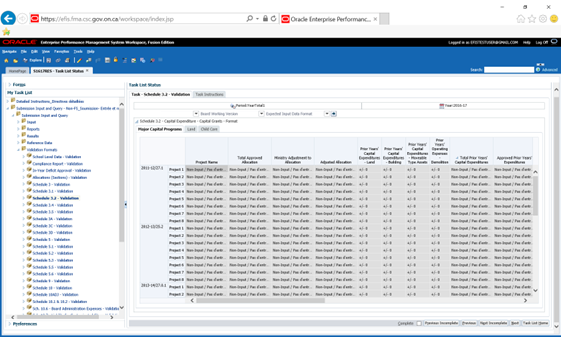
Each of the input cells requires valid data formats to be entered before the data will be saved to the system, the Validation Formats folder contains validation forms for each input form.
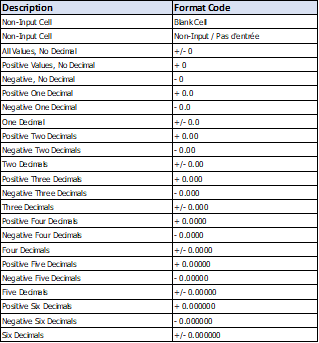
The chart below provides a listing of all input formats.
4.3.6 Submission Management Navigation
The Submission Management folder contains tasks used to perform Version Management submission and promotion activities (promotion of the Board working version). The Version Description and Summary form is where the boards can enter a description for the version user is working on as well as follow the activities on different version in the application.
Example of the Version Description and Summary form
Data Input
5.1 Data Input – Forms
Introduction
All data to be entered into EFIS 2.0 is entered using the data input forms. As described above, each section has a form or set of forms for data input. White Cells are data input, Blue Cells are loaded with prior year data that can be updated, Gray Cells are non-input cells and Red Cells indicate a data validation error.
The section below explains how to input data into EFIS 2.0.
5.1.1 Opening a Form
To open a Form in the Task List click on the form’s name.
EFIS 2.0 displays the form that applies to the particular task.
The Allocation (Sections) input form is a complex form with one tab per allocation. The Schedule input forms are either a single form (one tab) or a complex form (multiple tabs) depending of the amount of information to be entered.
5.1.2 Enable Input Field
Input fields are displayed with a white background, to enable an input field for input click in the cell. The selected input field is now enabled.

To navigate between cells, in addition to mouse navigation, the keyboard can be utilized:
- Tab – move selected cell to next cell in horizontal order
- Shift + Tab – move selected cell backwards, in horizontal order
- Enter – move to the next cell
- Shift Enter – move back to last cell
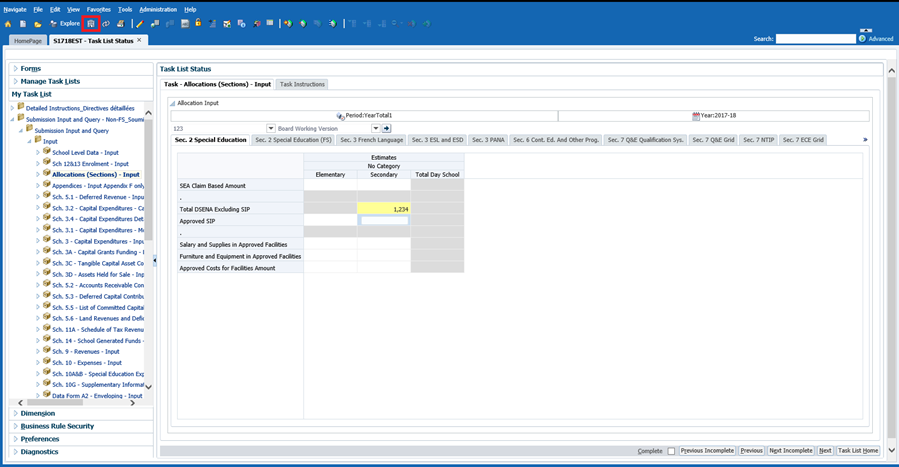
5.1.3 Key in Input Field
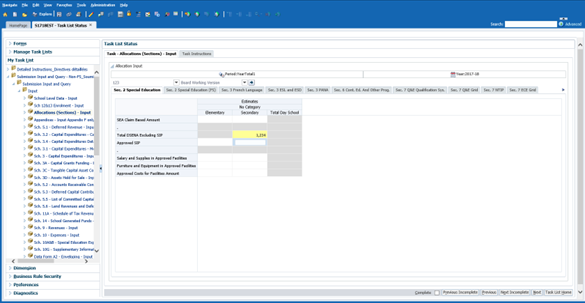
Once an input field is enabled the user can key a value into the cell. A dialog box will be displayed indicating the EFIS 2.0 Cell Coordinates:
The system highlights input values in yellow until they are saved to the database.
5.1.4 Save input field
To save data keyed in an input field click on the Save icon or File → Save
The system confirms that the data has been saved.
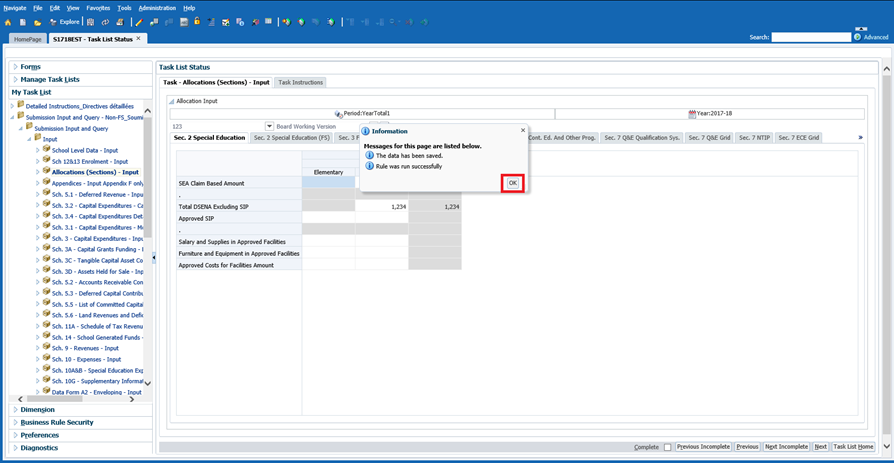
Click on OK to continue.
5.1.5 Invalid Data
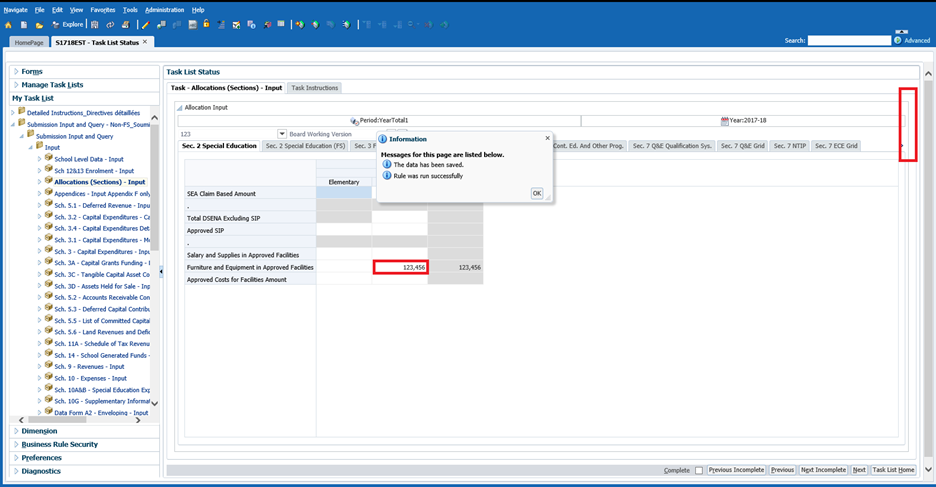
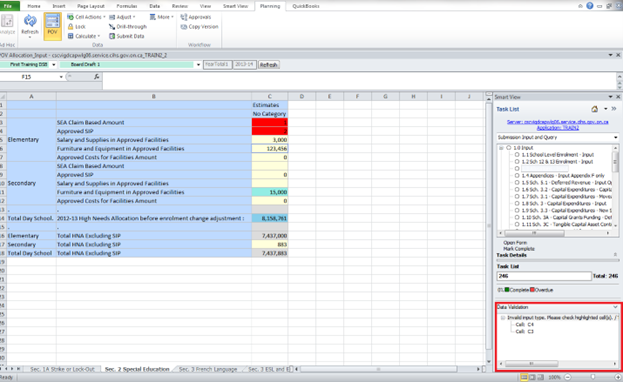
When the user enters and saves data that is invalid the invalid cell is highlighted in red and a Data Validation Message is displayed on the right side of the form.
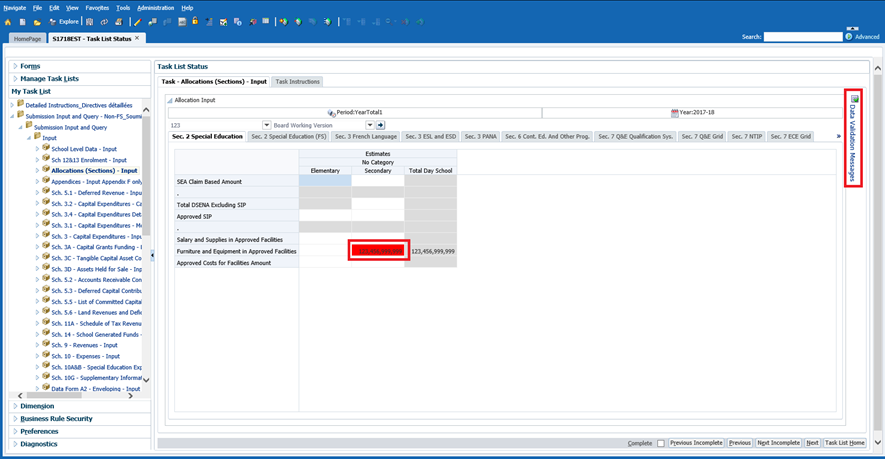
To see the Validation Error the user can click on Data Validation Message to displays the error message.
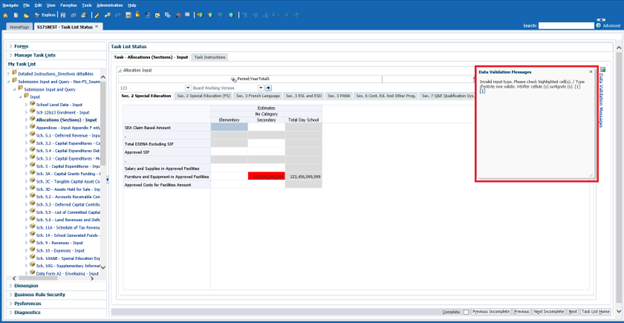
In order to correct the error, the user enters the correct value and saves the data. The confirmation message that the data is saved successfully is shown and if the data is now correct the validation message on the right side of the form disappears.
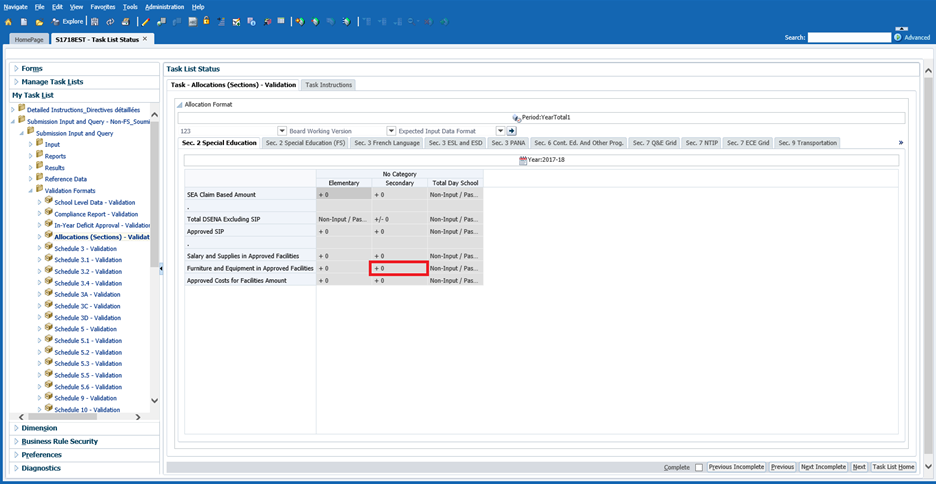
If the user is not sure what cell formatting should be different, the user can check the cell format by opening the same form in the Validation Formats folder and see the description for each cell.
If the user enters a non numeric value into a cell that is expecting numeric values an error will be displayed and the user will not be able to navigate away from that cell until it is corrected.

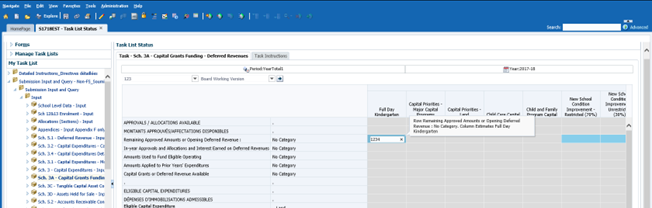
5.1.6 Prior Year Adjustment
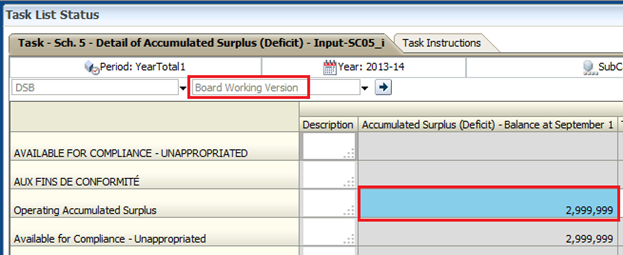
Data cell that have been loaded from a prior year or cycle but and can be adjusted by the user are blue. To make an adjustment click on the cell, enter data and save. If invalid data is entered the cell will become Red.

5.1.7 Input Form Types
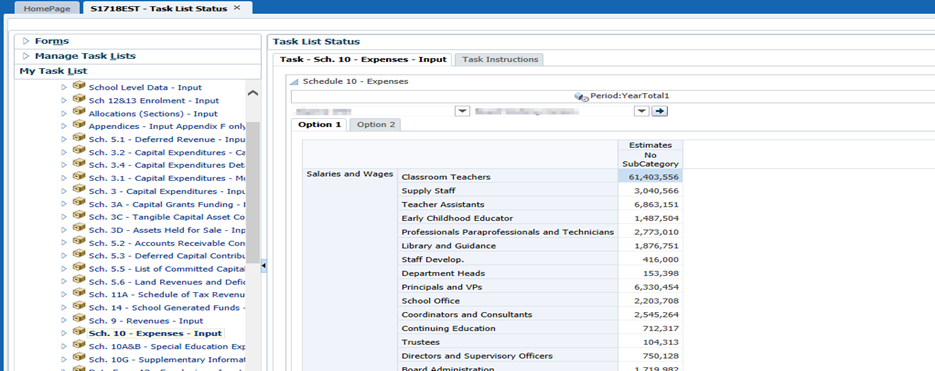
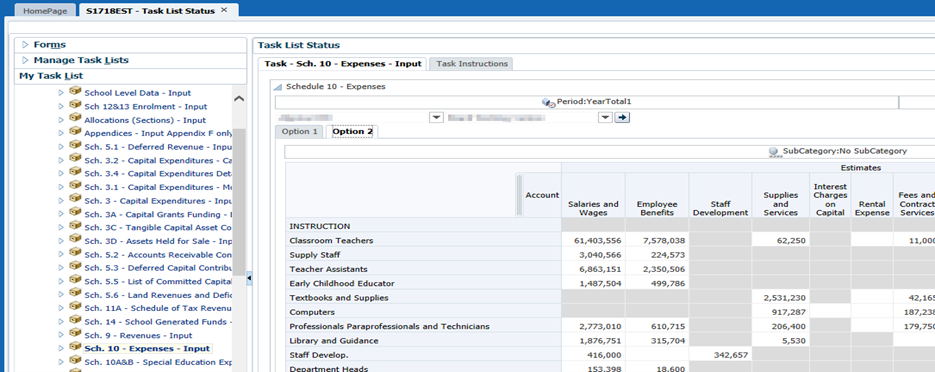
For some forms, for example Schedule 10- Expenses, 2 types of input form type forms are available for the user, Option 1 provides a single column of data entry; Option 2 displays the regular checkerboard approach. Users can enter data into either of the forms and the resulting data entry will be saved to both.
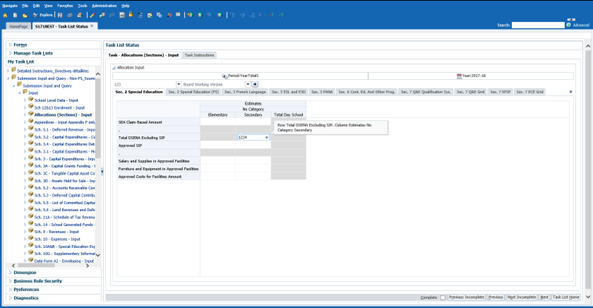
5.1.8 Distribution of Elementary and Secondary Data
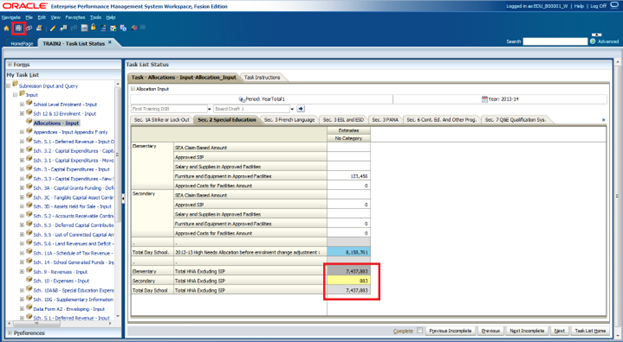
In EFIS 2.0 where data is required for both Elementary and Secondary, for example Schedule 10.1 and 10.2, data is now first entered at the total level (i.e Schedule 10) and the total amount is distributed to Elementary. To complete the distribution between Elementary and Secondary the user now enters the secondary amount only and the elementary amount will be calculated.
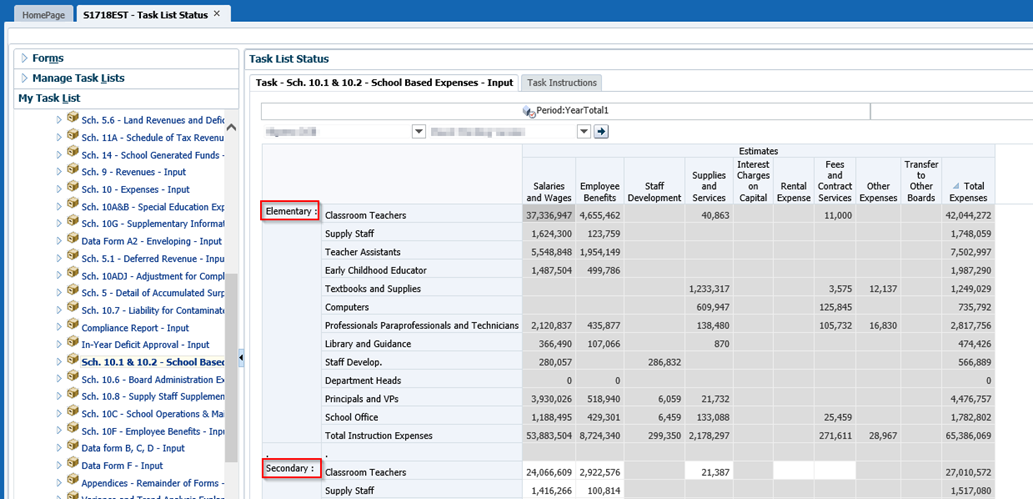
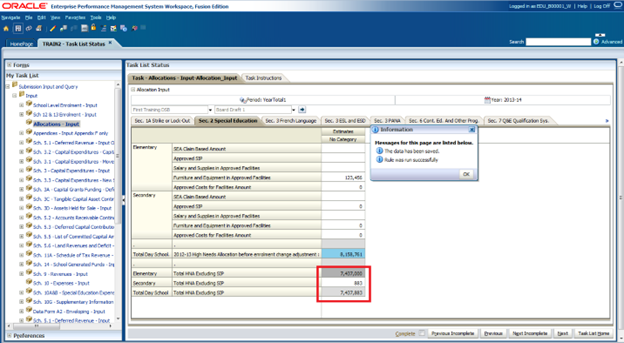
In the example below the user enters the amount of Secondary Total HNA Excluding SIP, then saves. The amount of Secondary Total HNA Excluding SIP is saved and the Elementary Total HNA Excluding SIP is recalculated to properly distribute the total amount between panels.
5.2 Cell Right Click Functionality
Introduction
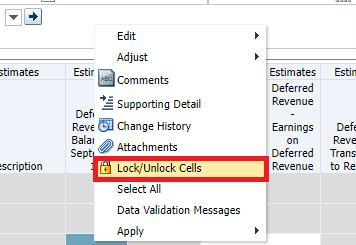
Hyperion Planning provides additional functionality to support data input. This functionality can be accessed by right clicking on an input cell. Functionality that is available in EFIS 2.0 includes:
- Edit
- Cut
- Copy
- Paste
- Clear
- Adjust
- Adjust Data
- Grid Spread
- Comments
- Supporting Detail
- Change History
- Attachments
- Lock/Unlock Cells
5.2.1 Edit
Standard Cut, Copy, Paste, Clear functionality can be accessed by right clicking on a cell the select Edit → Cut will delete the value and save it to your clipboard, copy will copy the value to your clipboard, paste will copy in the value from the clipboard and Clear will delete the value in the cell.

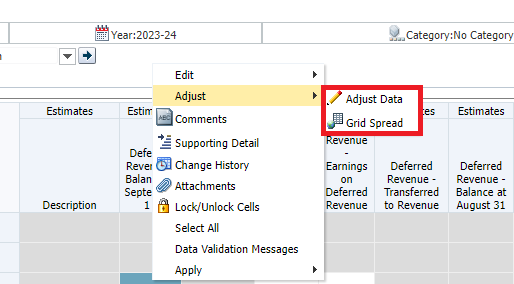
5.2.2 Adjust
Adjust has two options: adjust data, which provides users the option to increase/decrease the value in a cell by a certain amount or percentage relative to the original value in the cell, and grid spread, which does the same as adjust data but across several dimensions.

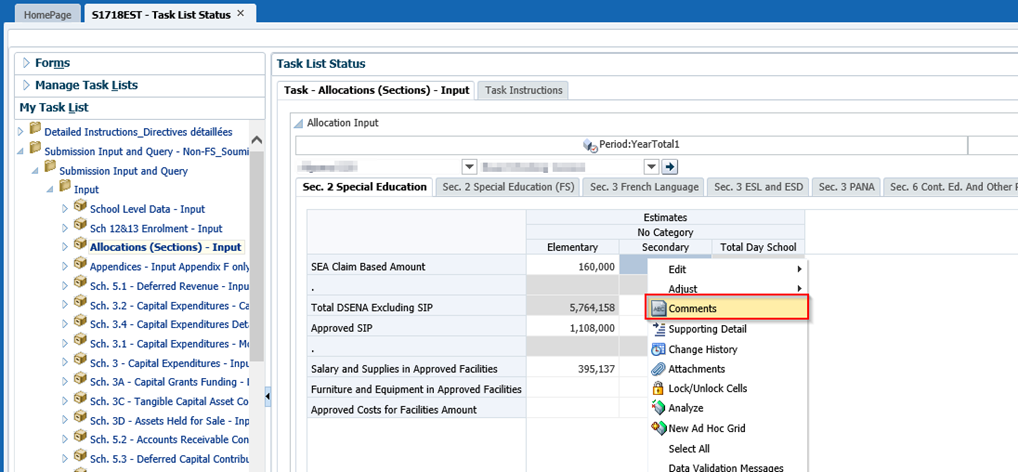
5.2.3 Comments
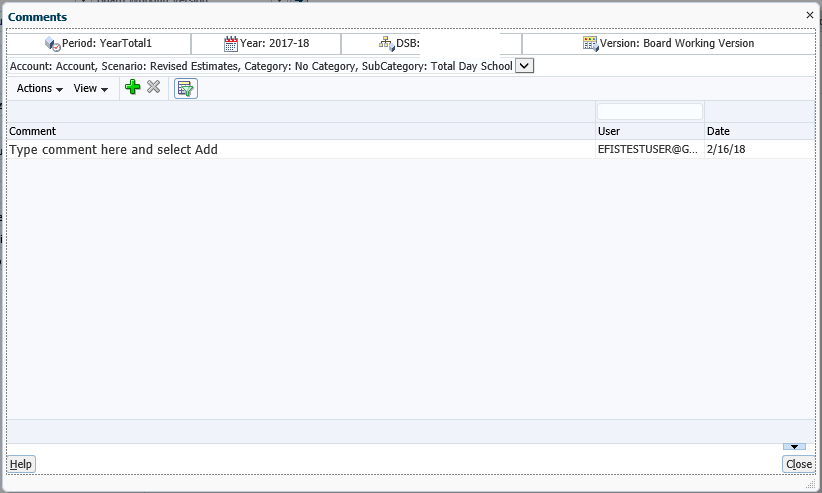
Users can attach a comment to a cell by right clicking on the cell and selecting Comments.
In the comment box that is displayed select either the  or
Actions → Add to enter a comment
or
Actions → Add to enter a comment
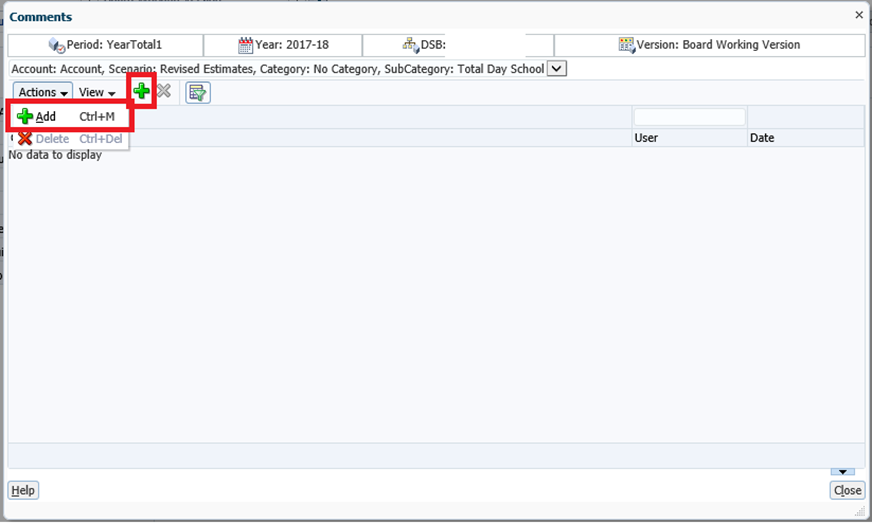
When the Comments window opens enter the comment and select Add.
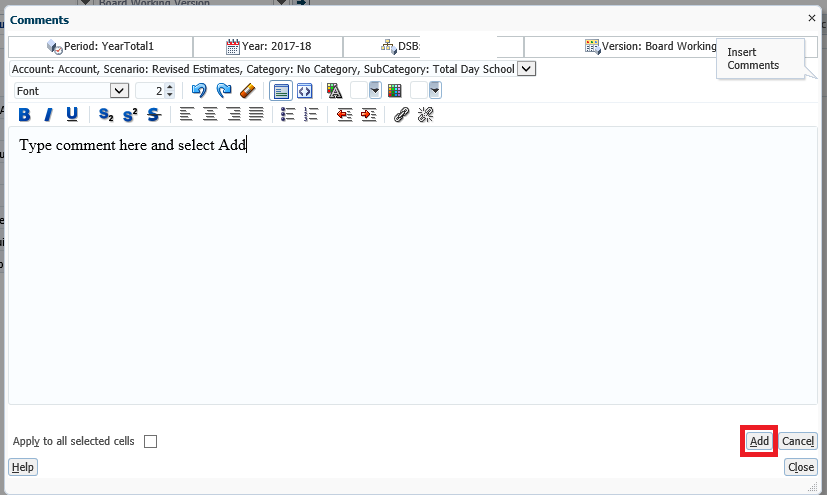
Comments are saved with the user name and date. Comments cannot be edited once they have been saved.
To remove a comment select the comment then either the  or Actions →Delete
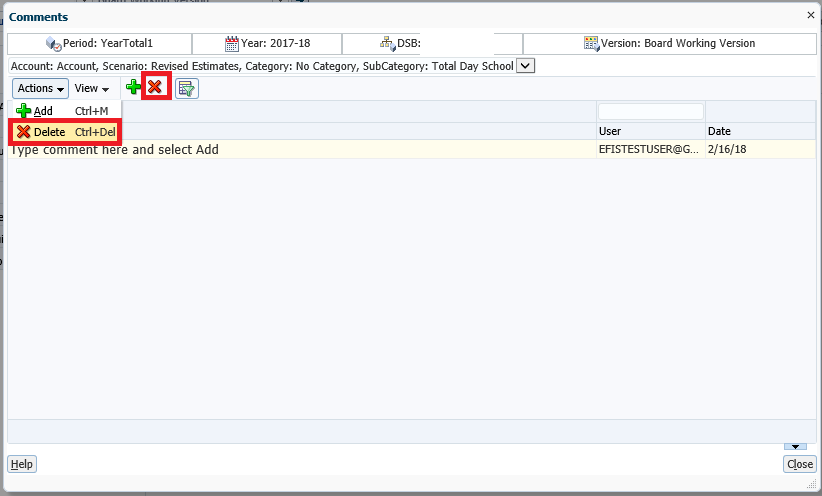
Cells that have comments will have a triangle in the top left corner of the cell.
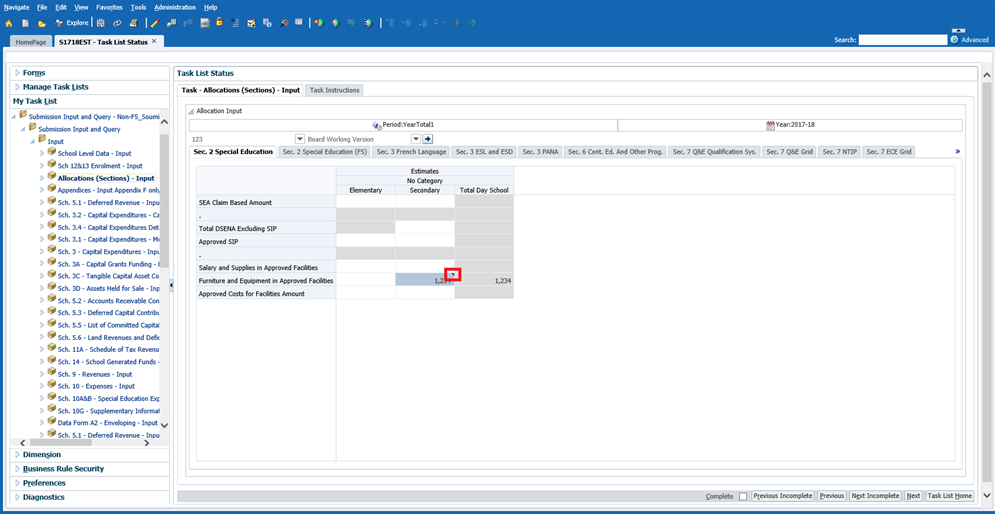
5.2.4 Supporting Details
The user can add supporting details to an input cell by right clicking on the cell and selecting Supporting Detail.
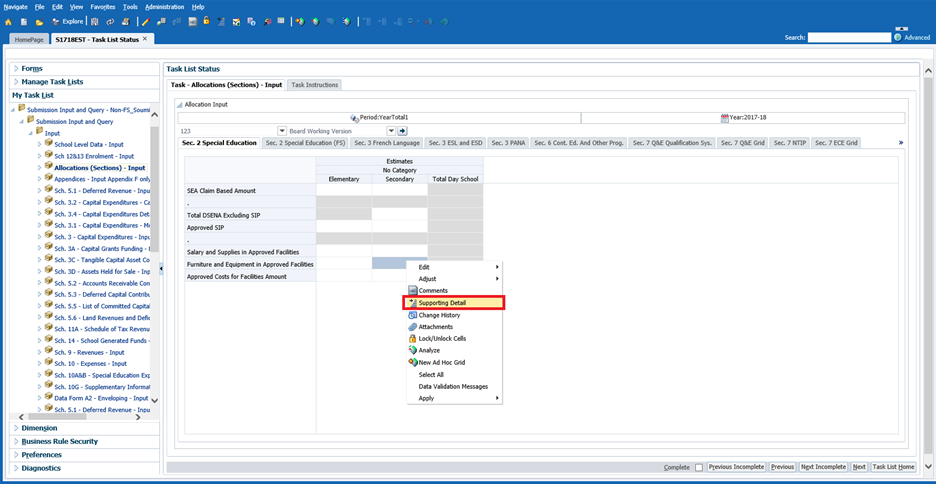
To enter data select Action → Add Child or Add Sibling depending on how the user wants to display the information.
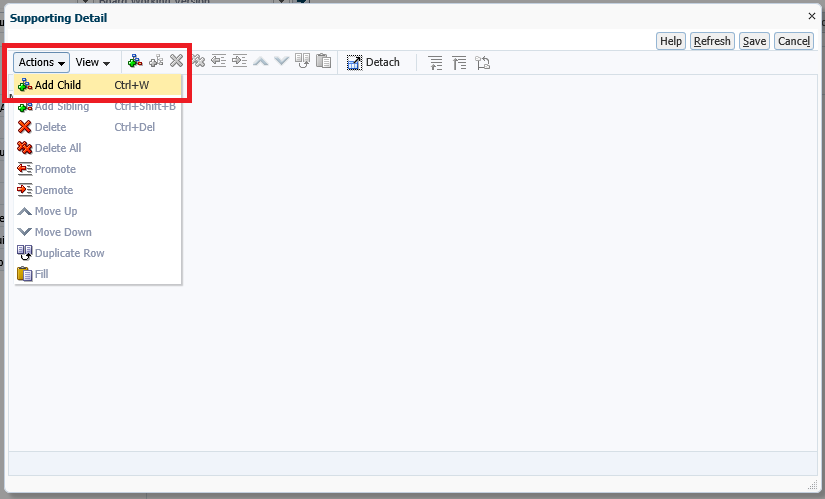
The example below shows how the user can provide the detailed split between Equipment and Furniture. Enter the detailed amounts and labels and select Save.
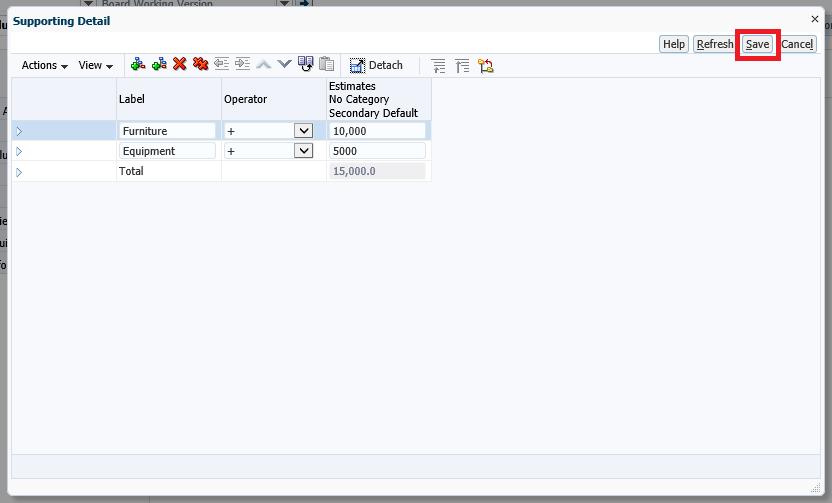
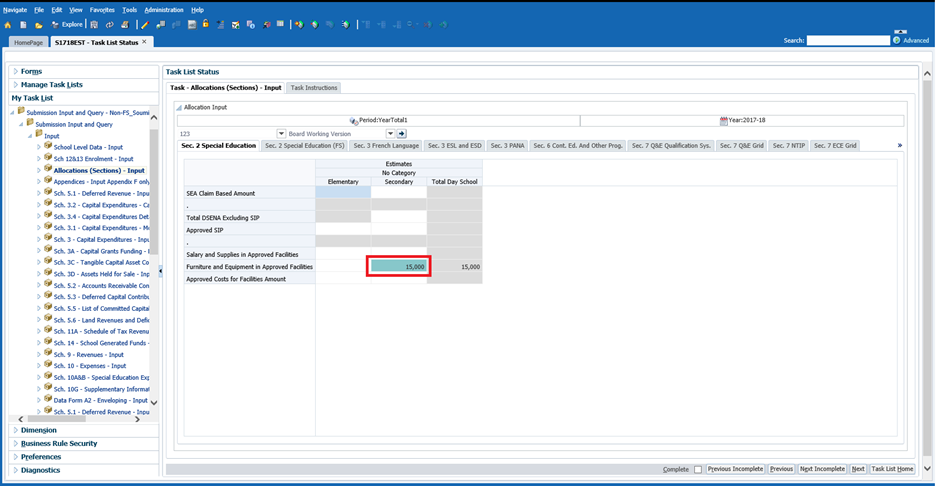
The total of the supporting details will be calculated and stored in the cell. The colour of the cell will change to dark blue to indicate that there is supporting detail.
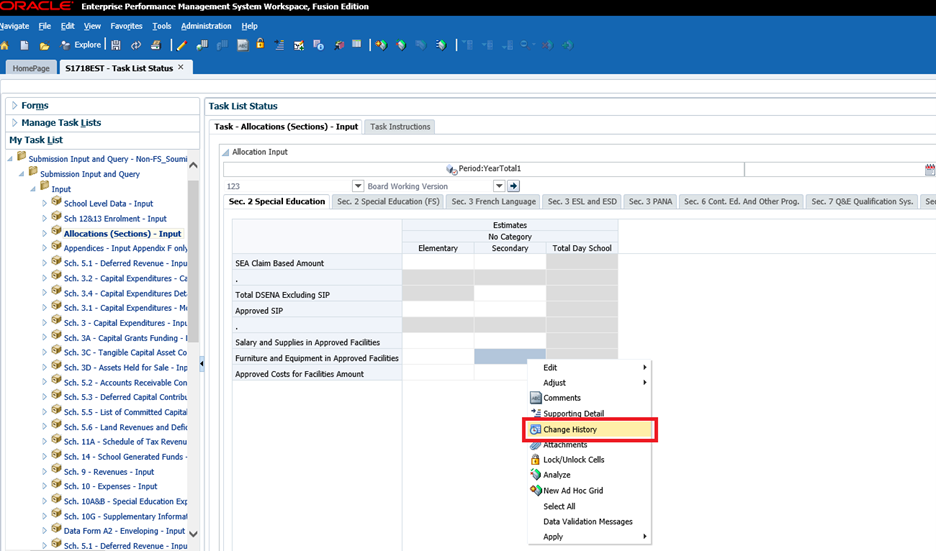
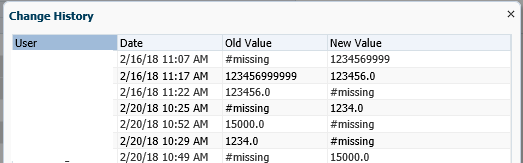
5.2.5 Show Change History
Each time the value in a cell is changed a record on the changes is kept in the database. To access the list of changes right clicking on the cell and selecting Change History.
The Change History screen will be displayed and identifies that user, the date, and the values that were changed.
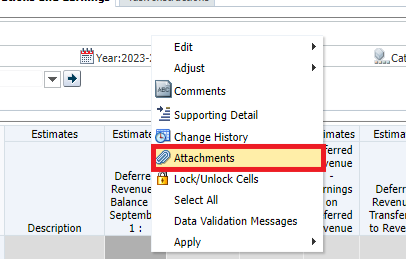
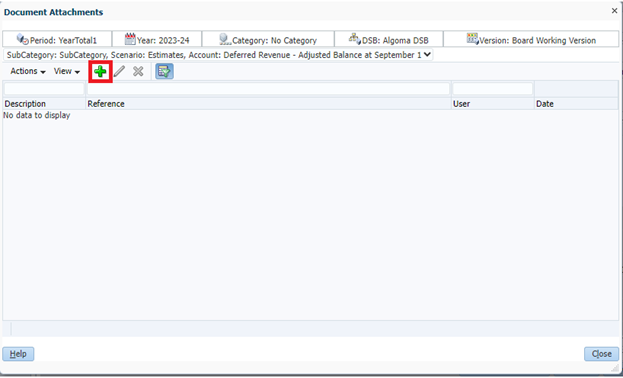
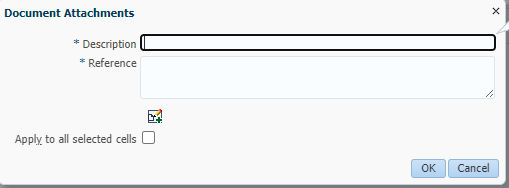
5.2.6 Attachments
Users have the option to add/edit documents or descriptions attached to an individual cell by clicking on the green plus sign and adding descriptions/references where they see fit.
5.2.7 Lock/Unlock Cells
Users have the option to lock cells to avoid inadvertently editing the values within. This is a toggle option, meaning that the same button should be clicked again to unlock the newly locked cell.
5.3 Reports
Introduction
Reports provide the user with the results of each of the sections in a report format. Users can access individual reports or a Report book that contains all reports.
Tip!
In order to simplify the reports process, users need to perform a simple one-time Preference set-up at the start of each new cycle. Please refer to Section 3.1 for detailed instructions.
5.3.1 Running a Report
To run a report the user selects the report from the Task List.
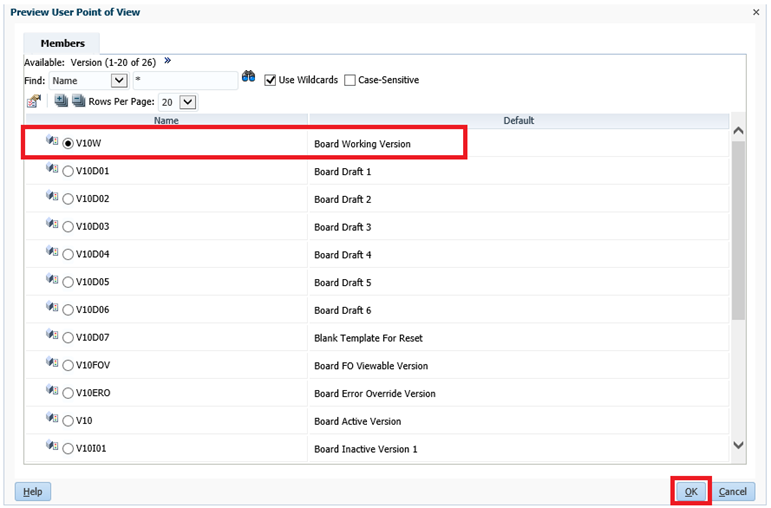
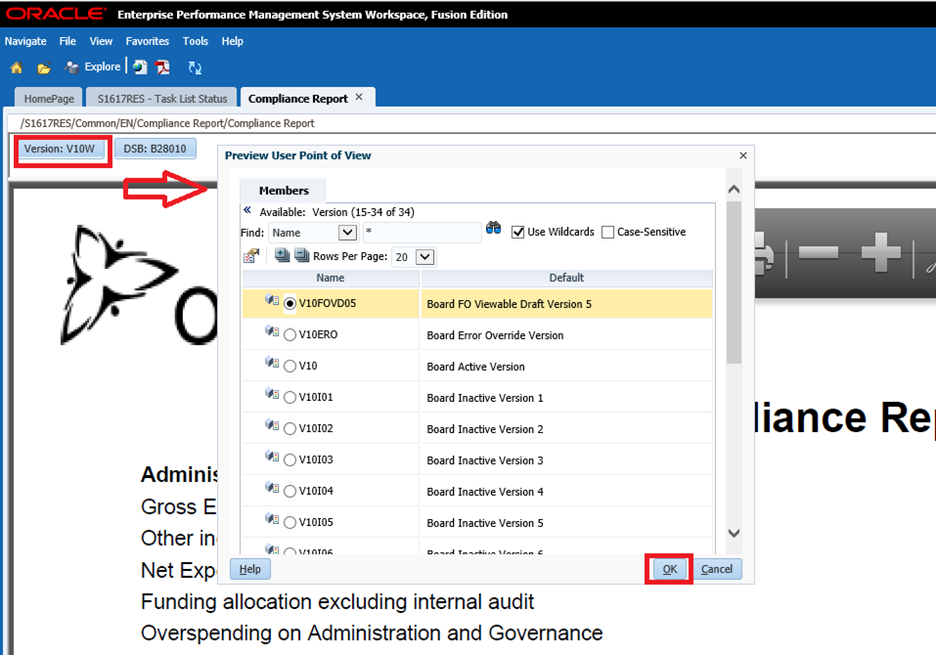
The Preview User Point of View screen will be displayed. The first time reports are run each cycle the user must select a version and the DSB, This will become the default setting until the user changes the Version. If an error message is displayed prior to the POV screen check that the settings in Section 3.1 have been applied.
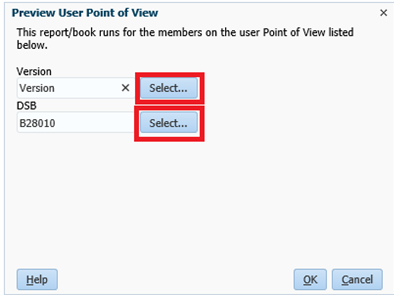
To select the Version click the Select button beside Version to open the version selection screen, select the version then OK.
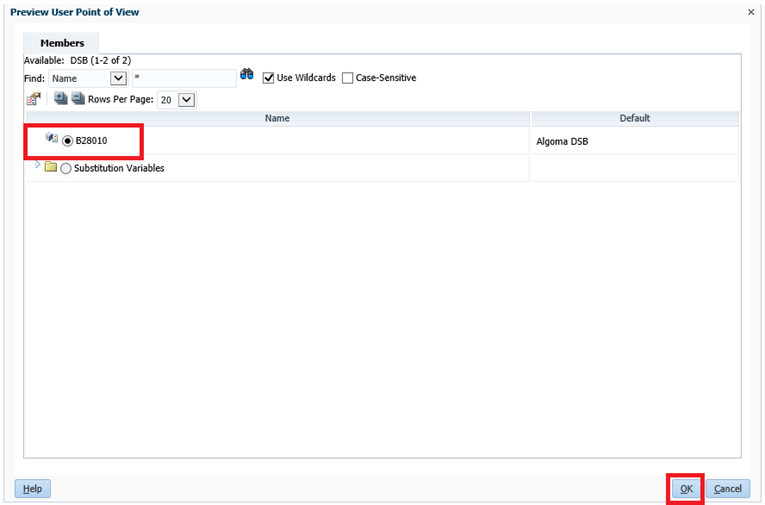
To select the DSB click the Select button beside DSB to open the DSB selection screen, select the DSB then OK.
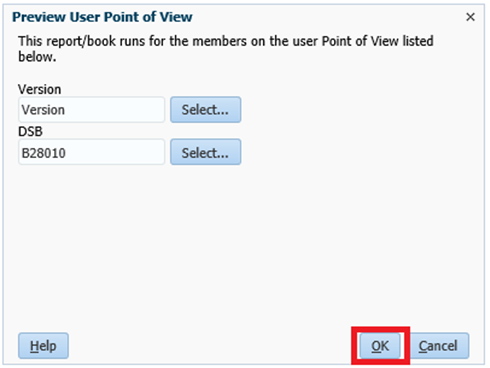
The POV screen will now have a version and the DSB selected. Select OK to run the report.
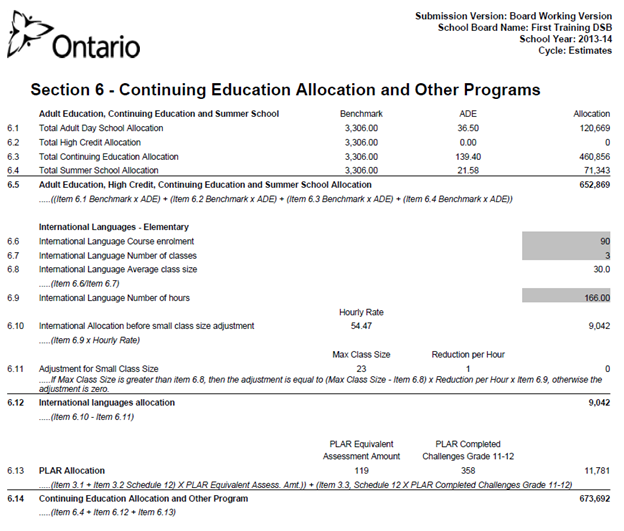
The report will generate in PDF. The user can view, save or print. Reports will contain detail similar to the reports that were available in EFIS 1.0.
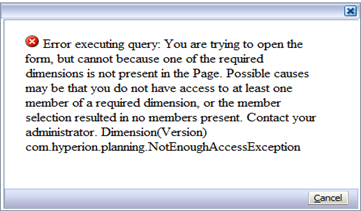
Tip!
If the error above occurs, check that correct values for Version and DSB have been selected.
To change the Version selection without regenerating the report, the user can select the Version screen by selecting the Version tab in the top left of side of the report Select the new version then select OK and the report will refresh with the new data.
5.3.2 Generating Report Books
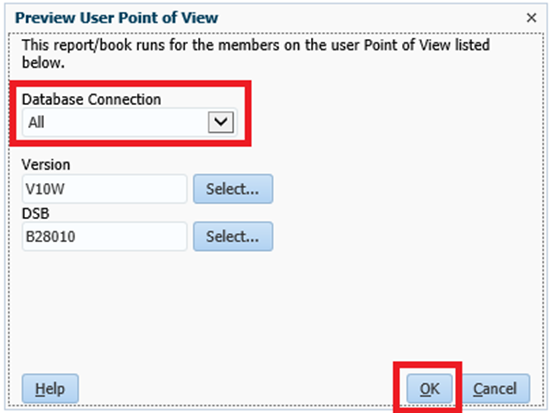
To generate a complete set of reports for all forms the user selects Reports → Report Book → 2013-14 School Board Submission – Estimates (or the cycle you are running your report on)
The Preview User Point of View dialog will appear. Select the Version that is to be run. In the Database Connection ensure All is selected and then select OK to generate the Report Book.
Tip!
When creating the Report Book, your planning screen will go blank for some time until the report is created. During this time you can perform some other tasks in the Planning until your report is created.
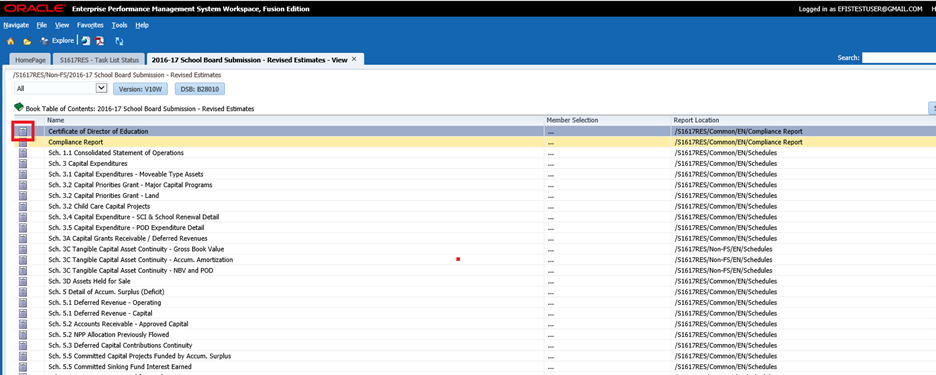
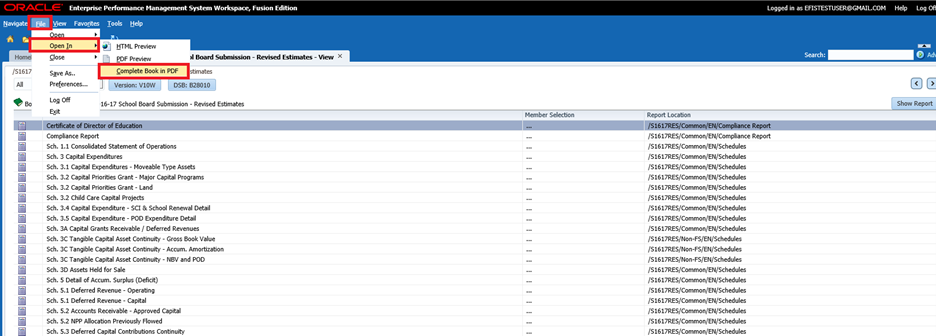
The report will return the Table of Contents; the user can open a single report by selecting the ICON to the left of the report or open the complete report by selecting File → Open In → Complete Book in PDF
Report will be generated in PDF.

5.3.3 Opening a report in Excel
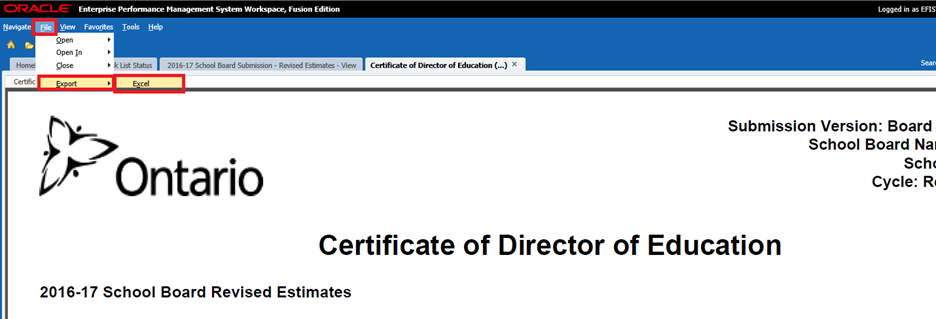
Reports that have been generated in PDF can also be exported and saved in Excel format. To export a report to Excel select File → Export → Excel
The report will begin to download. Open it in Excel once it’s finished by clicking on the file.
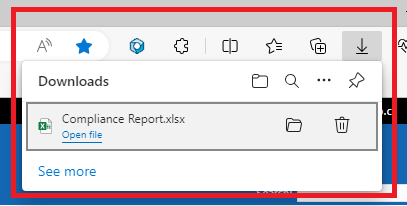
Report will be exported to Excel.

5.4 Results
5.4.1 Viewing Results in a Form
To access and view the result forms, select the Results folder in the Task bar. Results are grouped into following areas: Compliance Report, School Level Data, Schedules, Allocations (Sections), Data Forms, Appendices, Errors & Warnings and Data Analysis & Review.
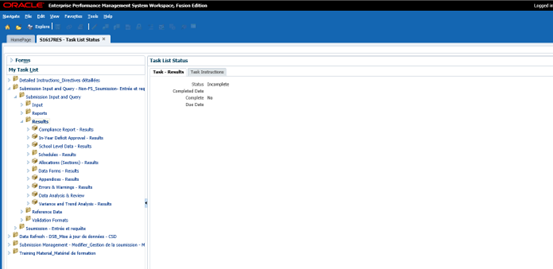
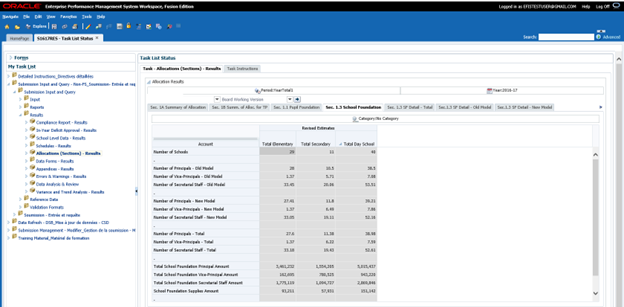
Select a form to view the results. Below is an example of the Allocation (Sections) Results form. Similar to the Allocations Input form, all allocations has been combined into one form with multiple tabs. Both Board Level and School Level results are available for review.
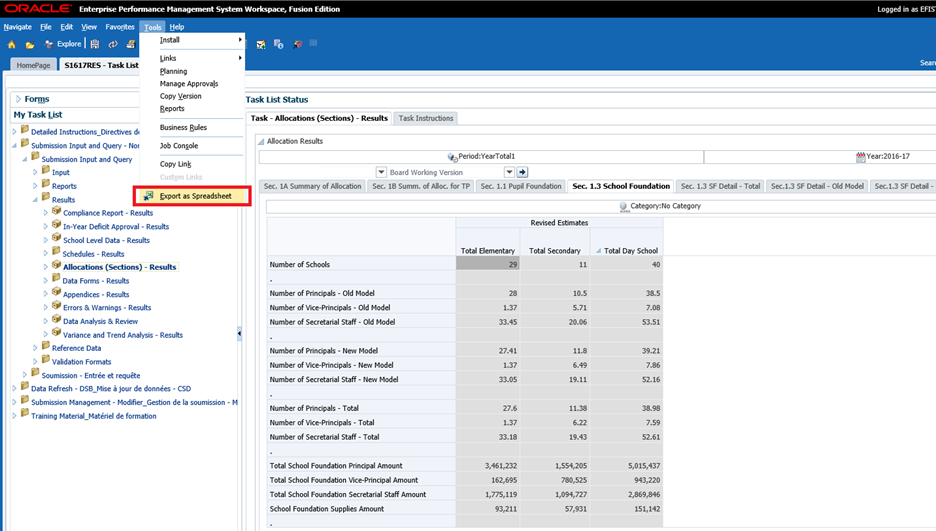
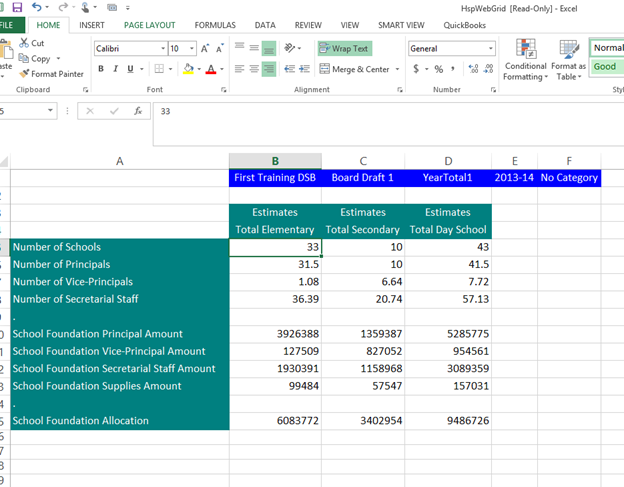
5.4.2 Viewing Results in Excel
Results forms can also be viewed and saved in Excel. To open a Results form in Excel select Tools → Export as Spreadsheet
Select Open with or Save
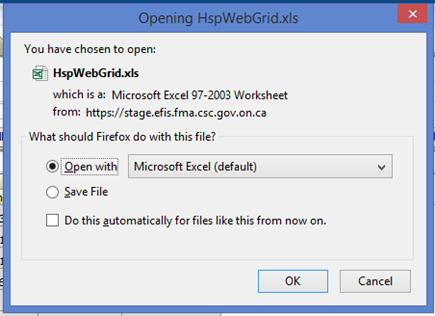
Results Form will open in Excel.
5.5 Reference Data
In EFIS 2.0 users are able to view Table amounts and Benchmarks related to their school board in one place. Table amount and Benchmarks are grouped under Reference Data. School Boards will be able to view changes to reference data as well.
All Benchmarks & Table Amounts data has been consolidated into one form with multiple tabs.
Information included on this form includes:

- Generic Benchmarks
- ESL and PANA Weighted factors
- Teacher Qualification Category
- Notional Shares – Elementary
- Notional Shares – Secondary
- Table Amounts
- Approved Amounts
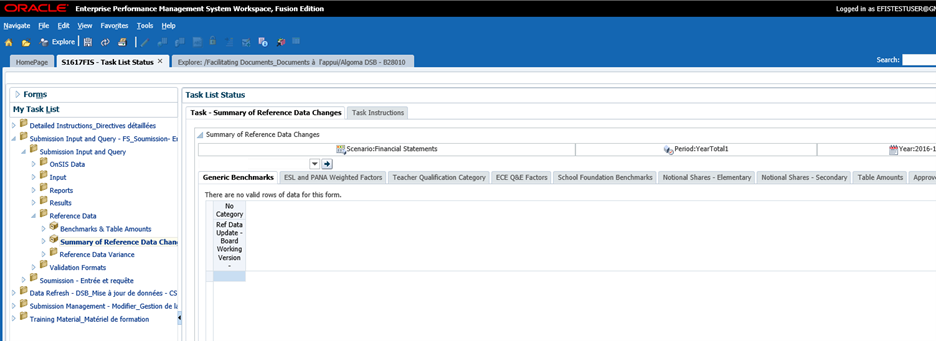
During a reporting cycle Reference data (Benchmarks, Table Amounts) may change. EFIS 2.0 has added a set of forms to allow the user to view changes to Benchmarks and Table Amounts. There are 3 forms in the Reference Data Versioning folder and a report.
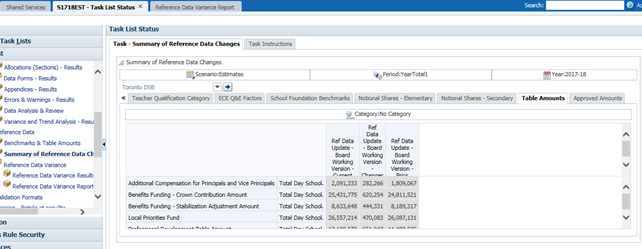
During a cycle changes may occur that affect the Reference Data. To provide the users with information about what has changed the Summary of Reference Data Changes form is available and displays changes that have been made to specific reference data.
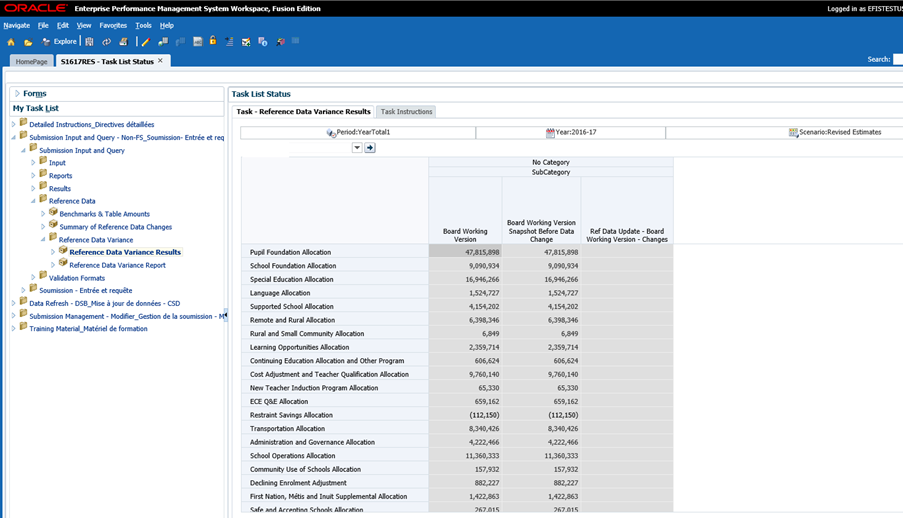
To view the impact of changes on the boards Allocations a Reference Data Variance Results form and the corresponding report are available. To view the changes in a form select Reference Data Variance Results. To view, save or print a report in a PDF select the Reference Data Variance Report.
Smart View
6.1 Smart View User Set Up
Introduction
The Smart View is an Excel add-on that allows user to enter data into EFIS 2.0. Web forms or Smart view have same functionality. In order to use Smart View (add-in for Oracle Hyperion EPM products), the add-in needs to be installed on users workstation. Please refer to EFIS 2.0 – User Set Up Guide for detailed instructions.
6.1.1 Setting up the Connection
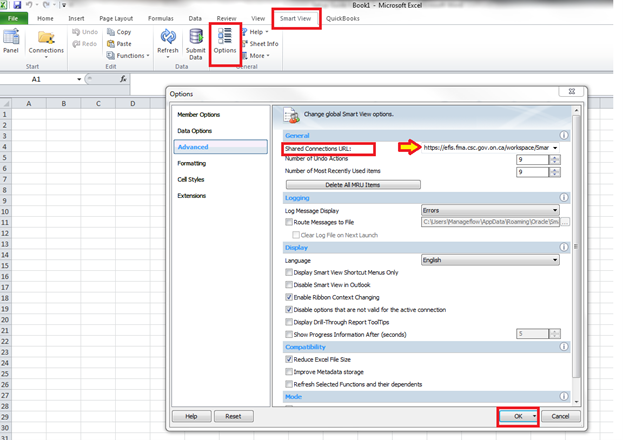
In Smart View, go to Options, Click on Advanced and specify the shared Connections URL, then select OK.
https://efis.fma.csc.gov.on.ca/workspace/SmartViewProviders
6.1.2 Setting Up Smart View Options
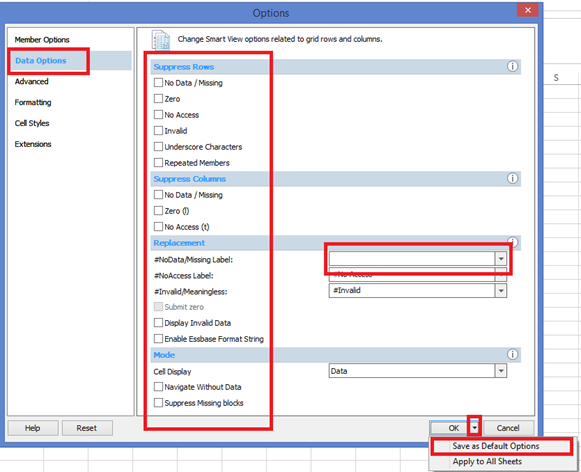
6.1.2.1 Data Options
In Smart View, go to Options, Click on Data Options. Check to make sure that no boxes are checked, clear the #NoData/Missing Label: to be blank, select the arrow on the right of the OK button and select Save as Default Options.
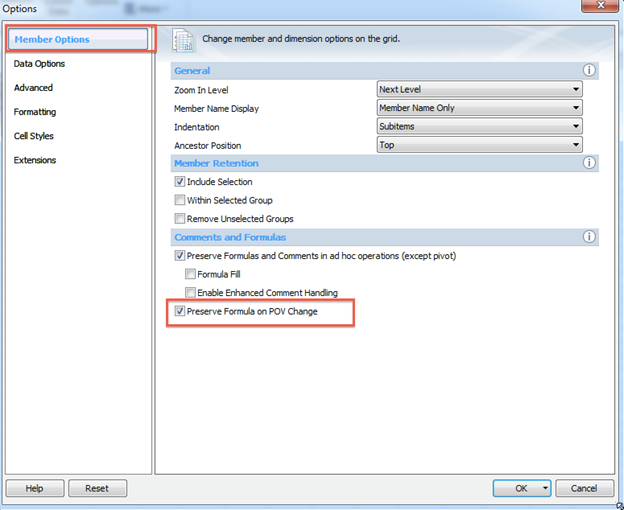
6.1.2.2 Member Options
To retain formulas that have been added to a Smart View form when moving between versions, it is recommended that the Preserve Formula on POV Change is checked.
6.1.2.3 Formatting
In order to format columns and rows user needs to set the formatting as per below example:
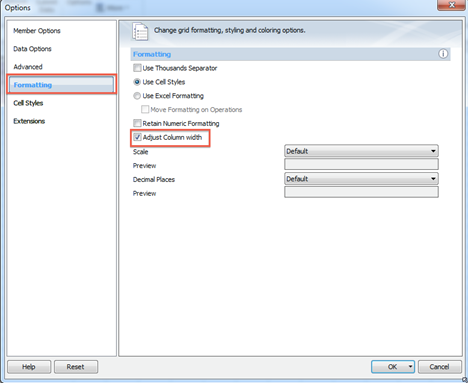
Select the arrow on the right of the OK button and select Save as Default Options.
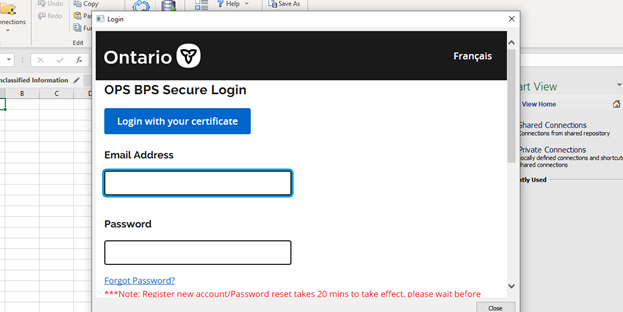
6.1.3 Connecting Smart View to Database
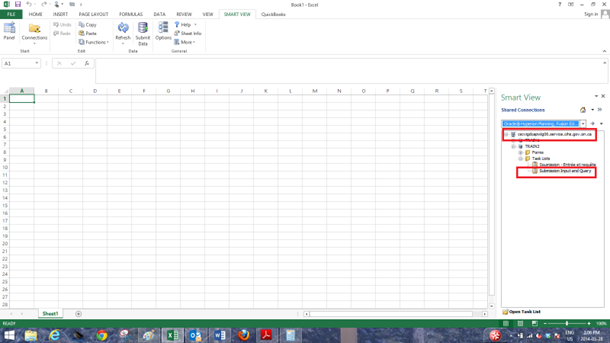
To access forms in the Smart View open a new session of Excel and click on Smart View tab at the top of the Excel ribbon. Select Panel and Shared Connections. The login screen will be displayed, enter your email address and password and select Sign In.
To navigate to the Task List to access forms select Oracle Hyperion Planning Fusion Edition from the Shared Connections drop down list:

Expand the Database, expand the Application to access (i.e. Train2), expand the Task List, and then double click on the Task List to display tasks.
The Task List is displayed and forms can be accessed by expanding the Task List. Reports cannot be run from within Smart View. The user must return the Planning Application to generate reports.
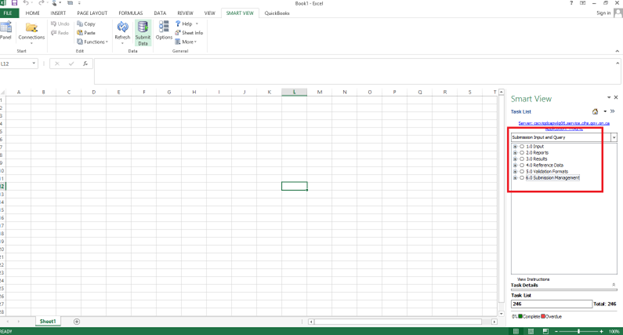
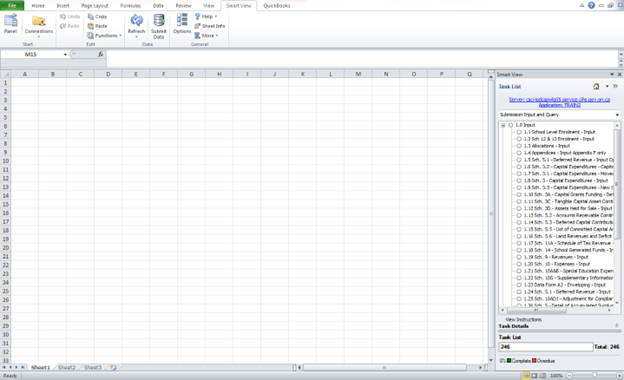
Example of expanded Task List:
6.1.4 Alternative way to open Smart View form via planning application
In the planning application user can open the form directly into the Smart View.
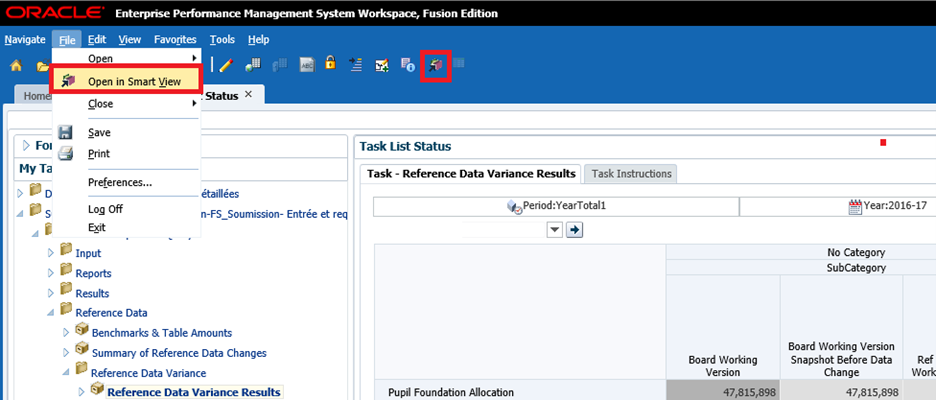
To do so, user needs to be in the form that wants to export in the Smart View. Next step is to click on
File → Open in Smart View, or user can click on the toolbar icon for Smart View
![]()
Tip!
When opening Smart View via planning, security settings can force browser to display the question if you want to proceed with opening. In the Firefox click Continue. Also see the Appendix A to see some additional settings in Firefox.
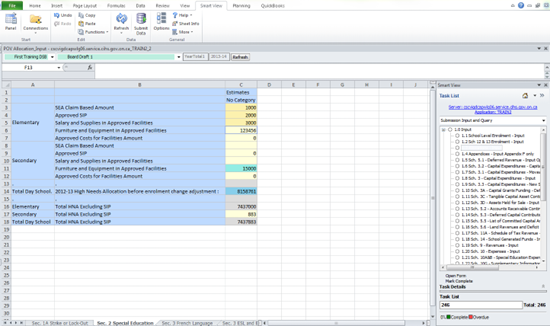
6.2 Data Input
Select the form from the Task List and enter data. The system highlights input values in yellow until they are saved to the database.
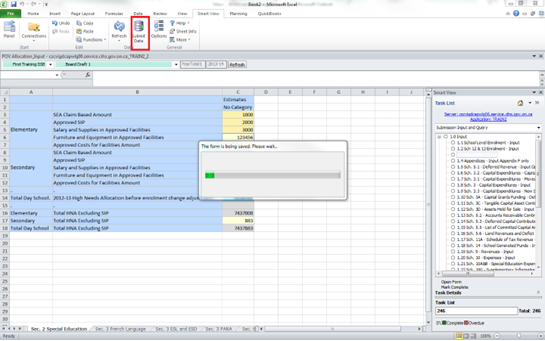
Select Submit Data icon and a saving message screen is displayed.
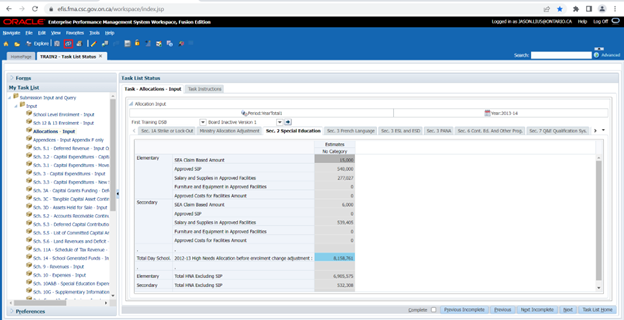
To see the saved data in a Web Form, open the same allocation in Web Form. If the Web Form is already open select the Refresh button.
If a user tries to enter data into gray cell following message is displayed:
6.3 Input data validation
Data validation for Smart View work the same way as for Web forms. The cells in red are the cells with incorrect data. Cells that have invalid data will be listed on the bottom right panel.
6.4 Advanced Smart View Functionality
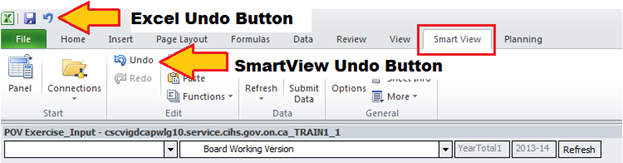
To undo data entry in Smart View, the undo button in the Smart View ribbon must be used, the Excel menu undo button will not perform this function.
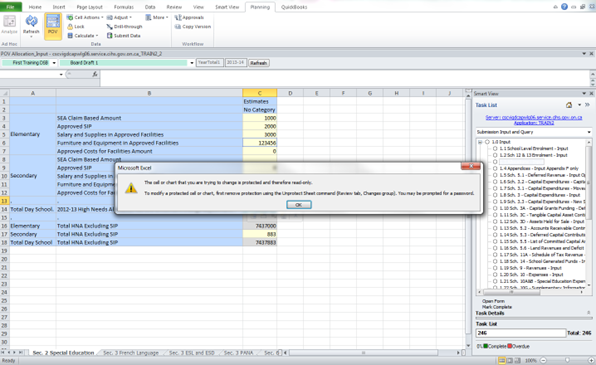
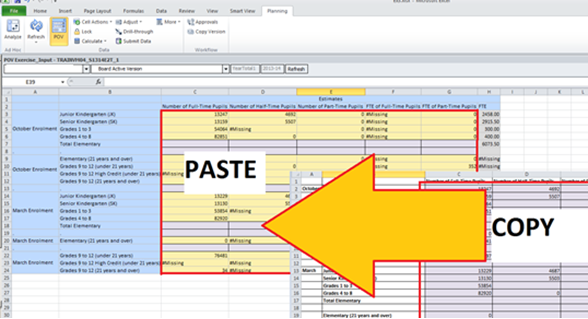
When attempting to paste a data grid without unprotecting the worksheet the following error will be displayed, to allow the data to be copied the user must select the Review- Unprotect Sheet button

Once the sheet is unprotected data in the form of a grid can be copied and pasted into the Smart View form.
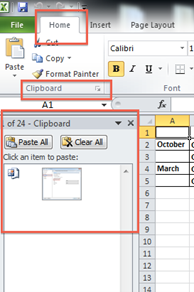
User can use Clipboard functionality to Copy/Paste. To turn on please click on the expand arrow.
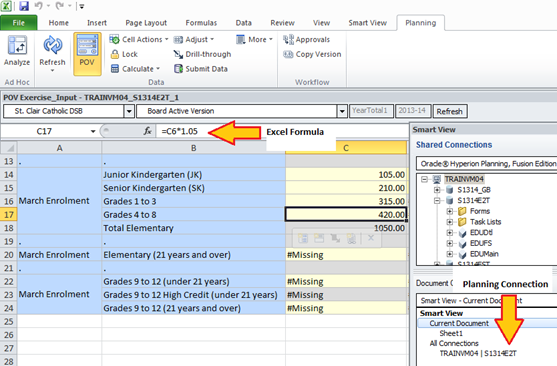
Formulas can be added to any input cell on a Smart View form.
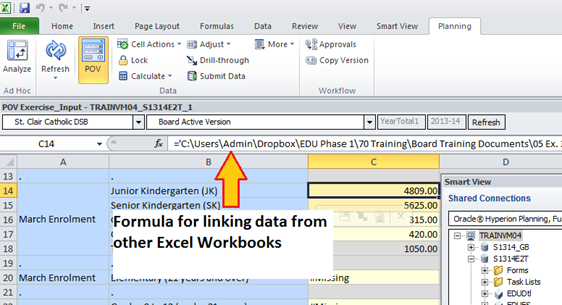
Data can be linked in from other Excel Workbooks.
Submission Management
7.1 Overview of Versions
Introduction
Submission management allows board users to manage the versions or submissions that they are working on. The tools provided give the user the ability to copy data between versions (such as the working version and the drafts) and to promote the version for review as needed (using the Workflow / Approvals Management process). The chart below lists all versions:
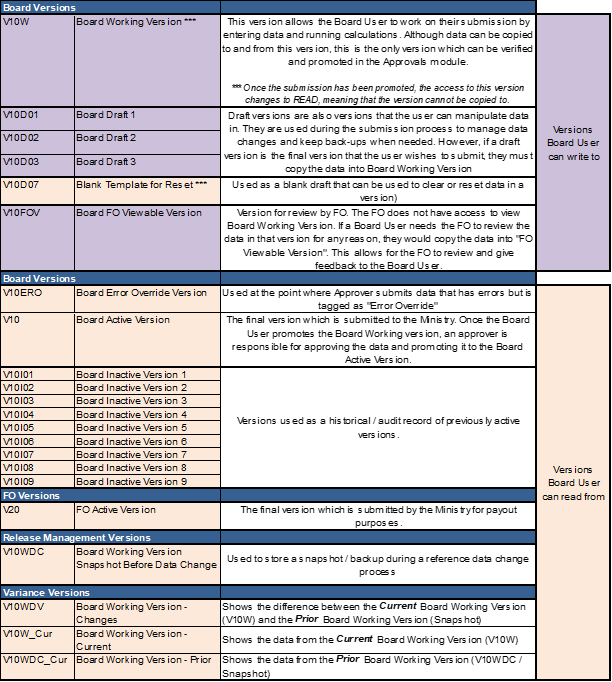
The user is able to write to all the versions in the list that are coloured purple. The data can then be copied from one version to another as need be (i.e. if the user wants to create a “backup” of a certain version they can copy it to a draft or when the user needs to push data into the FO Viewable version for an FO to review it). However, only the data in Board Working Version can be promoted during the approval process. When the user is ready to submit the data they must make sure that the correct data sits in Board Working Version. Any data management and movement are done by using the Copy Version process.
7.1.1 Copy Data Between Versions
Introduction
The Copy Version functionality can be used to copy data between different versions in the application. Some common uses of the Copy Version functionality are:
- Data Backup – i.e. copy data from Board Working Version into Board Draft 1 for backup
- What-if Analysis – i.e. copy data from Board Working Version into Board Draft 1, and make changes in Board Draft 1 to see how those changes affect the overall submission
- Copy data into FO Viewable – i.e. copy data from Board Working Version into FO Viewable Version in order for the Financial Officer / Financial Analyst to review the data
Note: Version copy is NOT a part of the Submission / Promotion / Activation process and should only be used in situations similar to ones described above.
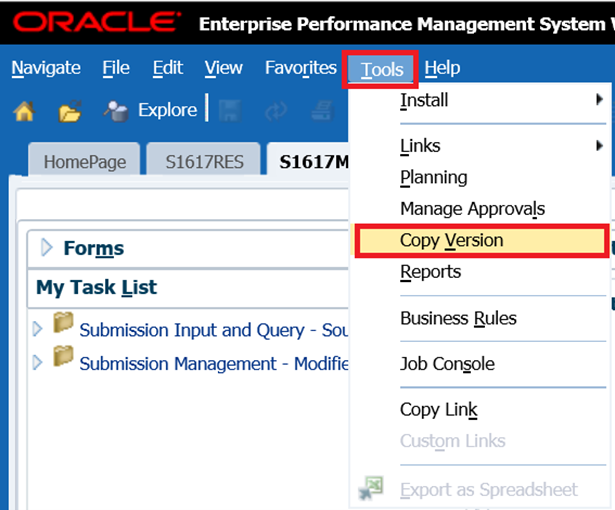
To copy data between versions, navigate to Tools → Copy Version
The following Copy Version screen is displayed:
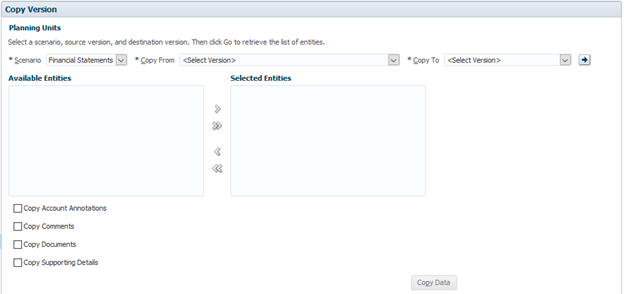
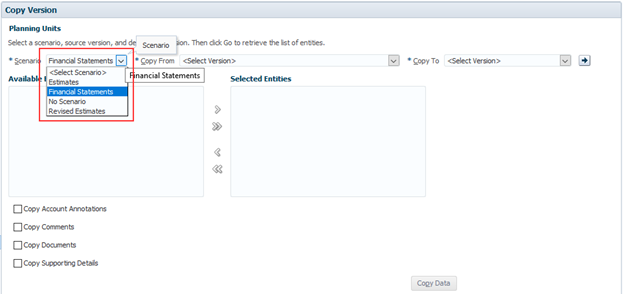
Select the Scenario related to the application (Cycle) the user is working in. (Although other cycles may be shown in the drop down box they are not applicable and nothing will be copied if one of them is selected).
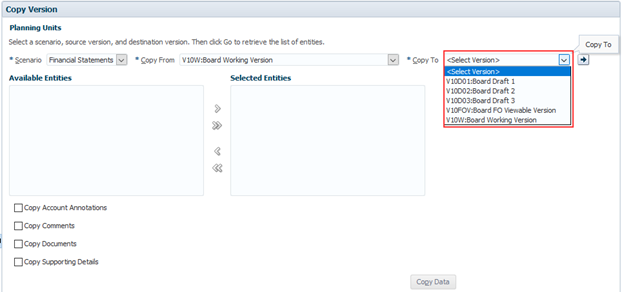
Select Copy From Version (Board User sees list of scenarios they have read access to):

Select Copy To Version (Board User sees list of scenarios they have write access to):
Click the GO ![]() button
button
Under Available Entities you will see the school board that user is responsible for.
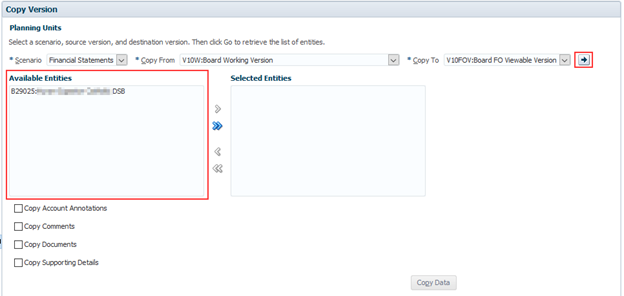
Select your school board and click the Move or Move All button to move the Entity into the Selected Entities box. Check off all of the options for copying additional information that has been attached to the version. Click the Copy Data button to run the copy process.
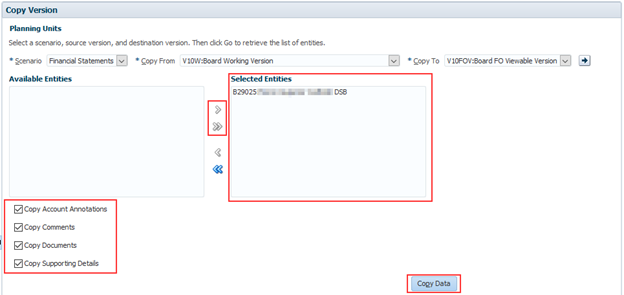
A window will pop up to confirm that the user wants to run the copy process and override all data in the “Selected Entities” for the “Copy To” version.
Please note: This process is not reversible and will cause ALL DATA in the “Copy To” version to be replaced with the data in the “Copy From” version.

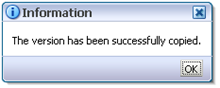
Once the process completes a window will pop up to inform the user that the copy was successful.
7.1.1.1 Copy to FO Viewable
If a Board User wants the FO to preview data before submitting it, they have to copy a version into the FO Viewable Version. The reason for this is that the FO does not have access to any of the Board versions until they are set to active or FO Viewable. This would be done using the Copy Version process.
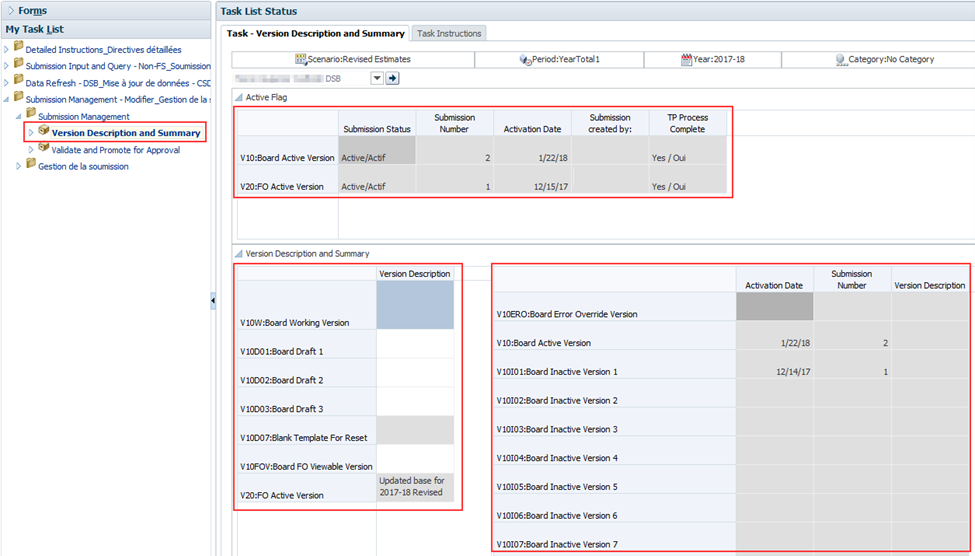
7.1.2 Version Description and Summary Dashboard in the task list
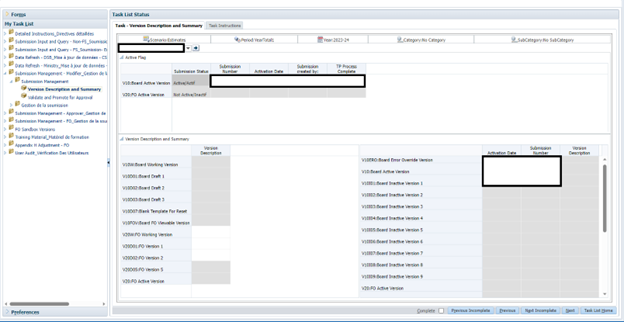
The Version Description and Summary – Submission Dashboard allows users to keep track of the versions they are working with. It is a place that allows the user to see the current status of their submission (whether it is active or not) as well as the status of the FO Version updated by ministry staff. It also allows users to add descriptions to each of the versions available. This way the user can know where their data currently sits and can easily work on promoting the correct data as part of the Sign-off and Approvals process. The right hand panel shows the history of the versions that were activated over time. Every time a new version is activated, the former Active version is copied into the next Inactive Version.
7.2 Approvals Process – Board Modifier
Introduction
The Submission Management task list is used to manage sign-off and approvals as the cycle moves along. Board users would use the Input task lists to enter all necessary data and calculate the submission. Once the submission is ready for final validation and promotion, they would enter the Submission Management task list and run through a number of steps to promote the submission.
As mentioned before, the data which is ready to be validated or promoted must be stored in the Board Working Version (the Version Copy process outlines this in more detail). It is recommended that the user first review and address any Errors and Warnings and Input Validation errors prior to beginning the Sign-off and Approvals process.
The validation and promotion functionality is done by running the following steps:
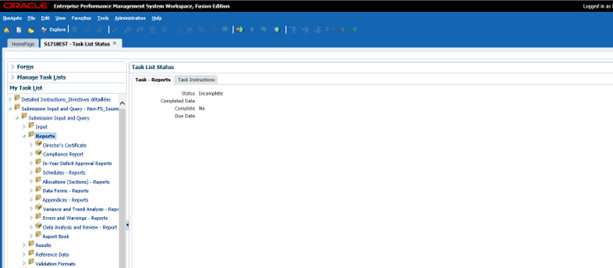
7.2.1 Validate Submission
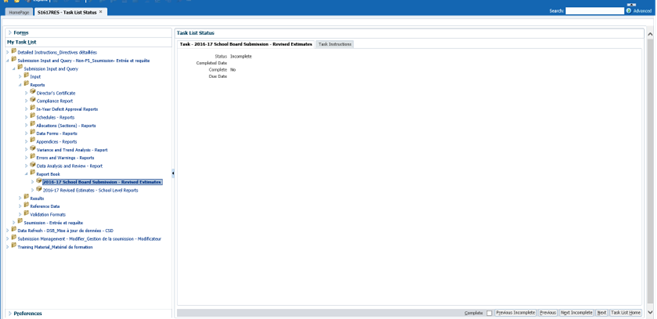
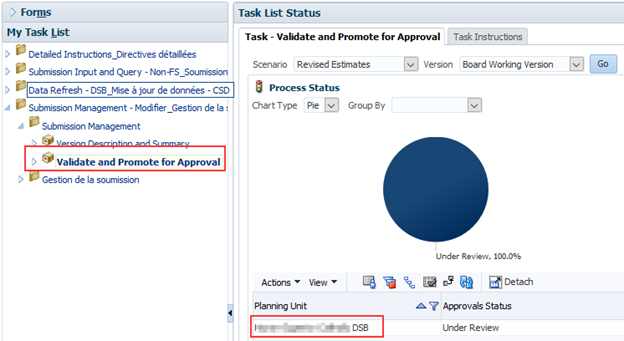
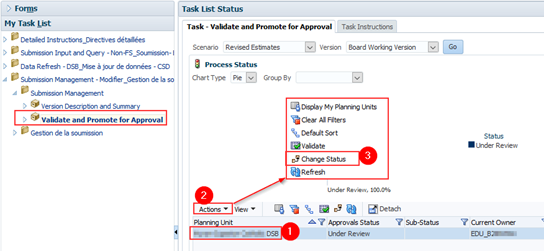
Select Submission Management - Modifier → Submission Management and open the Validate and Promote for Approval task
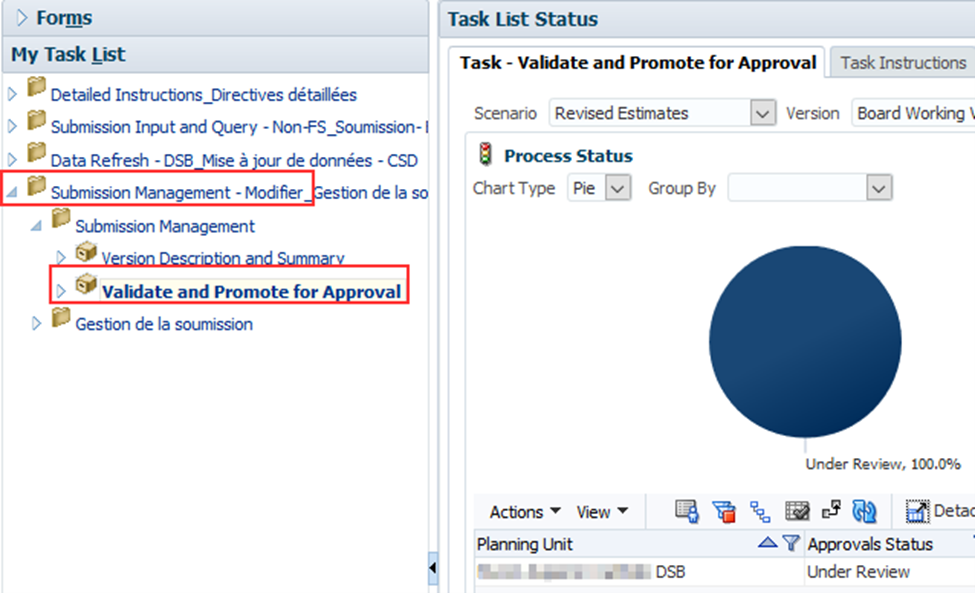
Select the your DSB shown under Planning unit and click on Actions → Validate
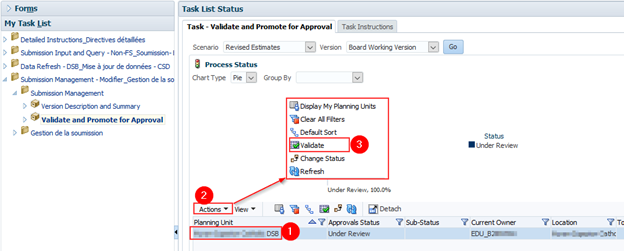
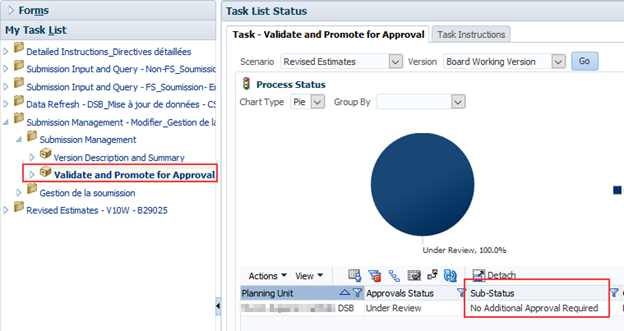
As the validation process takes a few moments you can click on the Refresh button to refresh the process and see the results. If there are any errors found during the Validation process, the Sub-Status will be displayed as Invalid Data. When there are no more validation errors the Sub-Status will display No Additional Approval Required.
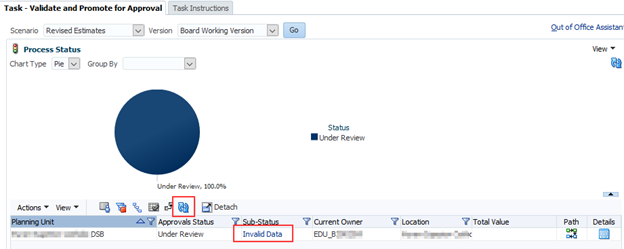
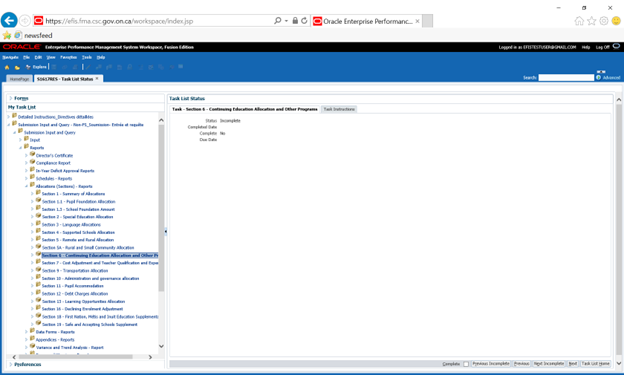
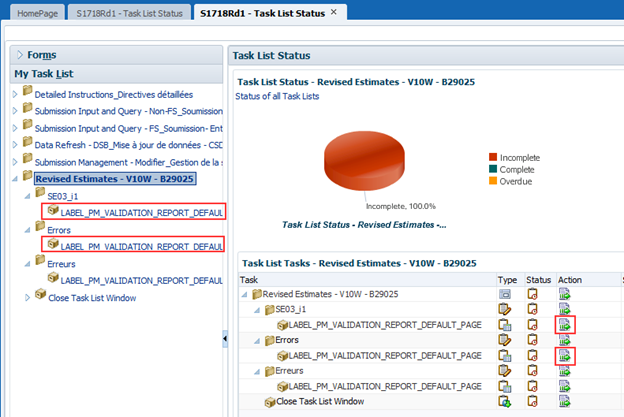
Select the Invalid Data Hyperlink and a new tab will open. In this tab a Task List will appear under My Task List and will outline all the forms that contain validation errors in them.
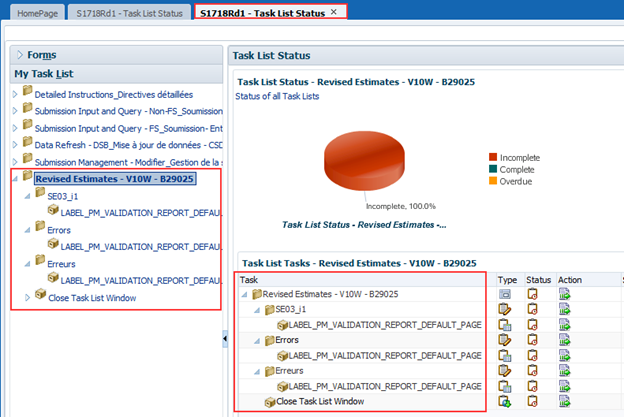
In the case shown here, the validation error appears in two different forms: Section 3 (i.e. SE03_i1) and the Errors page (i.e. Errors), which can be seen by the folder names highlighted.
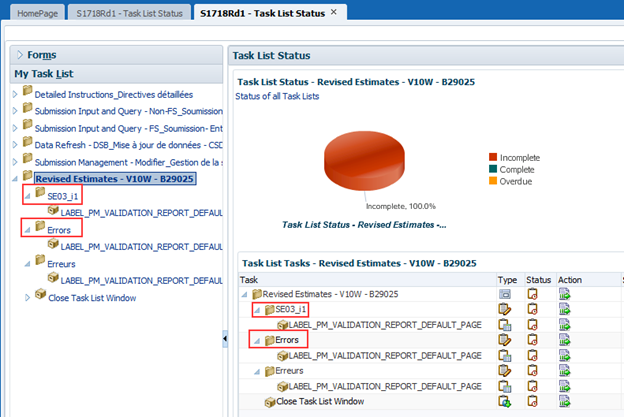
In order to open each of the web forms and see the validation error, follow the page link with the “task” icon (small cube), labelled LABEL_PM_VALIDATION_REPORT_DEFAULT_PAGE under each of the web form names. This can be done by clicking either the label from the left hand side in the task list or clicking the arrow under the Action column on the right hand side task lists, as shown below:
Opening the task in the Task list will take the user to the web form which contains the error that needs to be corrected. In the example below, the user is directed to the Section 3 input Form indicating there is an invalid input type error.
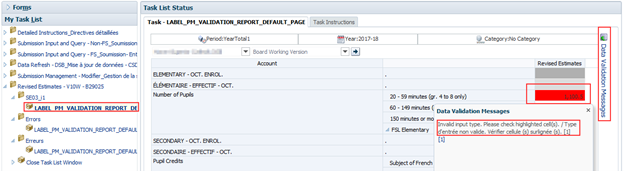
The user must locate and correct all validation errors before the Submission can be successfully promoted.
Once the validation errors have been corrected, the user can either rerun the Validation process to ensure they have not missed any errors or move directly to the Promote process.
When the Submission passes the validation, the sub status will be updated to No Additional Approval Required and the Error Task List will be removed. The submission is now ready to be Promoted.
7.2.2 Promote Submission
To promote the submission to the Board Approver select Submission Input and Query → Submission Management → Validate and Promote for Approval and select your DSB under the Planning Unit.
Once the DSB under planning Unit is selected select Actions → Change Status.
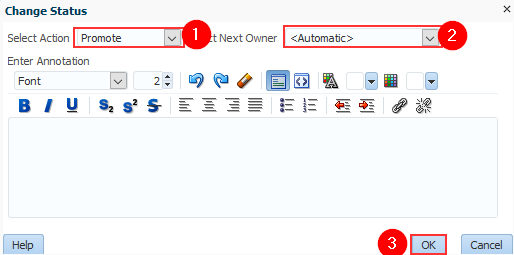
The Change Status screen will appear. Select Promote from the Select Action list and leave Select Next Owner as <Automatic>. Click OK.
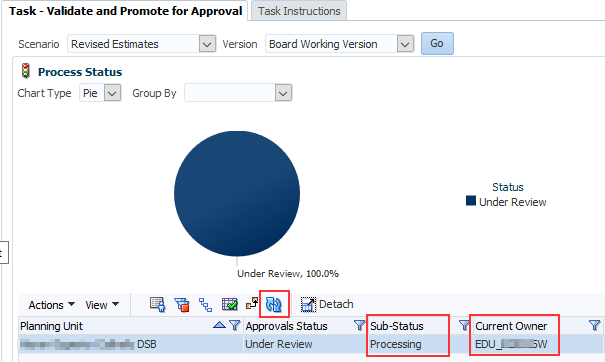
This will start the promotion process, which should take over one minute to complete. To get the updated status, make sure to refresh by selecting Action → Refresh or clicking the blue Refresh button. While processing, the Sub-Status will indicate Processing, and the Current Owner will be EDU_BxxxxxW (dependant on your board number)
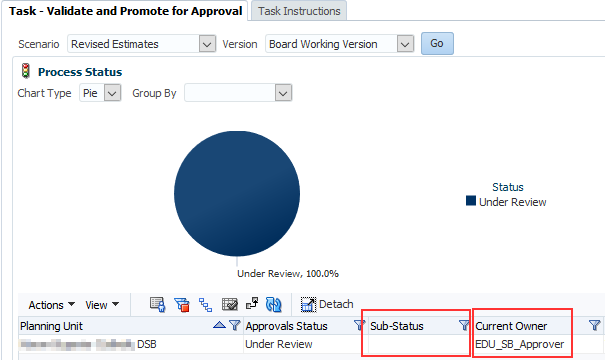
When the promotion process completes, the Sub-Status will become blank and the Current Owner will change to EDU_SB_Approver. The submission is now promoted to the Board Approver and the Board Working Version will now be changed to Read Only.
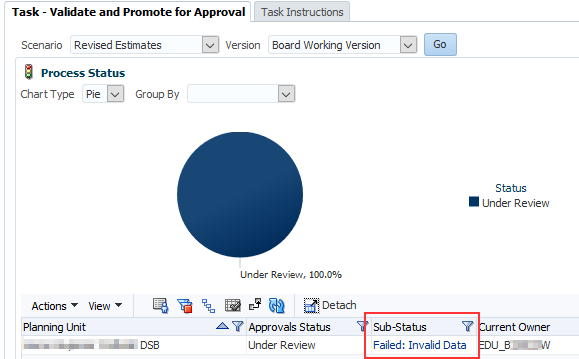
If a user attempts to promote a submission when there are validation errors the Sub-Status will be displayed as Failed: Invalid Data. The user will be required to correct the validation errors and then re-do the Promote process.
7.3 Manage Approvals – Board Approver
Introduction
Once a submission has been promoted by the Board Modifier, the Board Modifier no longer has write access to the Working Version and the next user in line is the Approver. The Approver is responsible for reviewing the submission and deciding how to proceed with it. The Approver has two choices: running the sign-off process on the submission or rejecting the submission. If the Approver decides to reject the submission, the submission is back in the hands of the Board Modifier.
Once approved, the data is automatically copied from the Board Working Version to the Board Active Version as well as the FO Working Version. At this point the status of the submission is set to “Active” and the FO is responsible for continuing the process.
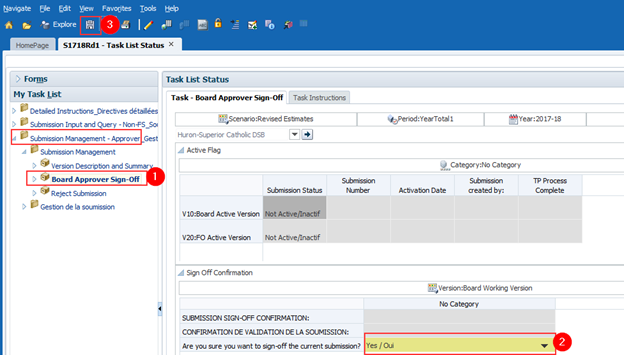
7.3.1 Approve and Sign-off
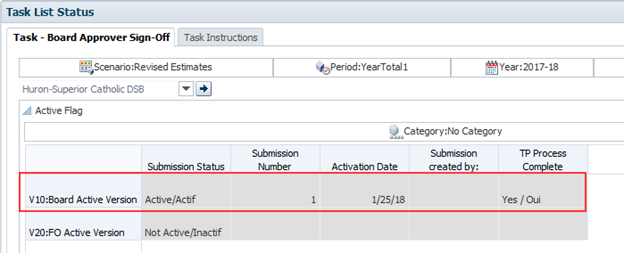
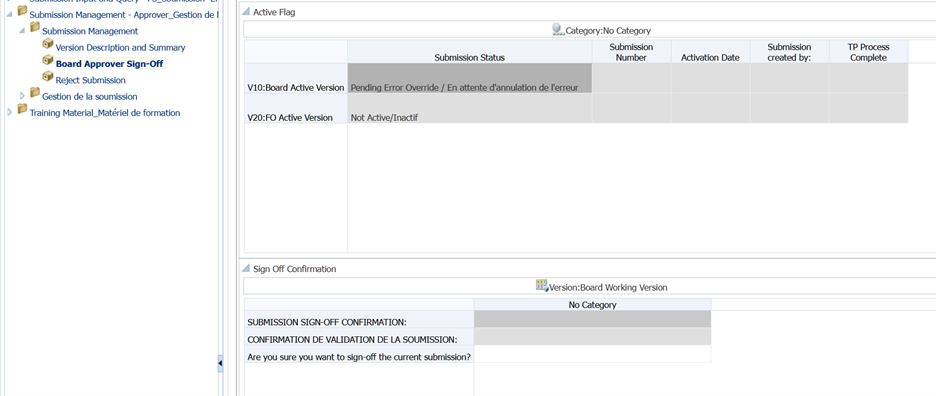
Select Submission Management - Approver → Board Approver Sign-Off. Within the form click the dropdown beside “Are you sure you want to sign-off the current submission?” and select Yes then click Save.

The status of the Submission will be changed to Active and the Activation date will be updated.
7.3.2 Reject and return submission to the Board Modifier
If the approver decides that the submission is not satisfactory and not ready for further sign-off, the approver can return the submission to the original owner (Board Modifier).
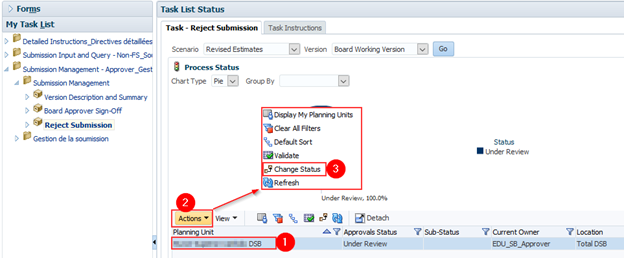
To reject a submission select Submission Management - Approver → Submission Management → Reject Submission

Once the DSB under planning Unit is selected select Actions → Change Status.
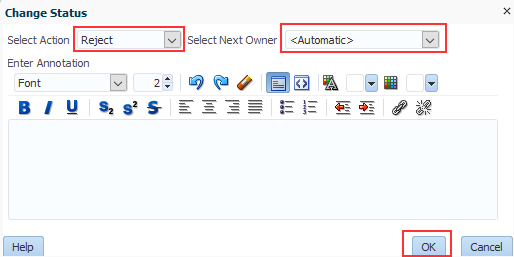
The Change Status screen will appear. Select Reject from the Select Action list, <Automatic> from the Select Next Owner list and click OK
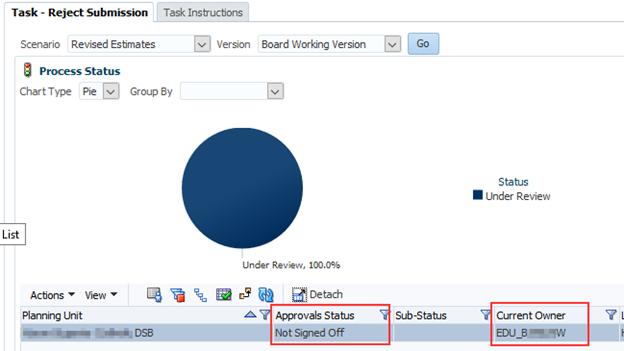
The Approvals status will change to Not Signed off. The Owner will revert back to the Board Modifier and Board Working version of the submission is no longer read only and changes can be made.
7.3.3 Submission with Error Override
Under special circumstances a Board may need to promote a Submission that contains errors. In these rare instances, the Board Modifier will set the Board Accepts Error Flag to Yes then follow the normal submission process. In this case the data is automatically copied from the Board Working Version into the Board Error Override Version. From the perspective of the Approver the process follows the exact same steps as outlined in the previous section for a submission containing no errors. After the sign-off by Approver, the data still sits in the School Board Error Override Version. At this point, additional steps will be required by Ministry personnel. The Ministry needs to confirm activation of submission with errors. Upon successful completion of this step, the data is copied from Board Error Override into Board Active Version and FO Working Version. Please note that once you have promoted the version with errors you need to contact the Ministry in order for them to perform the additional steps required.
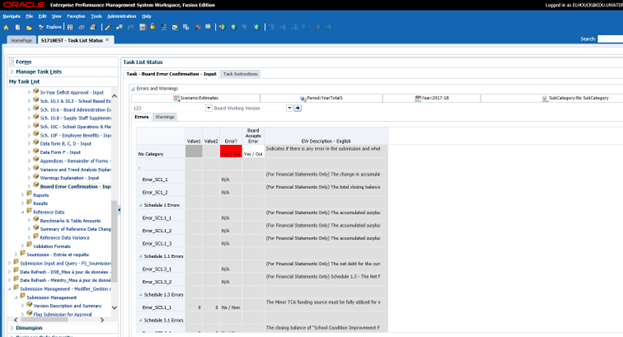
Select Submission Input and Query → Input → Board Error Confirmation – Input select Yes from the Board Accepts Error drop down list and select Save

The Board Accepts Error flag is set to Yes
Board Modifier follows the normal Promotion process.
The submission owner is now the Board Approver and the Board Working version is changed to read only.

Board Approver follows the normal sign-off process.
The Board Approver will receive the message that the Submission has been sent to the Administrator (Ministry) for error override and the submission status will become Pending Error Override.
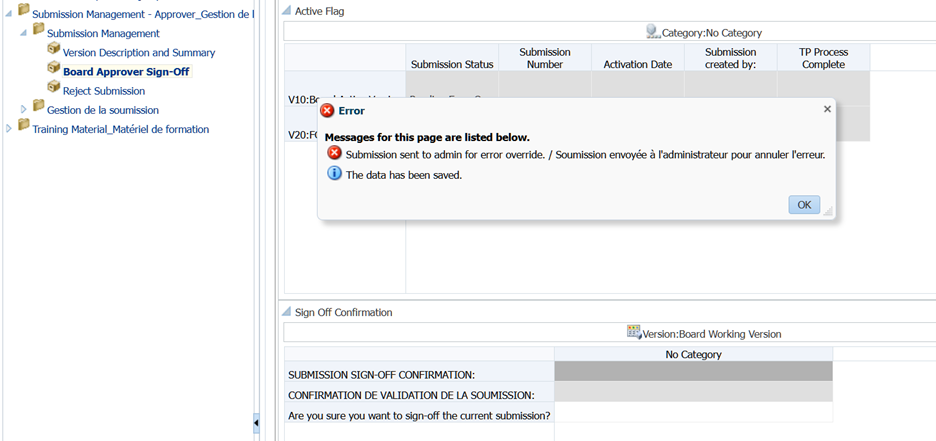
Board must contact the Ministry to initiate the over-ride approval.
7.3.4 Checking the Submission History
Users will be able to view the submission’s history as well as any annotations the Board Approver has made by selecting Validate and Promote for Approval and clicking the Details button.
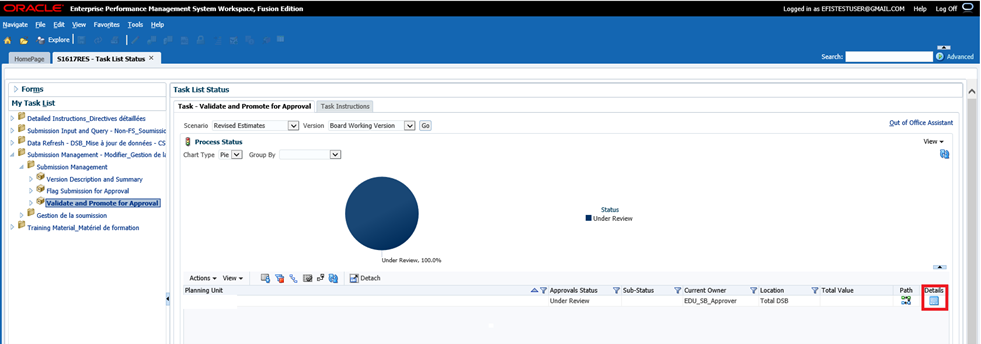
Status history and comments will be displayed, to view status changes collapse the pie chart by selecting the arrow in the right corner.
Facility Data Management
8.1 Process Overview
Facility data is loaded from SFIS at the start of the submission cycle to the Board Working and all Board Draft versions. During the cycle an hourly process is run to compare the facility data in SFIS to the facility data in EFIS 2.0. If differences are found in the facility data during the comparison process, the new facility data is loaded into the SFIS Data Management forms in EFIS 2.0 to allow the boards the ability to review and updated the data if required.
When a change is required to On The Ground Capacity (OTG) the changes will be first made in SFIS then the comparison process with update the SFIS Data Management form.
8.2 SFIS Data Management Form
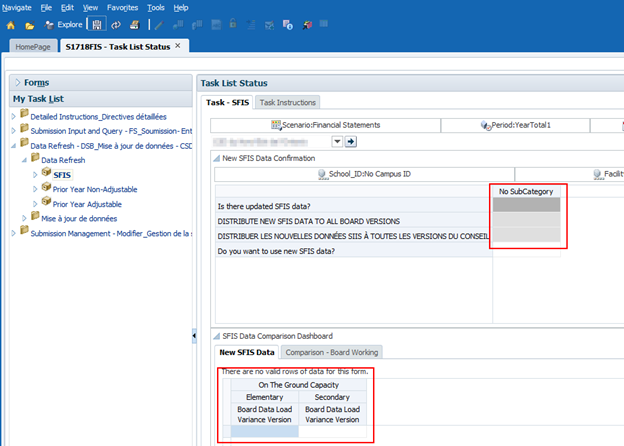
Select Data Refresh → SFIS from the task list to open the SFIS Data Management form.
When new data has been loaded the Is there updated SFIS data? Flag will be set to Yes and the New SFIS Data tab will be populated with the data changes. Note: only data values that have changed will be displayed.
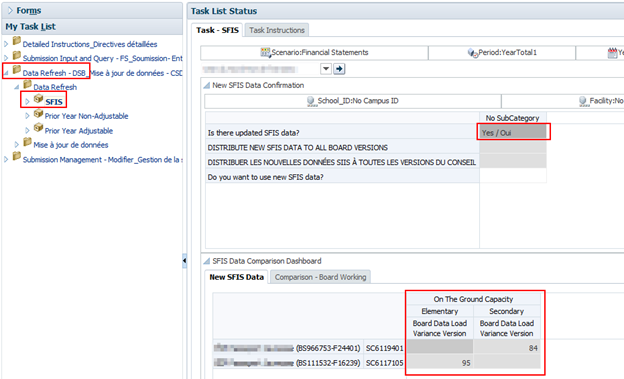
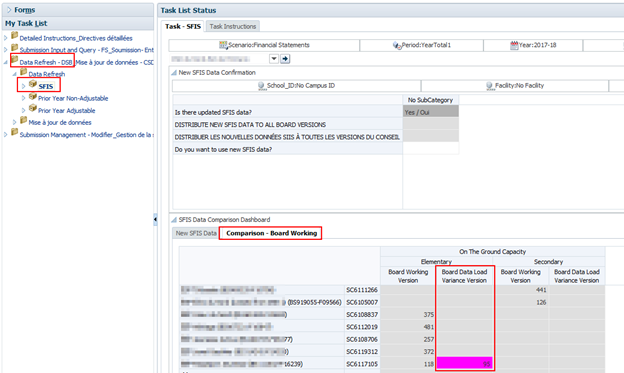
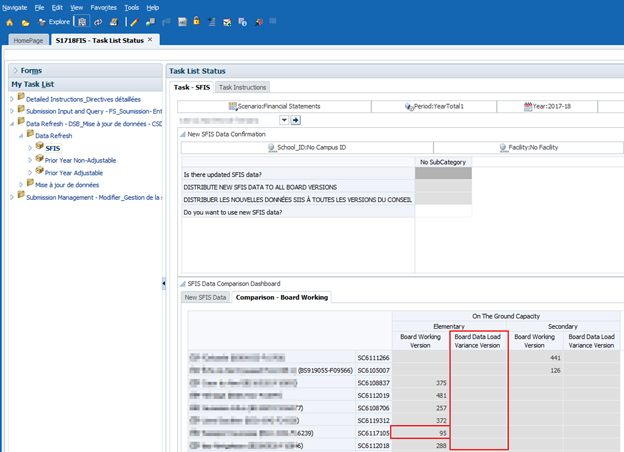
To review the facility data that has changes select the Comparison Board Working tab. All current values are displayed in the Board Working column and all values that have changed will be displayed in the Board Data Load Variance Version column and be highlighted in Purple.
The Board can choose to either use the new SFIS data in their submission or continue to work with the existing data. To update the new SFIS to the Board Versions select Yes from the Do you want to use new SFIS data? dropdown list, and select Save

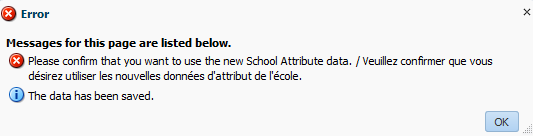
The data has been saved message will be displayed, the New SFIS Data Confirmation flags will be set to Blank, and the New SFIS Data Tab will become empty of data, select OK. The Board Working and all Draft Versions will be recalculated using the new facility data.
On the Comparison – Board Working Tab the Board Working Version column will be updated with the new data and the Board Data Load Variance column will be Blank.
If the user selects No from the dropdown the data will NOT be updated to Board Versions and the following message will be displayed.
Prior Year Data Management
9.1 Prior Year Data Overview
Prior Year data is loaded at the start of each cycle. During a submission cycle data can be changed in a prior year’s submission, which may impact the current submission. During the cycle a nightly process is run to load the data from Prior Submissions and compare it to the Prior Year data that is being used in the Current Submission. If differences are found in the data during the comparison process, the updated data is loaded into the Prior Year Data Management forms in EFIS 2.0 to allow the boards the ability to review and update the data as required.
9.2 Adjustable Prior Year Data
Prior year data that is available to be adjusted by the user is shown in blue cells in the Input web forms under the Input task lists. The data can be adjusted directly in the blue cells, and is reflected in the submission for the selected Version after the user saves the data.
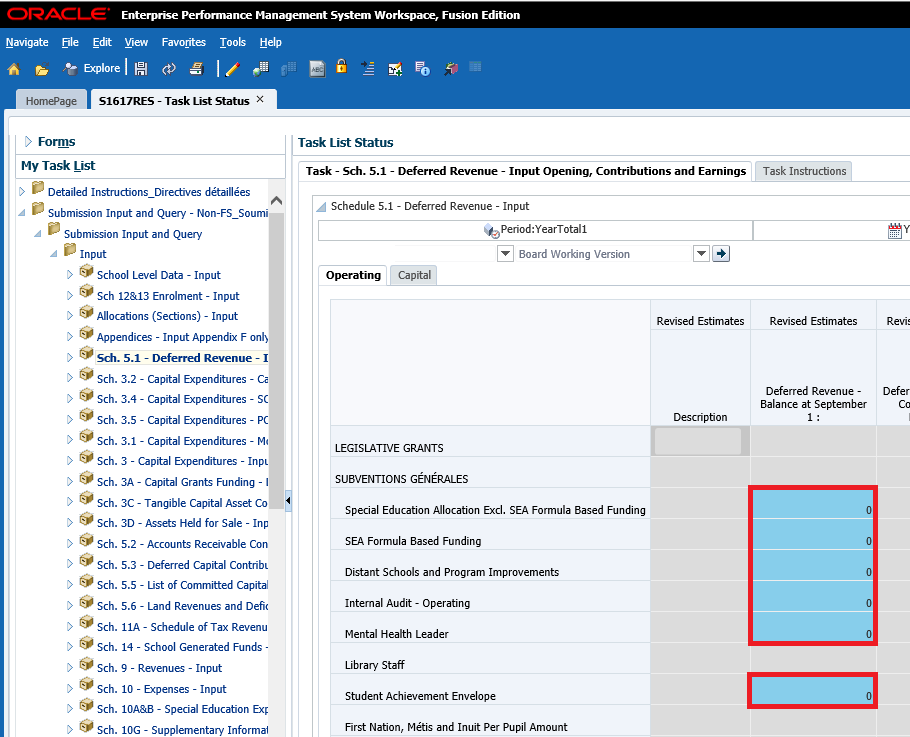
To assist the user in managing the data, the values which are loaded nightly are also shown in the Prior Year Adjustable web form under Data Refresh - DSB → Data Refresh → Prior Year Adjustable. This form shows all adjustable prior year data in one place. Depending on the cycle, the web form can contain one or two tabs:
Financial Statements Cycle:
- Adjustable PY Data – adjustable board-level data
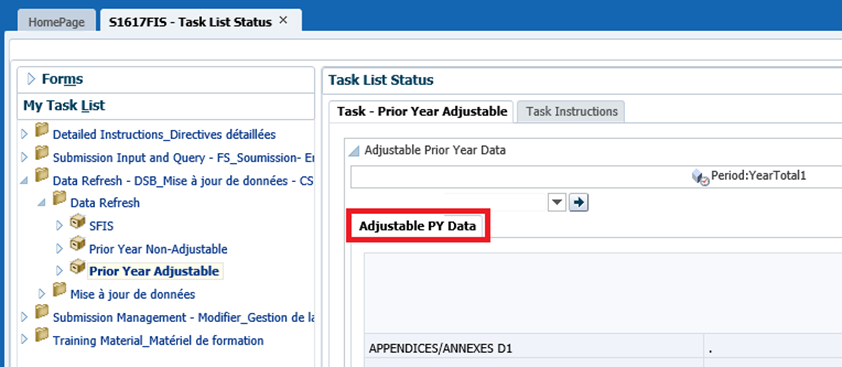
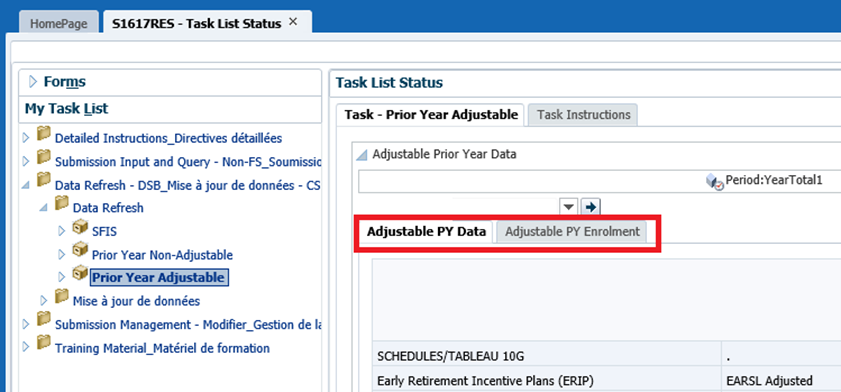
Non-Financial Statements Cycle (i.e. Estimates, Revised Estimates):
- Adjustable PY Data – adjustable board-level data
- Adjustable PY Enrolment – adjustable school-level enrolment data
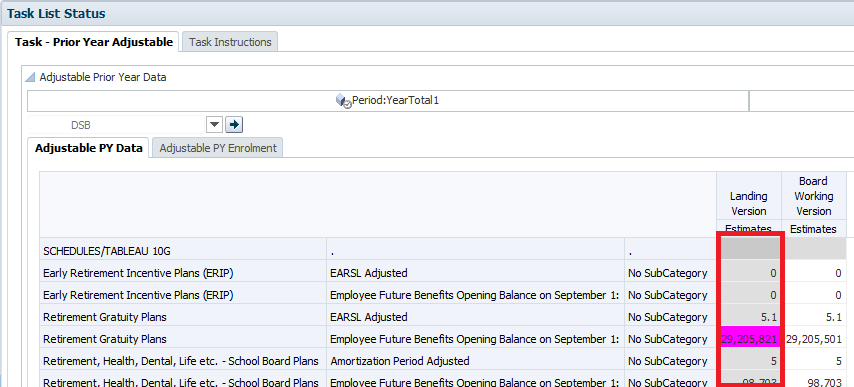
As mentioned earlier, these web forms show all prior year adjustable data in one place. In the example below we can see that there are two columns:
Landing Version: The data contained in Landing Version is the latest data loaded into the system the night before. This data is in the landing area and is currently not being used in the submission. If cell is highlighted pink it means that the latest data load is different from what was loaded into the system initially – at the beginning of the submission. The data shown in this column does not have to match what is in the Board Working Version column and is used as a reference.
Board Working Version: This column shows the data that is currently being used in the Board Working Version of the submission. This is exactly the same value as the one on the input web form, under Board Working Version. The user can adjust the data directly in this form. Once the user clicks “Save” the data is saved into the database, and the Board Working Version submission is recalculated using the newest number (same functionality as the Input form).
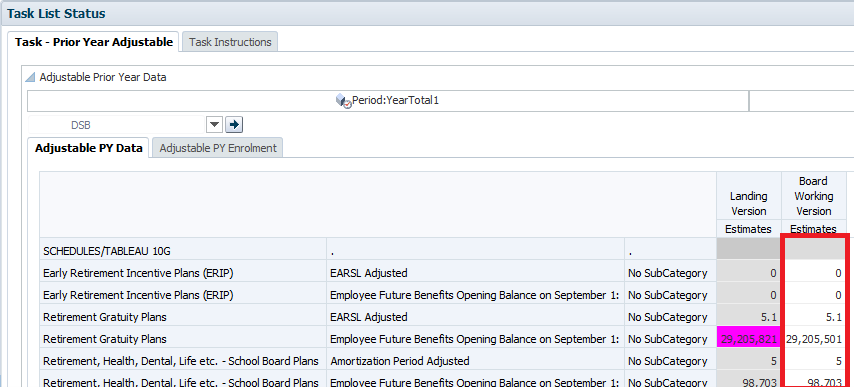
At that point, the submission will be updated to reflect the newly saved value.
9.3 Non Adjustable Prior Year Data
Non-Adjustable Prior year data is used in the submission but cannot be updated by the user directly in any web forms. Using the Data Refresh web forms, the user has the ability to update ALL prior year non-adjustable data into all board versions.
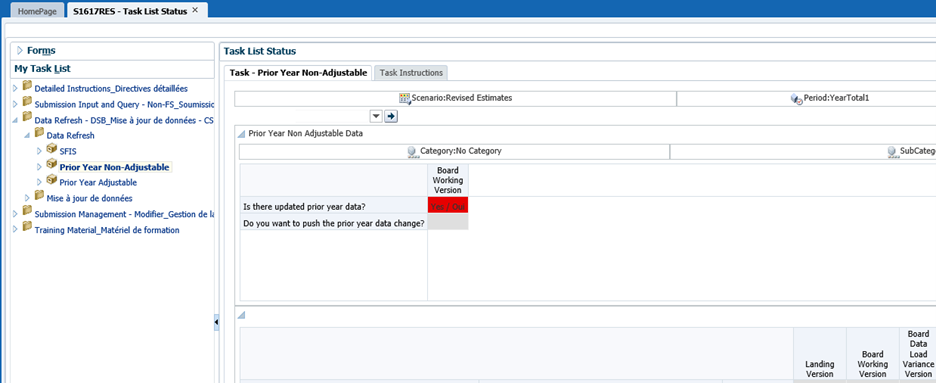
To assist the user in managing the data, the values which are loaded nightly are also shown in the Prior Year Non-Adjustable web form under Data Refresh - DSB → Data Refresh → Prior Year Non-Adjustable. This form shows all non-adjustable prior year data in one place. The form is made up of two major sections:
Top section: Contains two rows with a different flag in each:
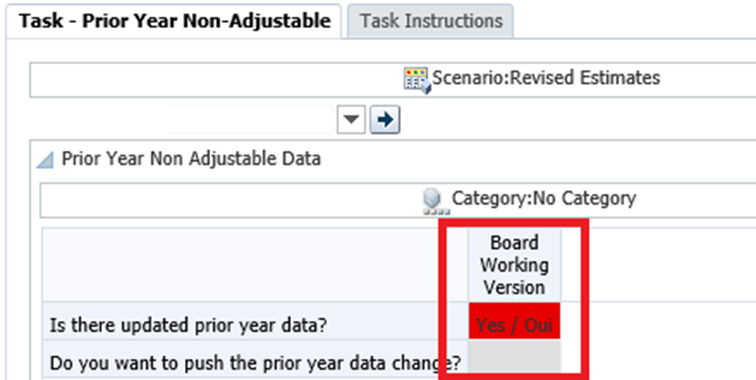
- Is there updated prior year data?
- This flag indicates whether the data loaded most recently (the night before) is different from the data contained in Board Working Version (and all board drafts)
- If any of the Prior Year cells in the submission are different this flag will be red and display “Yes/Oui”
- If the data matches the data in Board Working Version (and all board drafts) the flag will be gray and blank
- Do you want to push the prior year data change?
- This cell allows the user to confirm that they want to push the updated prior year data into all Board Versions – this will be described in more detail in later paragraphs
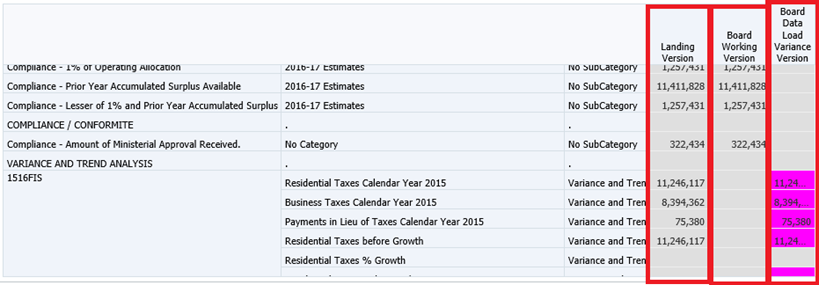
Bottom section: Contains all the non-adjustable prior year data organized by section, with three columns:
- Landing Version
- Shows the latest non-adjustable prior year data loaded into the system
- Board Working Version
- Shows the data which is currently being used in all Board versions in the submission
- Board Data Load Variance Version
- If highlighted pink, this indicates that there is a difference between the data in Landing Version and Board Working Version – in this case the value displayed in the cell will be used if the user chooses to push the data into the submission versions
- If gray with no value in it, this indicates that there is no difference between the data in Landing Version and Board working version – in this case there will be no changes to the data if the user chooses to push the data into the submission versions
Depending on the cycle, different data can be adjustable / non-adjustable. Therefore, the bottom section of the form can contain one or two tabs:
Financial Statements Cycle:
- Non-Adjustable PY Data – non-adjustable board-level data
- Non-Adjustable PY Enrolment – non-adjustable school-level enrolment data
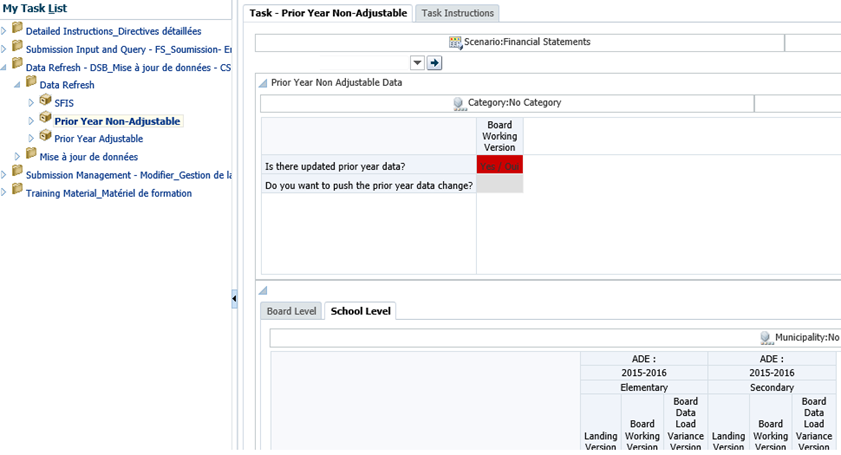
Non-Financial Statements Cycle (i.e. Estimates, Revised Estimates):
- Non-Adjustable PY Data – non-adjustable board-level data
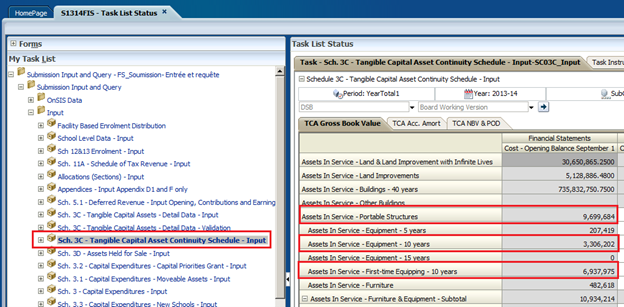
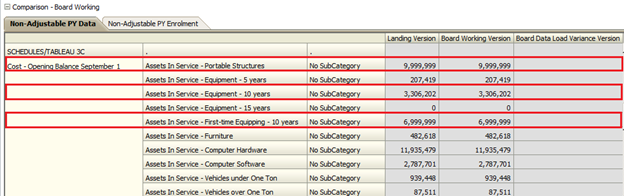
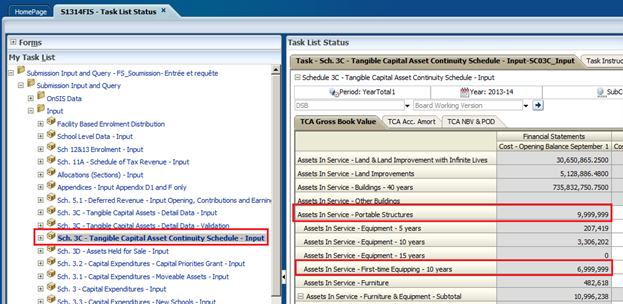
To demonstrate how the Prior Year Non-Adjustable forms work we will use Schedule 3C as an example. In Schedule 3C, TCA Gross Book Value (Submission Input and Query → Input → Sch. 3C - Tangible Capital Asset Continuity Schedule - Input) we have a number of Opening Balance cells that contain Prior Year data. We will focus on the three cells highlighted below:
- Assets In Service - Portable Structures
- Assets In Service - Equipment - 10 years
- Assets In Service - First-time Equipping - 10 years
The three cells are coloured grey, therefore are not open for input/adjustment directly on the form. These cells are controlled by the Prior Year Data Refresh process.
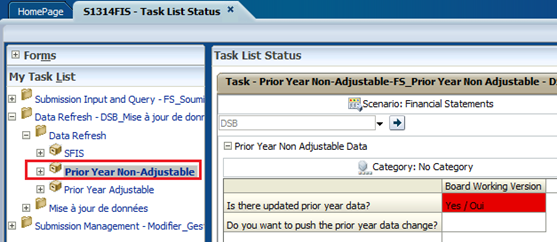
If we navigate back to the Prior Year Non-Adjustable web form (Data Refresh - DSB → Data Refresh → Prior Year Non-Adjustable) we will see that there is currently an update to the prior year data (indicated by the red flag)
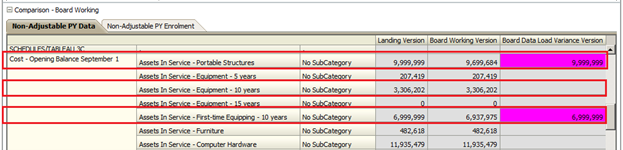
If we scroll through the rows of the bottom section, we can find which cells have changed. The flag indicates that there is data changed in either the Board Level (Non-Adjustable PY Data) or the School Level (Non-Adjustable PY Enrolment in applicable cycles). It is always a good practice to check both tabs and review all the changed data. If we scroll towards the middle of the first tab, we will find data pertaining to Schedule 3C. From here we can see that two of the three rows have a pink highlight in them, meaning that the newest prior year data is different from what is currently being used in the submission.
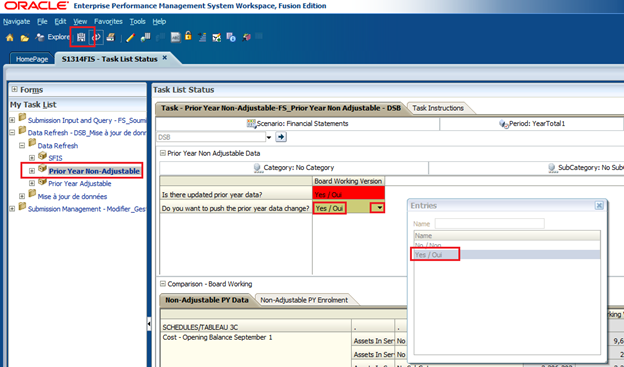
In order to update the submission with the latest data for Schedule 3C, we must also update all other non-adjustable prior year data which has changed. It is always a good practice to review all data in the web form before proceeding. Once we have confirmed all data changes and are ready to push all the changed data into Board Working Version and all the Draft Versions, we would click on the white cell next to “Do you want to push the prior year data change?” and choose “Yes/Oui” from the drop down. Next we would click “Save”
After clicking “Save”, a new window will pop up indicating: “PY_DataConfrimation_DSB in Progress…”

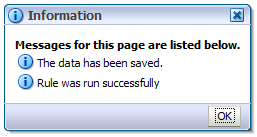
Once the process has completed, a window will pop up indicating two things:
- “The data has been saved”
- “Rule was run successfully”
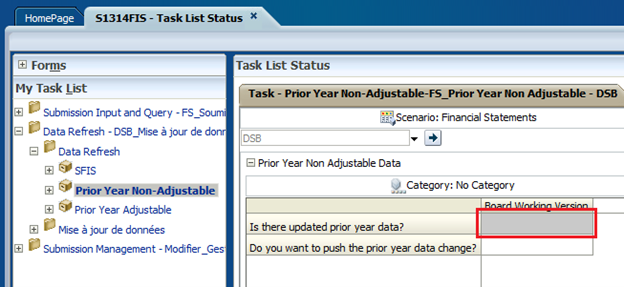
At this point the process has taken the data from the Landing Version in the Prior Year Non-Adjustable data form(s) and copied it into Board Working Version, Board Draft 1, Board Draft 2 and Board Draft 3. The submission has also been re-calculated to reflect the new numbers. Since all data has been updated into the submission the “Is there updated prior year data?” flag has been reset and is now blank.
If we scroll down to Schedule 3C in the bottom section of the form, we will see that the data for our updated rows has changed and the pink highlighting is no longer there. The data in the Board Working Version column now matches the data in the Landing Version column.
If we navigate back to Schedule 3C, TCA Gross Book Value (Submission Input and Query → Input → Sch. 3C - Tangible Capital Asset Continuity Schedule - Input) we see that the Opening Balance data has been updated for the Prior Year rows which changed.
9.4 Prior Year Data Warning
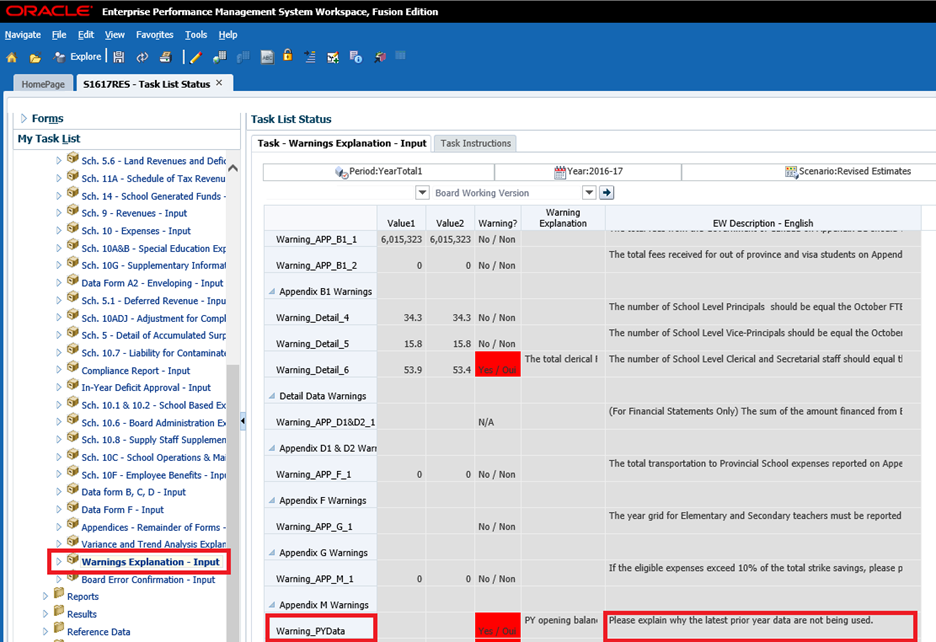
As prior year data is updated on a nightly basis, the Warnings module contains a warning to ensure that the board uses the latest prior year data in a submission. If for any reason, the board chooses not to accept the prior year data changes, an explanation must be entered in the Warnings Explanation - Input (Submission Input and Query → Input → Warnings Explanation – Input) page. If no explanation is entered, the submission will not be able to be promoted.
OnSIS Data
In the EFIS 2.0 Financial Statement reporting cycle, Enrolment data will be loaded directly from the ONSIS system. Boards will update all changes to enrolment data in ONSIS and EFIS 2.0 will load data from ONSIS on a nightly basis. Boards will be able to view detailed data in the ONSIS viewing area similar to the current Enrolment Verification Application. For schools (BSID) that belong to more than 1 facility, a process will be available to allow the Board to allocate the enrolment between the individual facilities. Financial Officers and Administrators will have the ability to adjust school level data prior to making FO Active Version.
10.1 Data Viewing Area
Introduction
To view and review the OnSIS data in the EFIS 2.0, the following tabs are available.
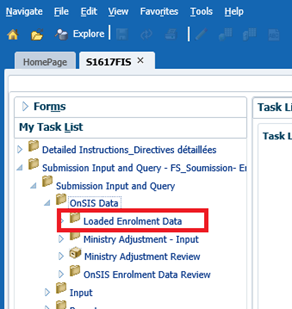
Loaded data from the OnSIS will go into Submission Input and Query/OnSIS Data/Loaded Enrolment Data Tab.
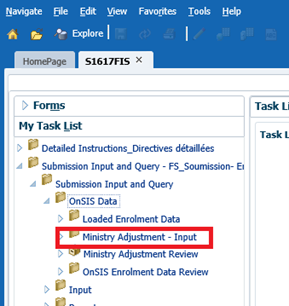
Ministry can make the updates and changes directly in the EFIS 2.0, Boards can view the changes under the Ministry Adjustment- Input tab
All the changes to the adjustment are to be reviewed in the Ministry Adjustment-Review tab

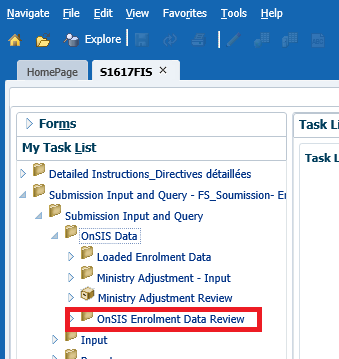
When the OnSIS load updates the records in the EFIS 2.0, user can review all the records that have been updated under OnSIS Enrolment Data Review tab
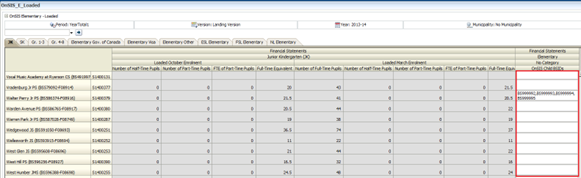
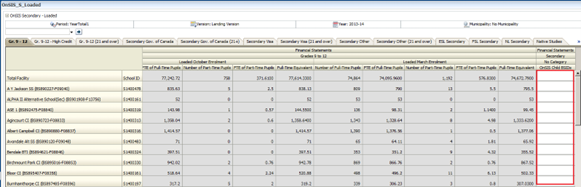
10.1.1 Loaded Enrolment Data Tab
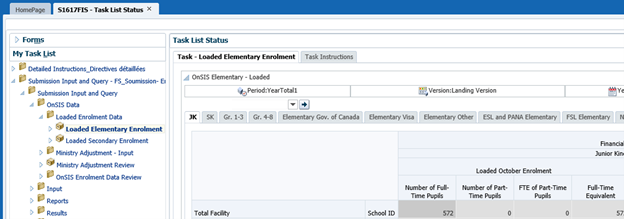
Loaded Enrolment Data tab under Submission Input and Query/OnSIS Data/ contains the data loaded directly from OnSIS that is read only for all users. The form is separated into Elementary and Secondary,
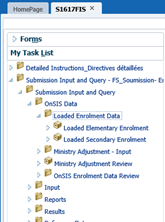
Which are then subdivided into different subcategories dependent on enrolment input
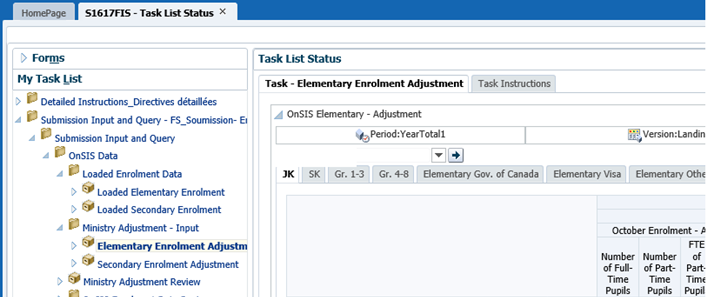
10.1.2 Ministry Adjustment-Input (Ministry user only)
Before promoting to FO Active, FO/FA can make adjustment to the OnSIS load directly in the EFIS 2.0 under Submission Input and Query/OnSIS Data/ Ministry Adjustment-Input The form is separated into Elementary and Secondary,
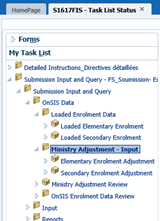
Which are then subdivided into different subcategories dependent on enrolment input
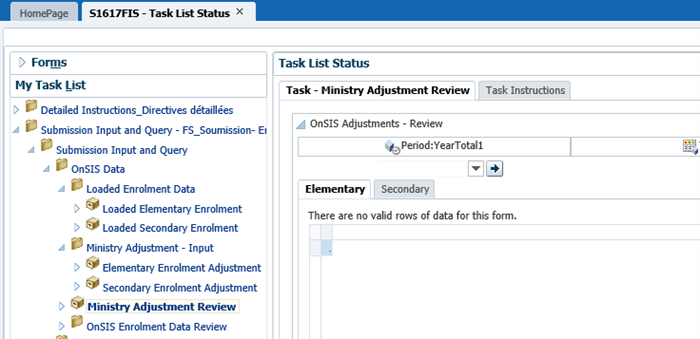
10.1.3 Ministry Adjustment Review
After FO/FA makes the adjustment, the changes can be reviewed under Submission Input and Query/OnSIS Data/Ministry Adjustment Review tab. The form is separated into Elementary and Secondary,
10.1.4 OnSIS Enrolment Data Review
After initial load, if there are changes in the OnSIS, the OnSIS process will load those changes into EFIS2.0. User can review all the records that have been updated under Submission Input and Query/OnSIS Data/OnSIS Enrolment Data Review tab
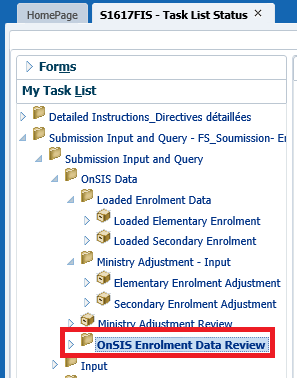
The Records are read only and cannot be changed. All the changes regarding OnSIS have to be performed in the OnSIS application which will, through the nightly upload, update the EFIS2.0 records.
10.2 Multiple BSID
To accommodate the situation where records for multiple BSIDs are loaded to a single Facility/School_ID combination, a read-only text field will display a list of all applicable BSIDs that are mapped to the loaded record. This relationship must be specified in the staging area before the ONSIS data file is loaded. This process will be generated by admin.
Elementary
Secondary
10.3 Facility-Based Data Distribution
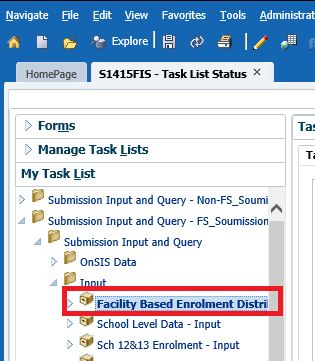
Boards can have one school that has multiple facilities. However, in the ONSIS system there is only one BSID number and as a result the total enrolment for both facilities is reported as one school. For GSN purposes the Board is required to allocate manually the enrolment between the 2 facilities. Form to distribute the facility is to be found under Submission Input and Query/ Input/ Facility Based Enrolment Distribution.
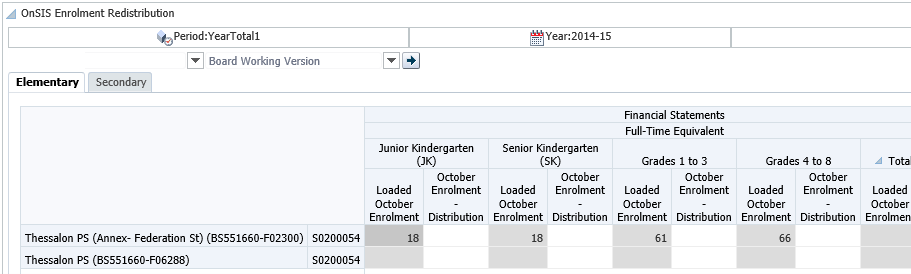
In the example below the data is loaded into the second facility under the “Loaded October Enrolment” column. The second column, “October Enrolment – Distribution” is open for input and allows the user to enter the distribution values.
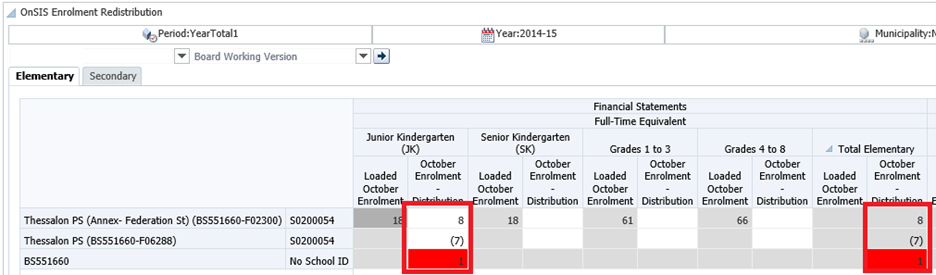
Boards will allocate the enrolment by entering a negative amount for one of the facilities and a positive amount for the other. Any allocation that has been made will be retained each time there is new data loaded, and if the allocation needs to be changed the boards will be required to change the amount of the allocation. Distributions are only applicable to facilities that belong to multiple BSIDs. Distributions are required to be zero sum adjustments for each School ID; if not, a validation error will be triggered to prevent promotion of the current Submission.
An example of the data being improperly distributed between two facilities (the sum of the two distributed amounts does not equal to zero). The non-zero total is highlighted in red.
An example of the data being properly distributed between two facilities:

The distributions are version specific, so distribution changes are retained within the version in which they were made. Below we can see that since the distribution in the above example was made in Board Working Version, the Board Draft 1 version was not changed.
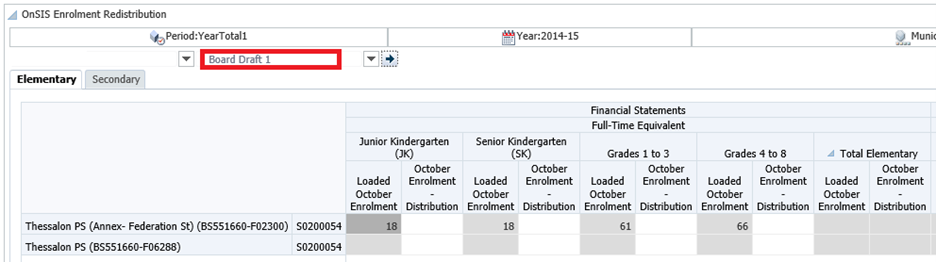
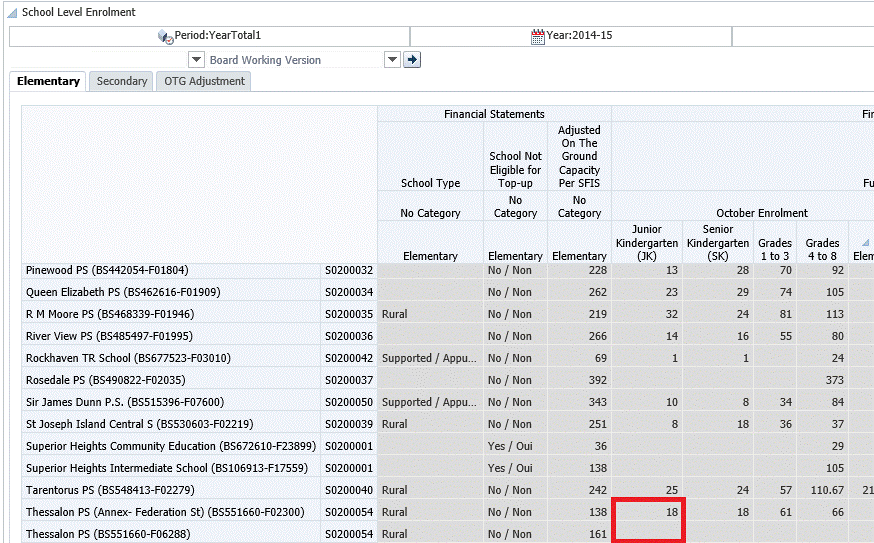
Result of the distribution can be seen in the School Level Enrolment forms, under Board Working Version.
School Level Enrolment Before:
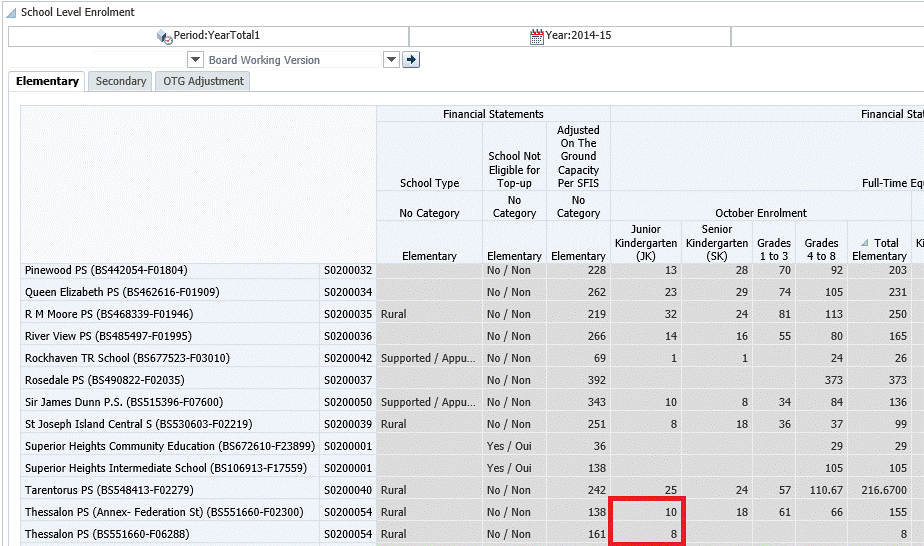
School Level Enrolment After:
Appendix A
11.1 Accessing files as a Board User
Ministry will upload files for Boards to download. To access and download the files please refer to the EFIS File Download Portal - User Guide for instructions. The guide can be found in the FAAB Website.
Changelog
| Version | Date | Changed By | Description of Changes |
|---|---|---|---|
| 1.0 | April 23, 2014 | FAAB | Final Version |
| 1.1 | August 20, 2014 | Vlad Dragovic | Updated for FS Cycle |
| 1.2 | August 20, 2014 | Al McLaren | Review of Updates |
| 1.3 | August 20, 2014 | Vlad Dragovic | Facility- data distribution addon |
| 1.4 | Sept 02, 2014 | Vlad Dragovic | Remove Appendix A |
| 1.5 | Sept 03, 2014 | Vlad Dragovic | Add Appendix A- file distribution |
| 1.6 | Sept 04, 2014 | Vlad Dragovic | Onsis updated |
| 1.10 | Sep 16, 2015 | Stevan Garic | PY Data updated |
| 1.11 | Feb 2, 2018 | Stevan Garic | Submission Management Section updated |
| 1.12 | Mar 12, 2018 | Aline Amaral | Updated the screenshots |
| 1.15 | August 17, 2023 | Ronald Chen, Nancy Castillo | Updated screenshots and obsolete info (i.e., use of Internet Explorer) |
| 1.16 | March 20, 2025 | Ruby Hou | Modified "Contact Us" footnote |